KW Homestead

Pasture Raised Poultry & Edible Landscaping Plants Since 2013

Tag: food forest (page 1 of 2)

2015 Apple Harvest

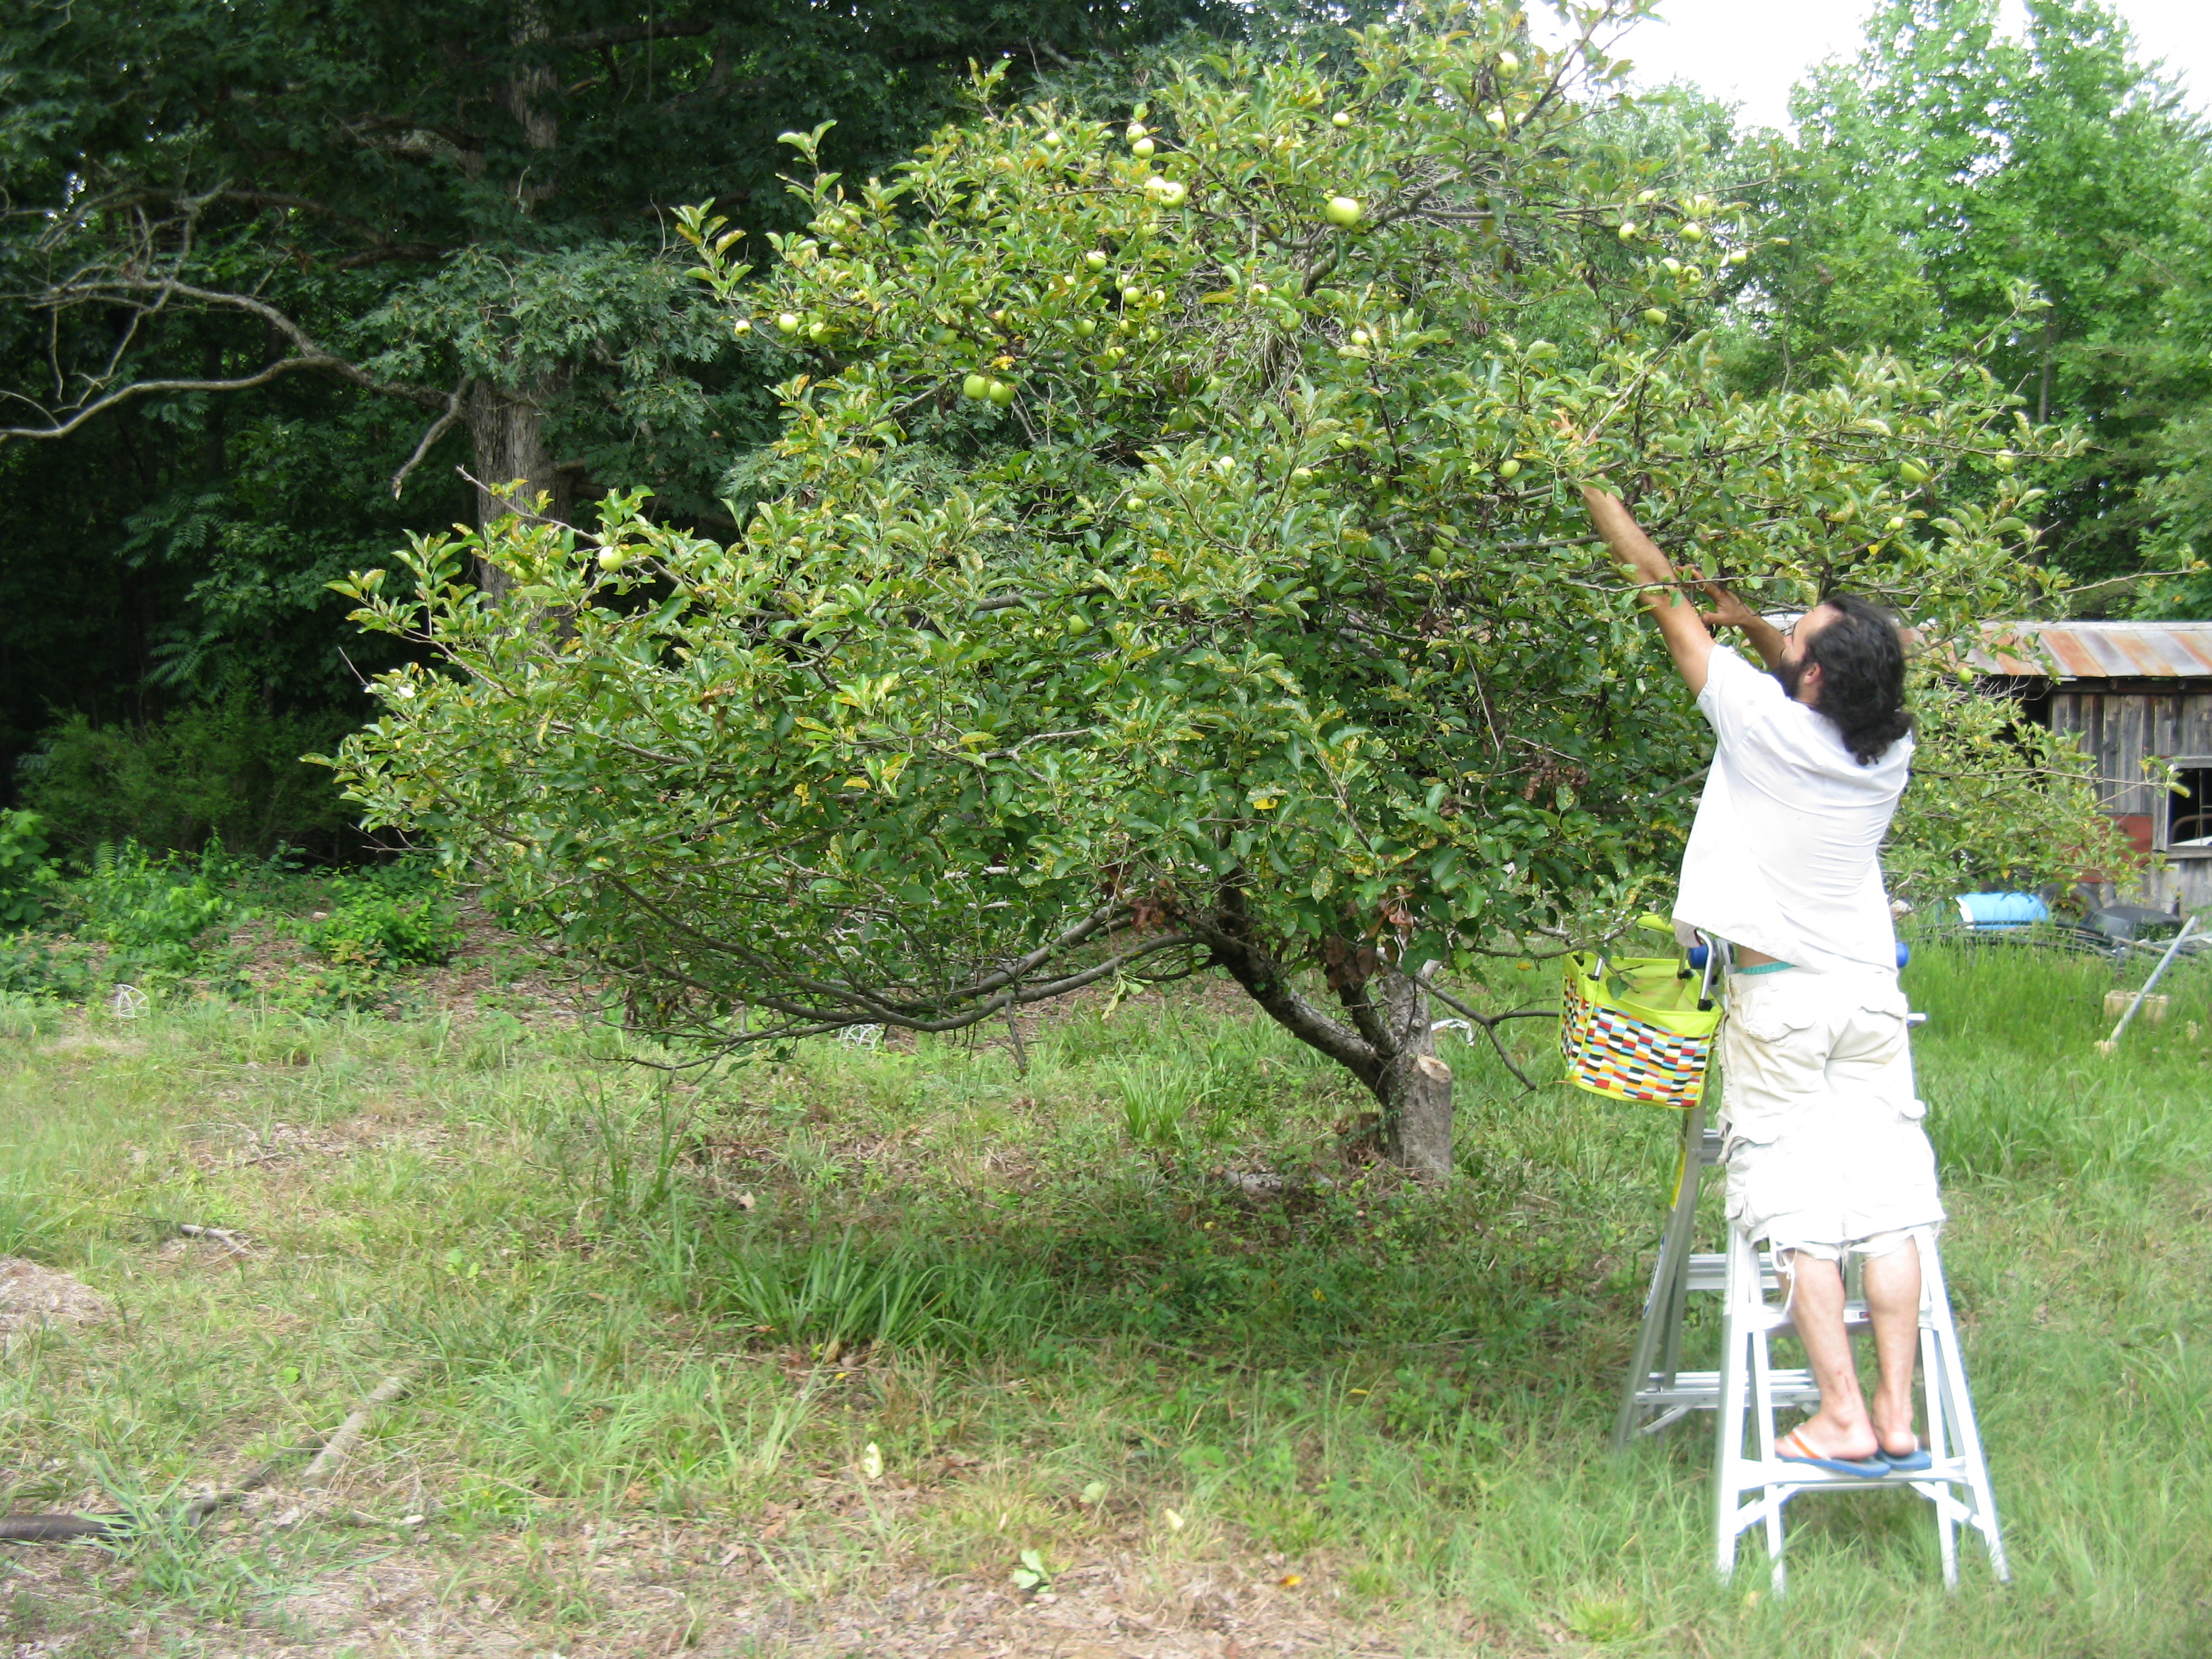
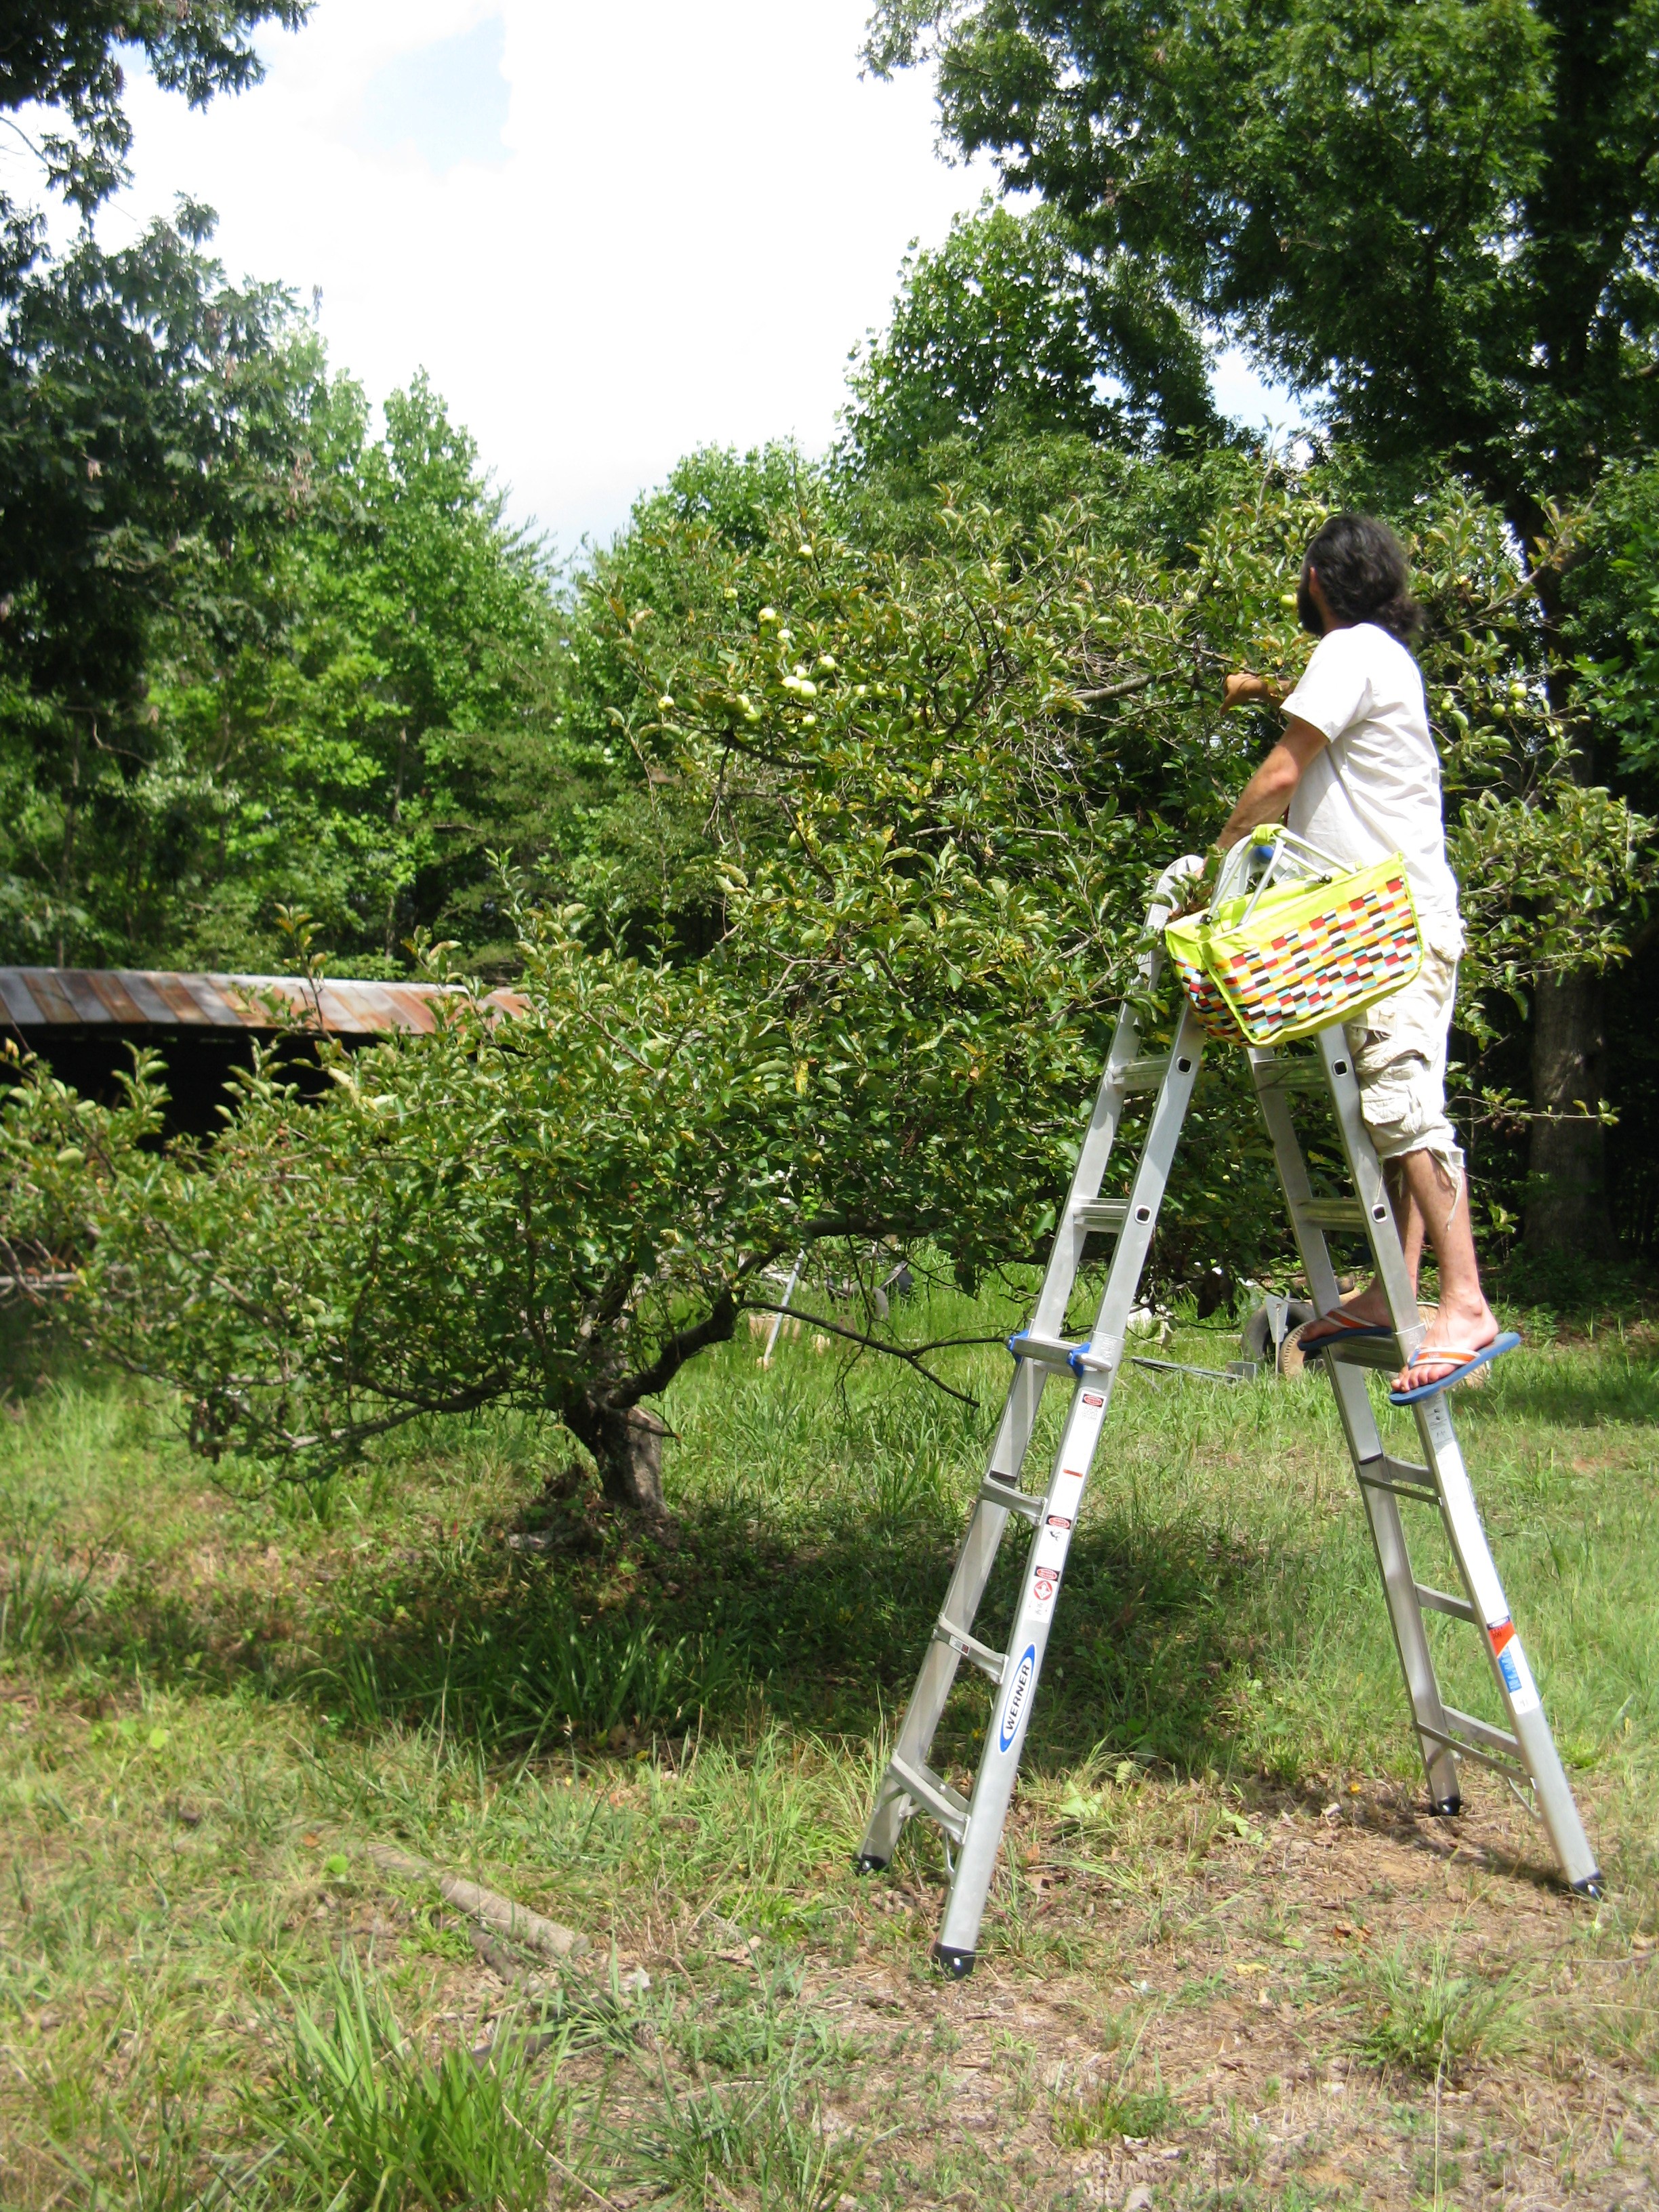
Harvest season is upon us! In addition to the wild blackberries we put up, we harvested apples the other day from our somewhat deformed backyard Apple tree. This tree was planted by the previous owners of our homestead and forgotten to the point that it was almost completely engulfed by a massive honeysuckle vine.

Our first year here, it produced only a few small and tart apples that were eventually all eaten by deer, but after removing the honeysuckle and some heavy pruning, we were rewarded with a 32 pound harvest last summer.

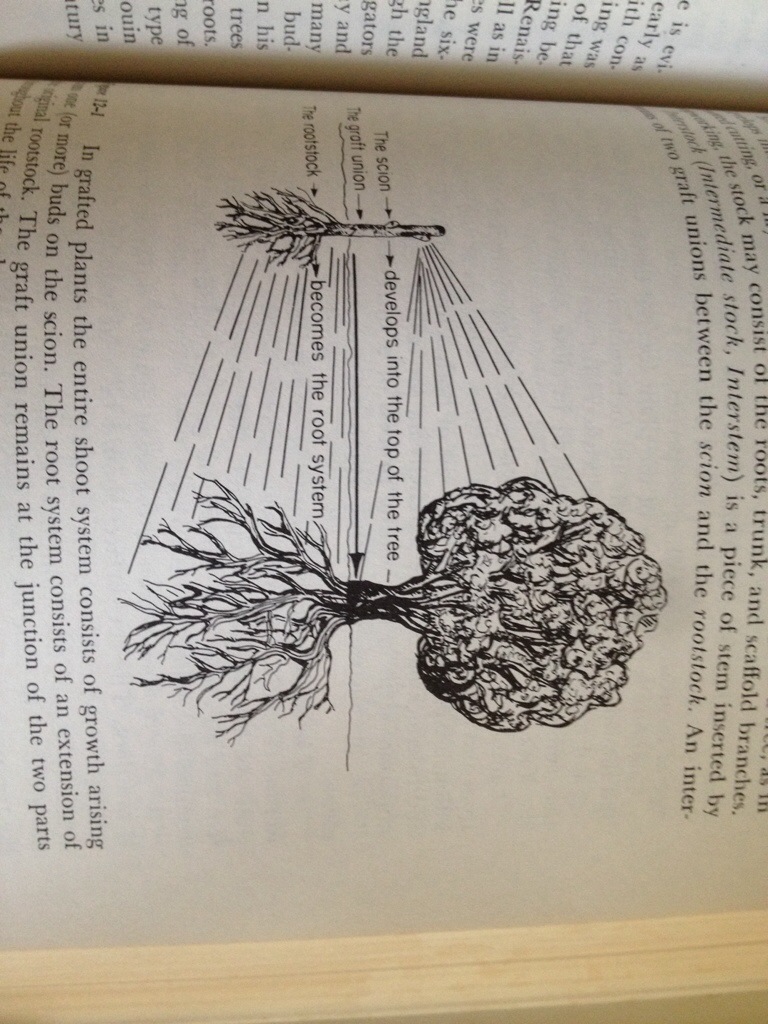
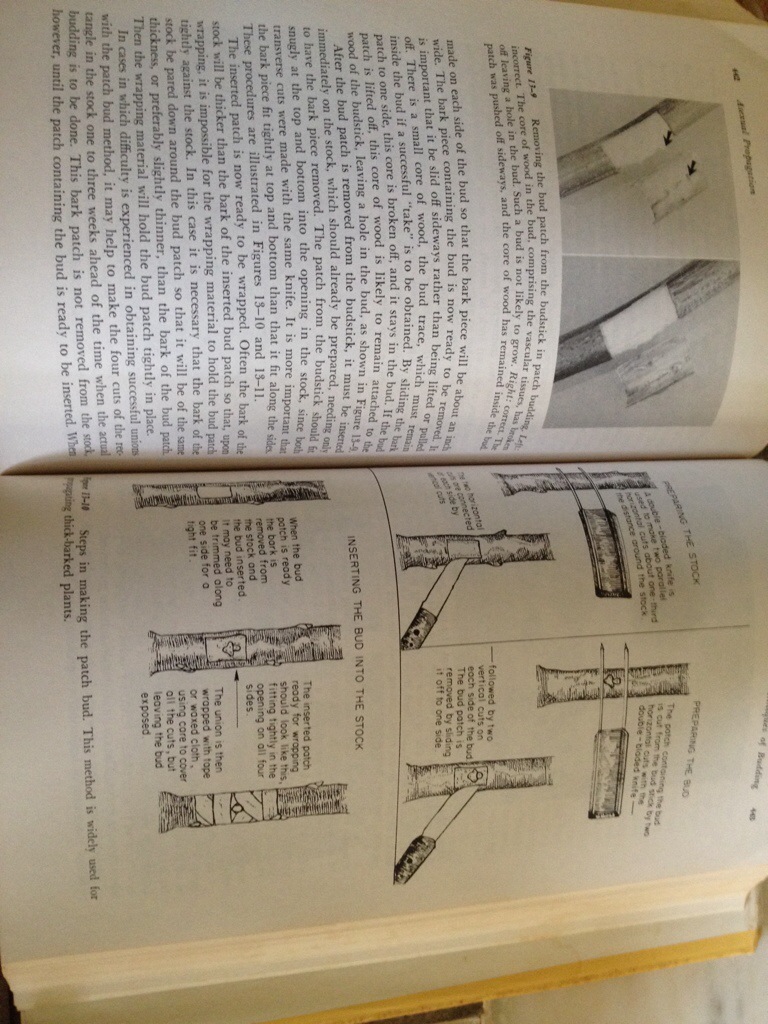
This winter, I pruned it even more, and actually grafted some Roxbury russet scion onto a few potential leaders. Serious pruning of any fruit tree should be carried out over several seasons, so as not to shock the tree too badly.

apple harvest yield culls

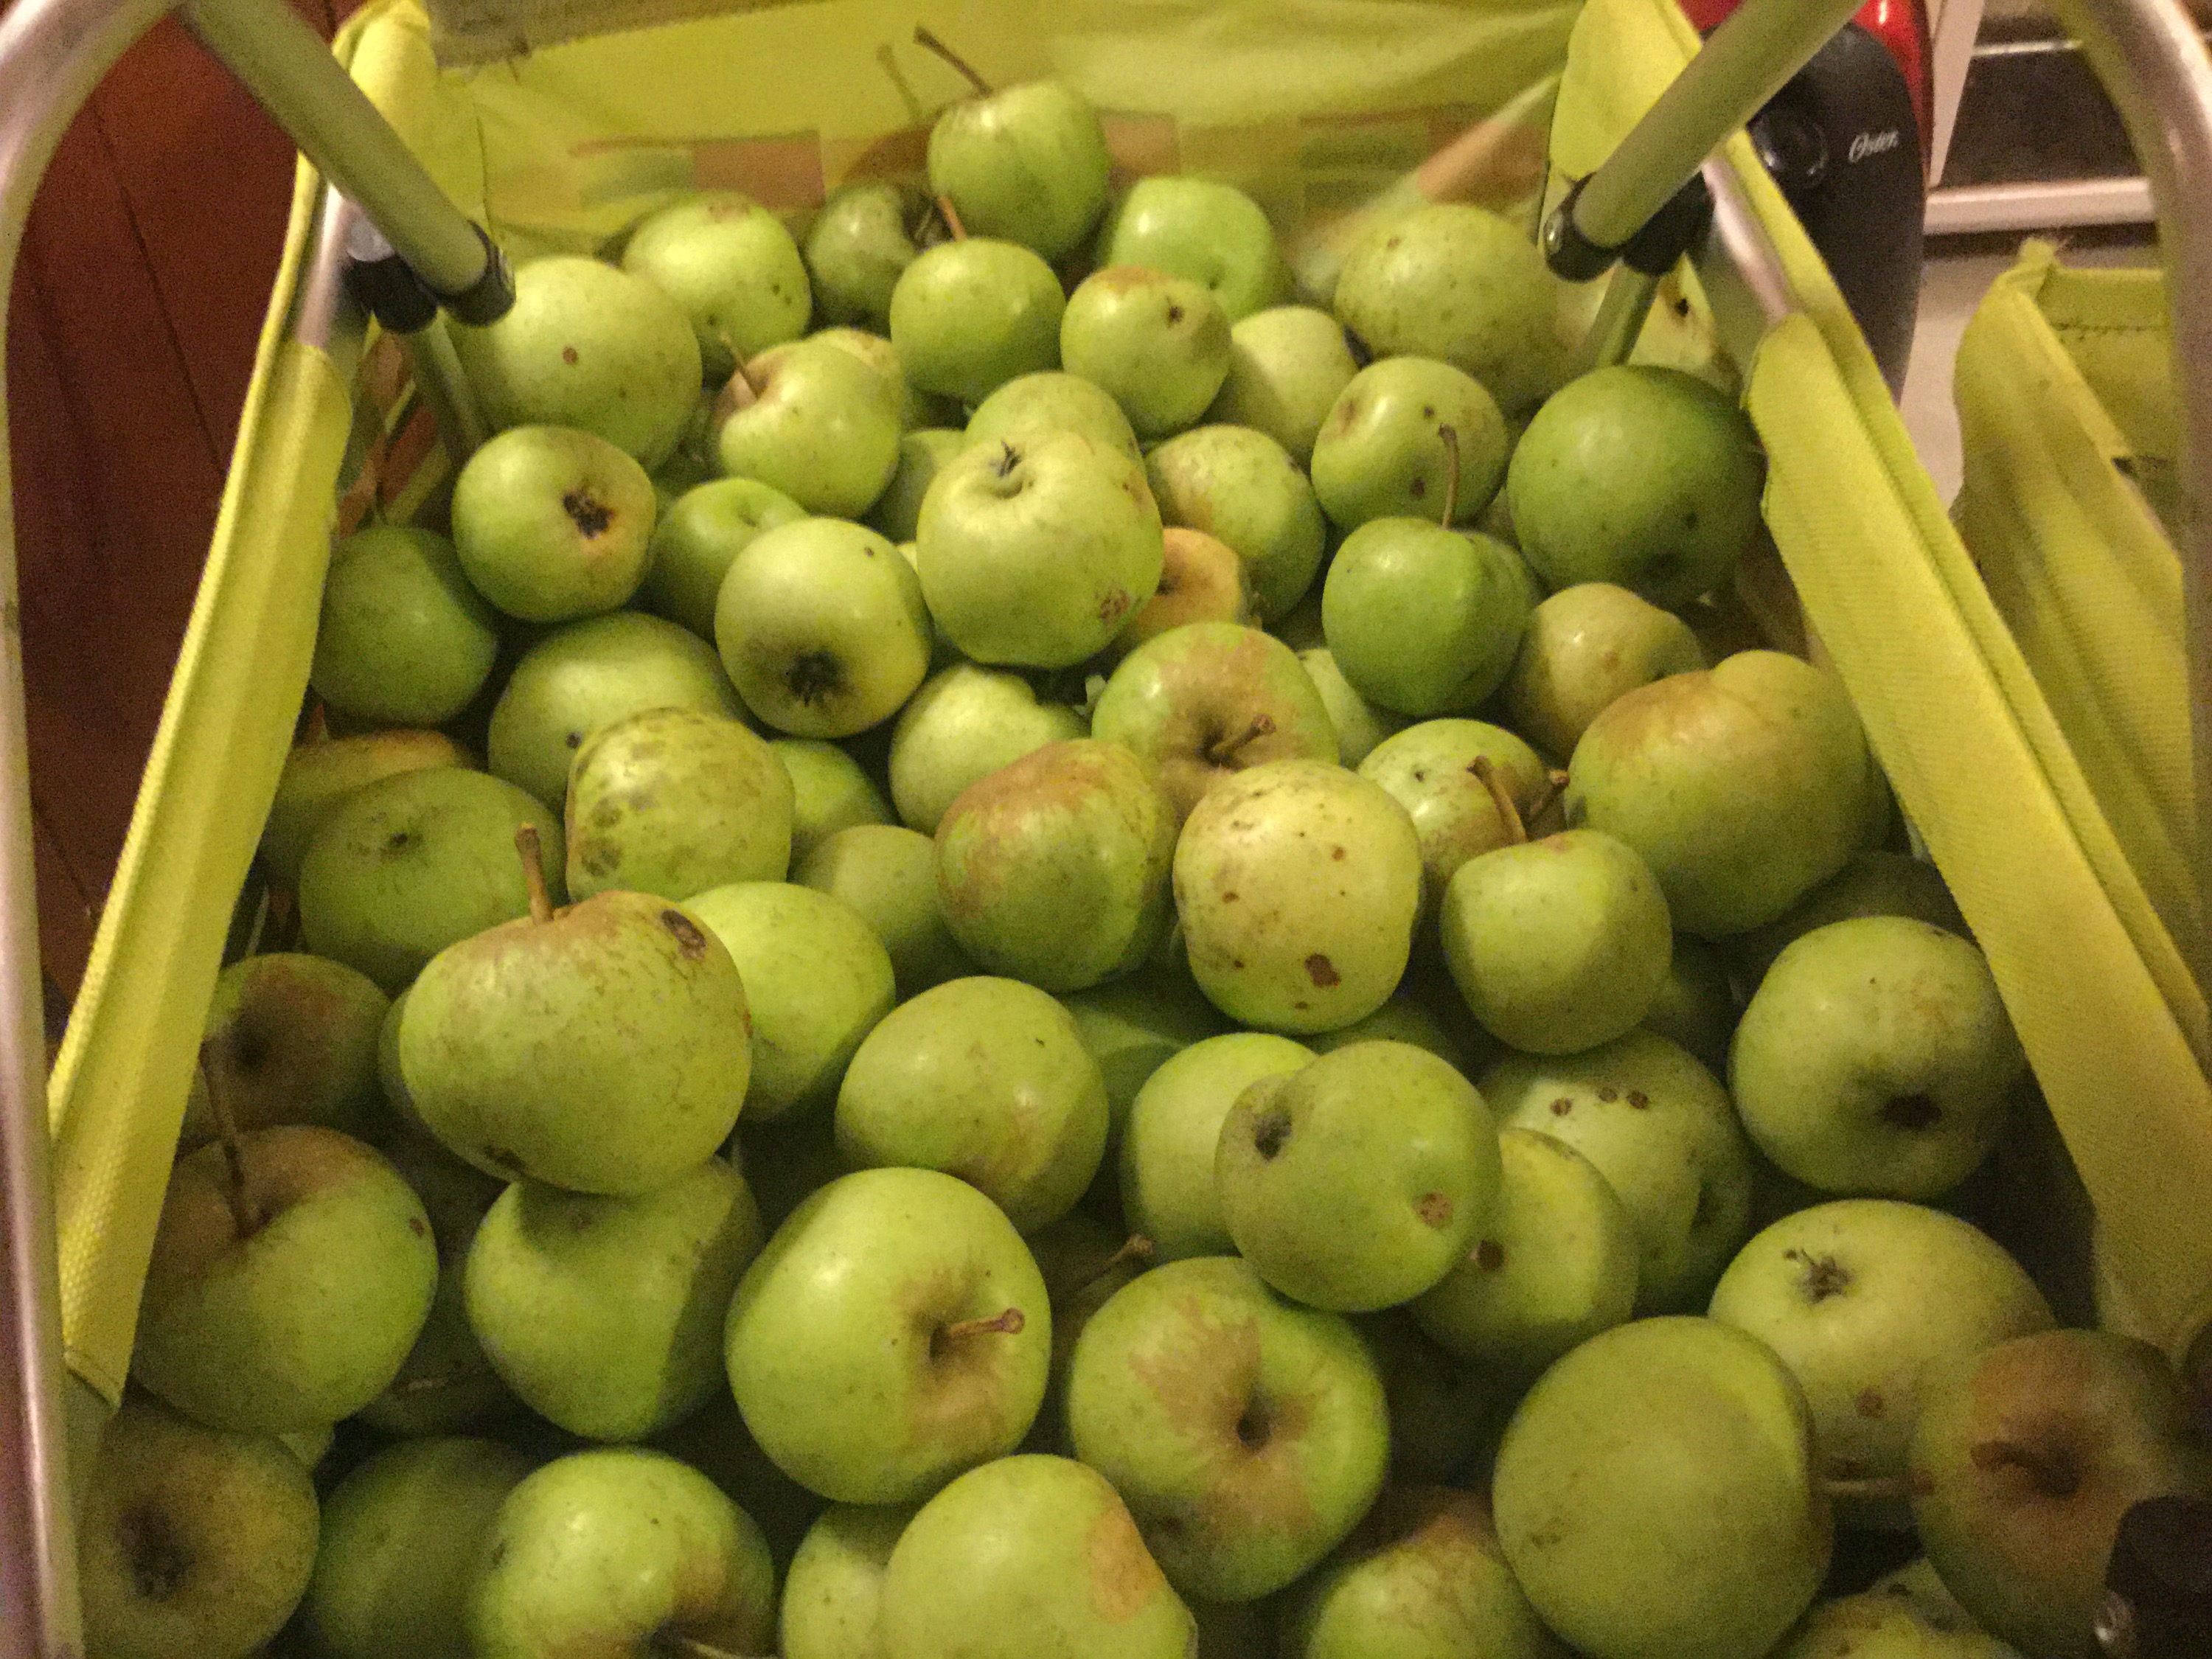
our 2015 apple harvest, sorted and ready for processing

This year, we harvested a little over 40 pounds of apples. Now that’s not the 4-7 bushels that I talk about in my post on the value of a fruit tree investment, but it is a lot of apples for, other than a little pruning in winter, and 20 minutes of picking in Summer, essentially no input. No fertilizer, insecticide, fungicide, herbicide, or irrigation.

Now of these 40 pounds of apples, I’d say that only 15% are “grocery store” apples. That is nice and plump, with no blemishes, bruises, funny shapes or insect bites. We’ll eat these fresh and savor every bite.

the grocery store apples: blemish free and plump.

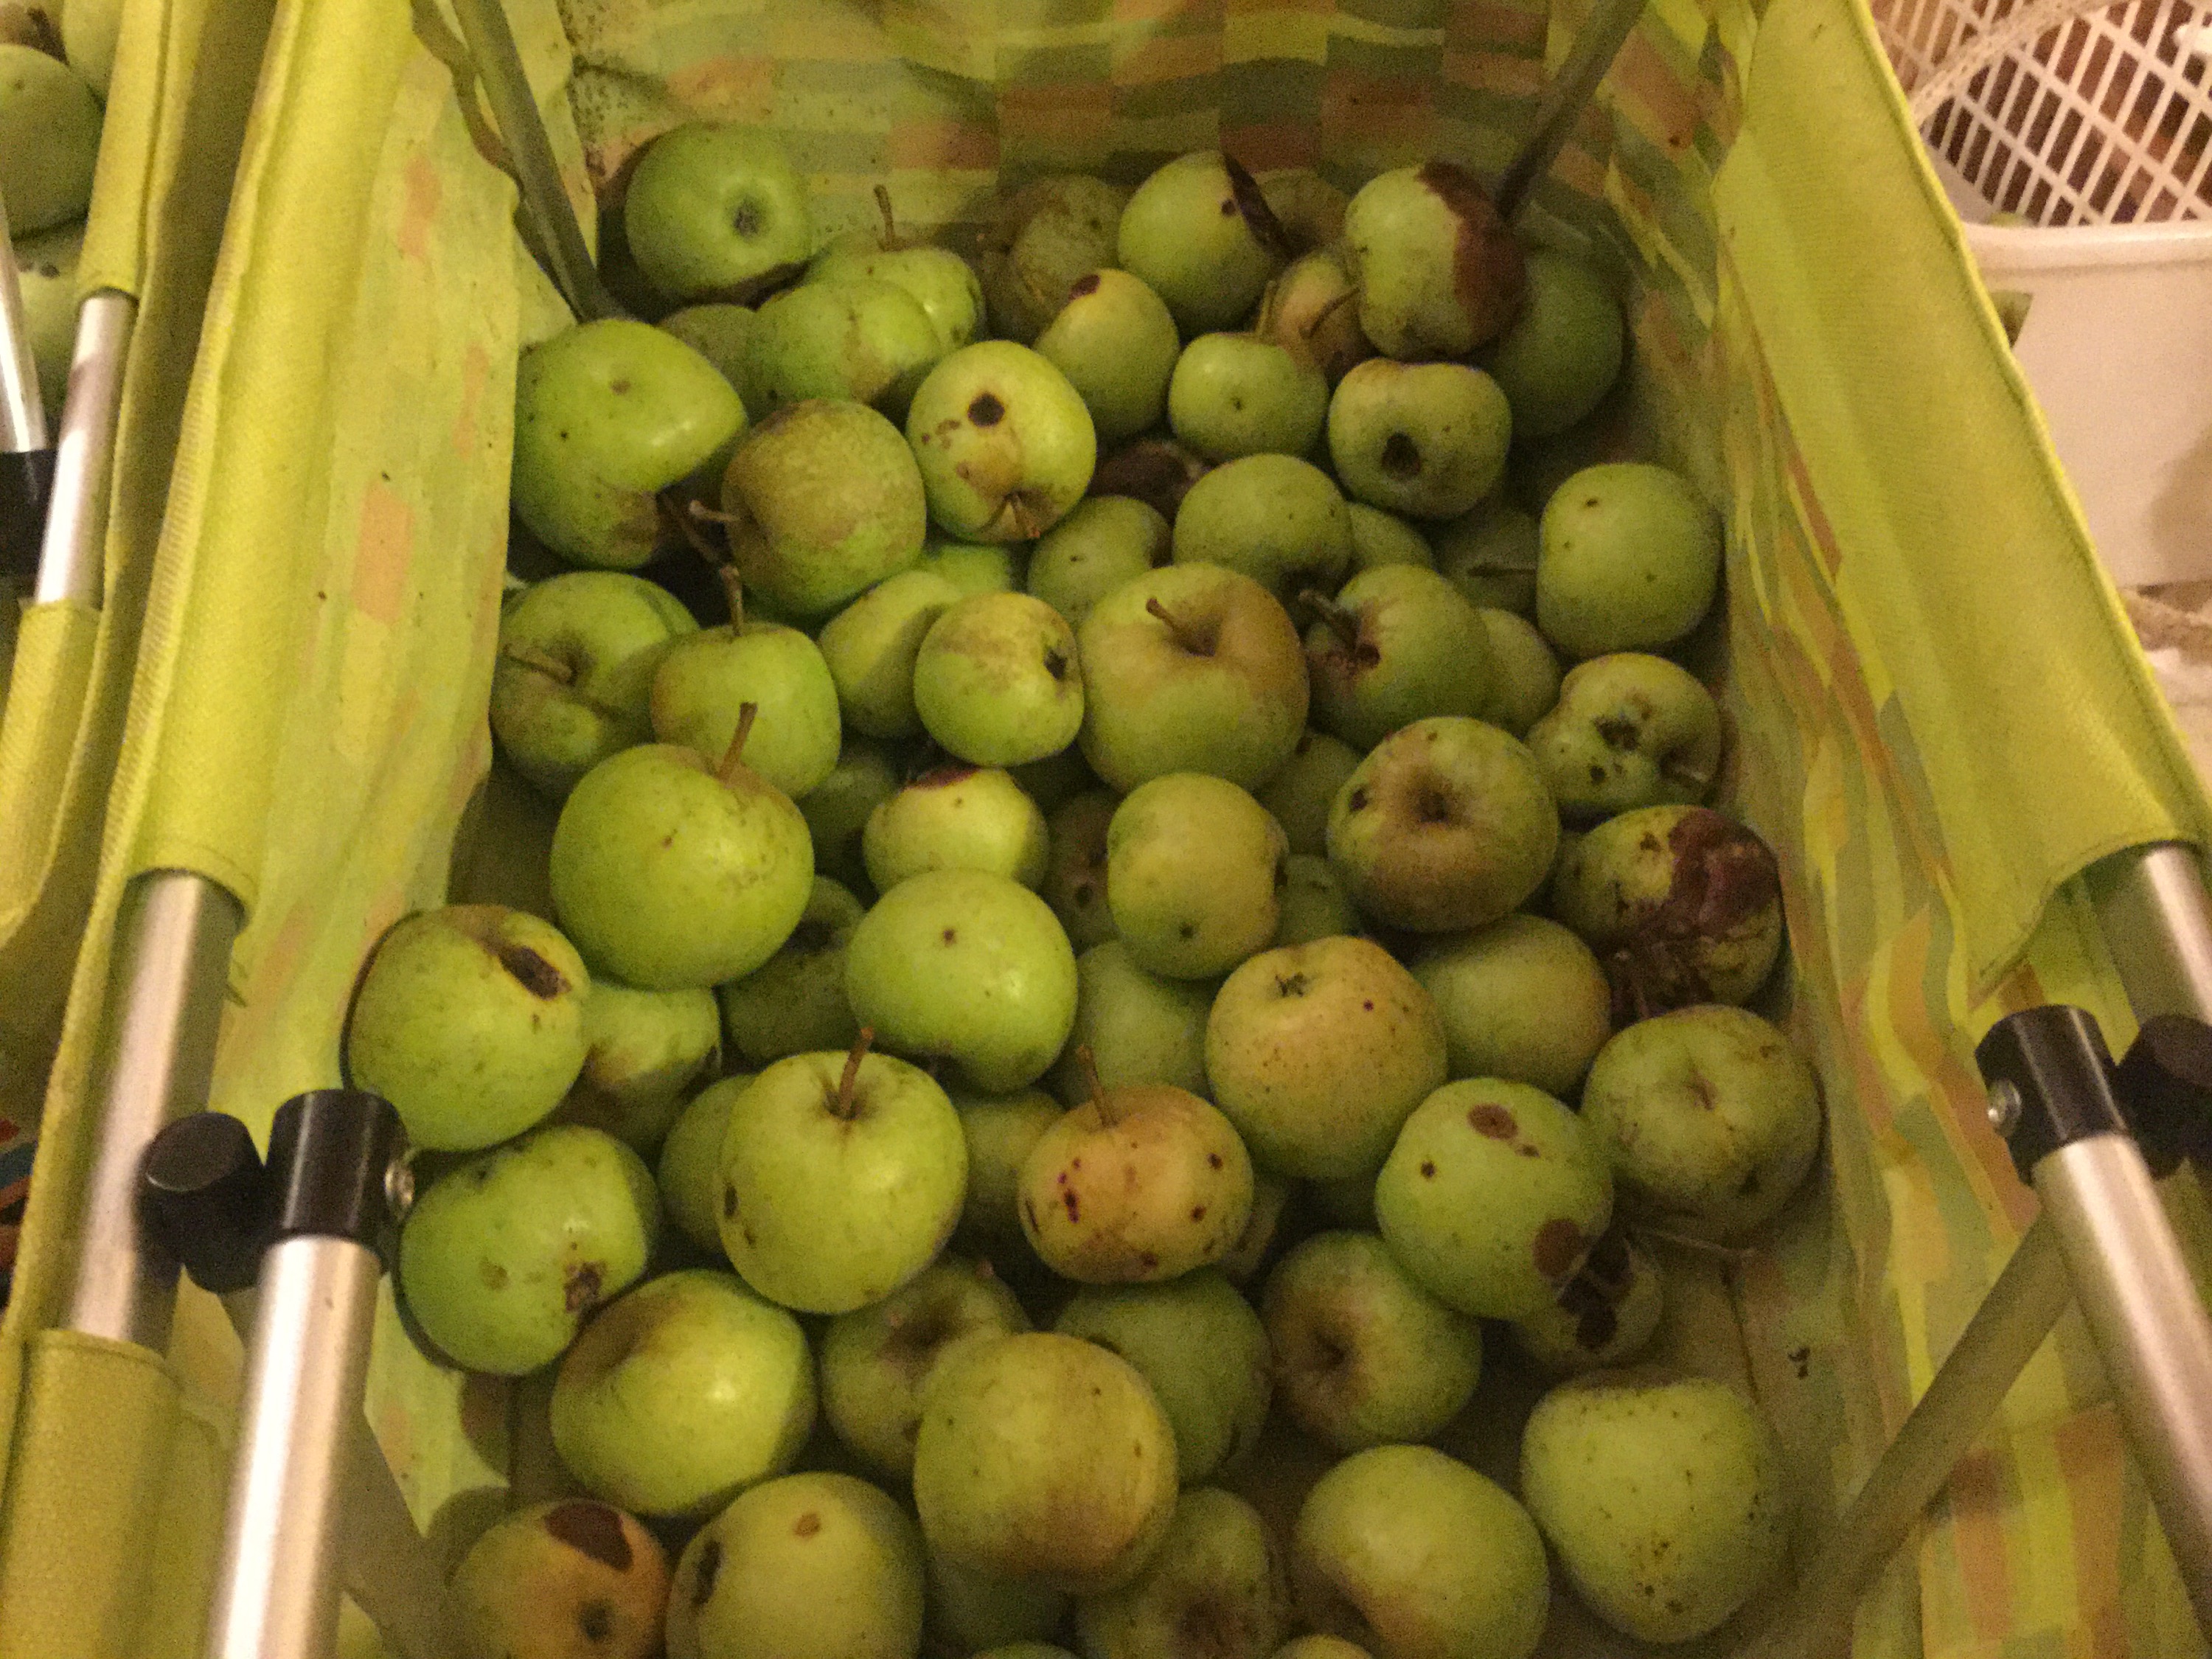
The rest of the apples will be processed and preserved. We are plan on drying/dehydrating them.  Of these apples, the non grocery store apples, most of them contain either a few minor defects, or 1 large defect. They also tend to be a bit smaller, and more oddly shaped. This doesn’t effect the flavor though and they should dehydrate fine. 70% of our apples fall into this category.

processing apples with minor defects, nothing major to see here

The next batch of apples have more serious defects, often a major soft spot that will effect its shelf life, or many medium sized defects. These apples are often small, and we are going to have to cut around the bad parts when we dehydrate them. They are still usable, but the yield of fruit on them is low. I’d say about 10% of the apples fit this category.

these guys are still usable, but the yield is low and they don’t store well

The last category are the culls. They’re pig food. These apples are either too small to mess with, or almost completely covered in defects and soft spots. Drops and rotten apples fall into this category and they will be fed to the pigs who will enjoy them thoroughly. The remaining 5% fall into this category.

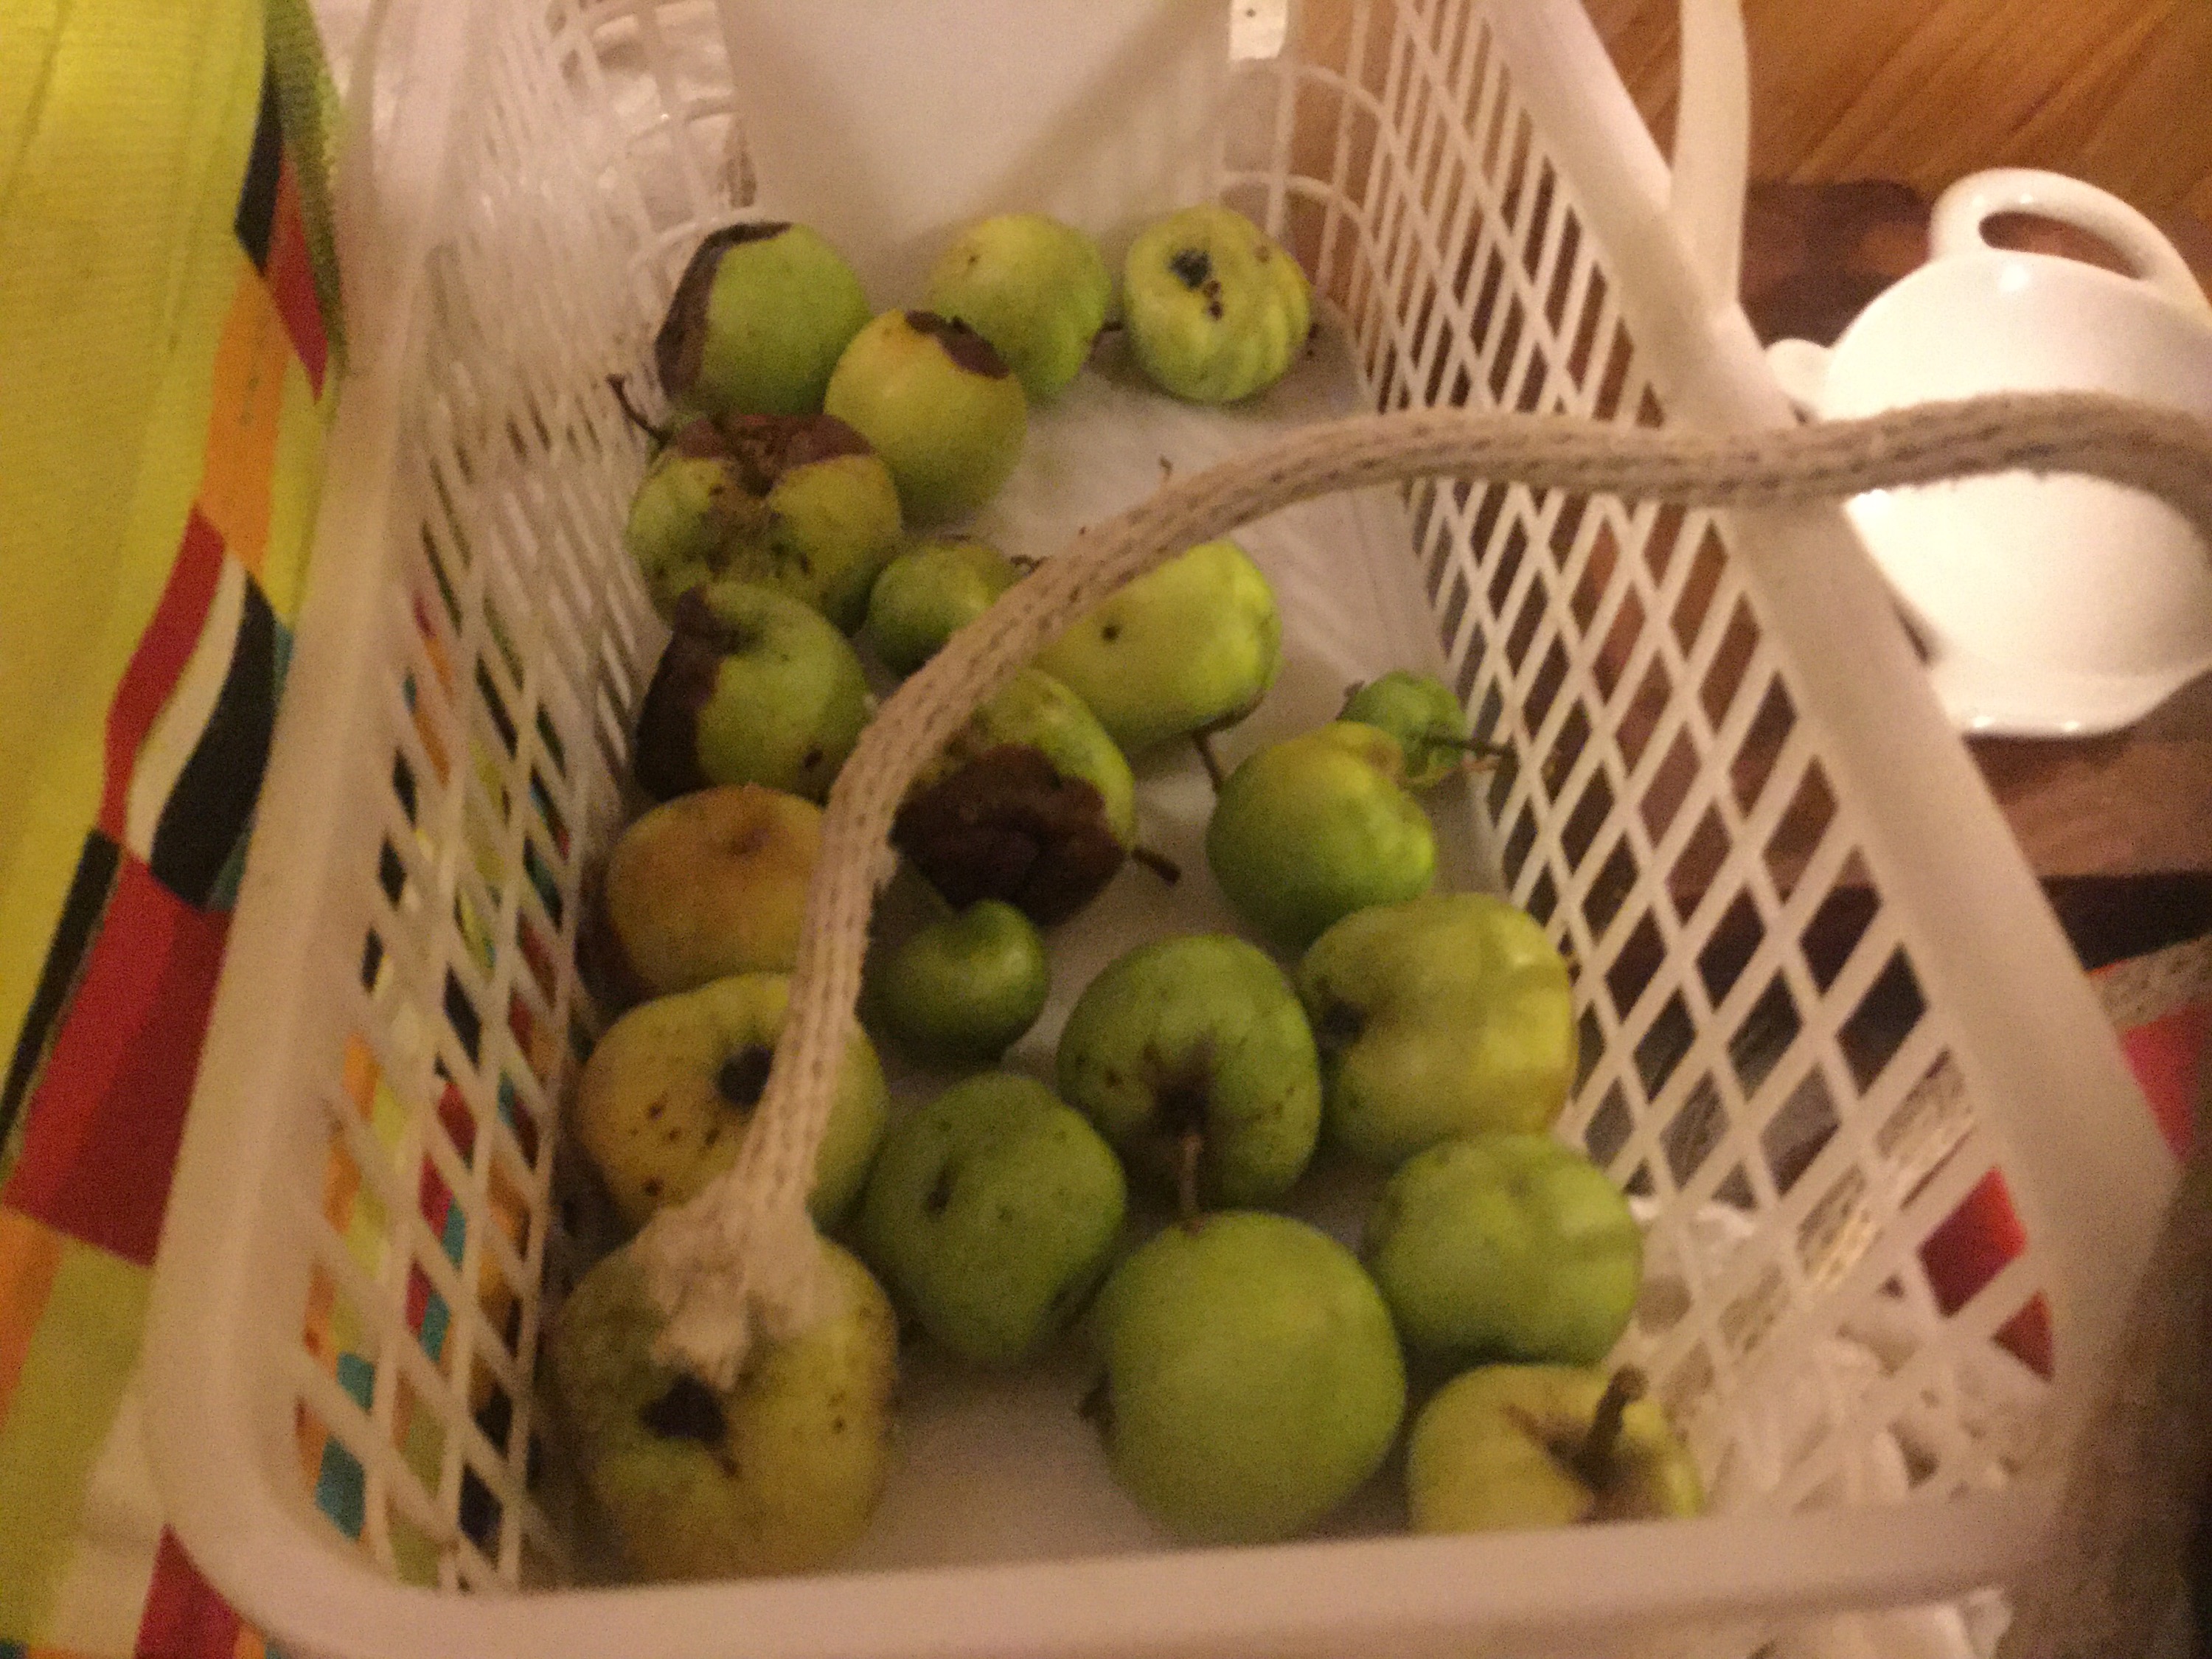
culls. not worth messing with, a.k.a. pig food.

All in all not too bad, and we will definitely update you when we start dehydrating apples!

Maple Sap Ideas

Sap season is here, at least for those of us in the Piedmont of North Carolina. The maples trees in our area have begun the yearly ritual of the sap flow. While we don’t have a lot of sugar maples in NC, and none grow on our land, we do have plenty of red maples. Red maple doesn’t produce as sweet a sap as sugar maple and therefore is a less economical choice for tapping and maple syrup production.

However, syrup production is a time and energy intensive operation that I don’t really have a desire to get into just yet. Something I am interested in is maple water, aka straight maple sap. Maple water is an old concept that has recently been rediscovered by health food companies. It’s essentially the same sap that would be boiled down into maple syrup left unaltered and bottled. The result is a slightly sweet and clear drink with a dose of antioxidants and minerals. Different cultures have used maple sap as a cleansing tonic for a very long time, and it is well known to wildcrafters and foragers as a source of clean water.

maple popsicle

a delicious maple icicle, formed at the end of a trimmed twig

My interest in tapping a few of our red maples is part science experiment (especially considering Emma’s discovery last year of sugarcicles), partly a pursuit of fresh maple water to drink, and part fermentation experimentation. I want to make some maple wine and some maple beer.

I’ve read a few different recipes that use maple sap as a brewing/vinting ingredient and it seems that straight maple sap would yield a fermented beverage clocking in at around 1-3% abv. Now, if you were to either add some sugar or boil this down a bit to concentrate it, you could raise these to more traditional beer and wine levels (FYI: Don’t forget to check out our craft beer review show , Beauty and the Beerd).

Now, in order to get this sap, i’ll have to tap some trees. The standard rule of thumb is not to tap a tree less than 10″ in diameter. We have a few of those on our property, and i’ll probably tap them in the traditional way by drilling a hole in the tree and inserting a tube/tap that drips into a bucket or some other container. But what i’m really excited about is some recent research out of Vermont about tapping smaller trees.They coppiced young maple trees and used vacuum tubing to yield over 10 times the amount of syrup per acre.

I don’t have any vacuum tubes, but this is still interesting because it shows that even smaller trees can yield sap without harming their growth. My idea, and it’s not an original idea, is to try and harvest the sap from twigs and smaller branches on our maple trees. You simply prune off the end of a twig and either attach a tube or plastic bag to the branch to collect the sap. According to gardengrapevine.com, some twig taps can equal the sap production of a trunk tap, and you can do many per tree.

maple sap twigs

a maple twig tap is less invasive and easy to use

This action is less invasive and harmful to the young trees, and actually stimulates growth due to pruning. I’m pretty excited to experiment with it and see how it goes.

Of course, not just maple trees can be tapped, but also birch, walnut, linden, sycamore, and many others. You can see how tree saps, and tree sap beverages can fit nicely into a permaculture system as a late winter activity. By utilizing these saps in for items other than syrup production, which can be costly both in energy and time, even marginal sap producing regions can harvest appreciable yields form their trees, and stack another function into their designs and homesteads.

Cheers!

Using Hardwood Bark As Mulch

What do you do with all of that bark, wood chips, and woody debri that accumulate when you split wood? While all of this material could be burned in you fireplace or woodstove, I find that after I sort out the smaller pieces of wood for kindling, I’m left with chunks and larger pieces of bark. For me, this bark doesn’t burn as well as dried wood. I think it holds more moisture, is less dense, and isn’t great kindling.

bark as mulch

a fresh layer of bark under a Methley Plum tree in our food forest

So I prefer to use it as mulch. Now these pieces of bark are pretty big, anywhere from 2 – 12 inches long, so I don’t put them on our vegetable gardens. Instead, I dump these larger pieces of leftover bark in our backyard food forest at the base of fruit trees. Here they can break down slowly and won’t get in the way of any planting or harvesting.

bark as mulch

Mulch helps to conserve water, block weeds, and protect the soil


This also mimics a forest environment where dead and dying trees litter the forest floor and aid in the nutrient cycle feeding all sorts of microorganisms in the soil. Right now, in the middle of winter, most of the leaves have fallen off of the trees, and by adding a fresh layer of mulch over top of them, we create the perfect environment for decomposition and lock all of the new fertility in place with a protective layer of bark.

Blackberry and Raspberry Propagation by Layering

We have plenty of wild blackberries growing on our homestead, so when we ordered cane fruit plants last year for our food forest, we focused on raspberries. We did get 1 type of blackberry though, a thorn-less variety named Chester, known for its sweet, early ripening berries. Because we only have 1 lone plant at the base of  a dwarf apple tree, we figured we should try our hand at layering, an easy method of cane-fruit propagation.

blackberry layering

a chester blackberry ready to be layered

Layering involves digging a small hole by the base of the berry bush and then bending one of the canes down into it. That’s pretty much it. Over the winter, the buried portion of the young cane will start to send out roots, and will develop into a new plant! By bending the cane, instead of snipping off a cutting, the new plant still has access to the old plants more established root network and all of it’s nutrients and water it can absorb from the soil.

layering blackberries

dig a small hole by the base of the plant, about 6 inches deep

blackberry propagation layering

then bury the new shoot, tamp down the soil, and wait until spring!

Come spring, simply cut the cane 6-8 inches from the base of the new plant, and feel free to either dig up and transplant your new black/raspberry or extend the older plant outwards like you would if you were creating an edible hedge, or fedge. This new plant will be exactly like your old plant, except that for the first year it’s leaves will be upside down!! Pretty cool, and a great way to produce more plants for free!

Don’t forget to join our email mailing list and stay updated on all things our ochre way!


Rhus copallina: Shining, Dwarf, Winged or Flameleaf Sumac

Rhus copallina, or shining sumac, was one of the wild plants on our property that puzzled me for the longest time. I could recognize its distinctive sumac-y look that meant it belonged in the Rhus genus that contains the more common staghorn and smooth sumacs, but it didn’t match any of the pictures I could find of those two species. I was worried for a bit that it might be poison sumac (Toxicodendron vernix) but a quick Google search told me that the best way to tell poison sumac from okay sumac is the color of the berries. Red berries = don’t worry, and white berries = don’t touch/eat/make sumac tea. So, I went on not knowing exactly what the plant was, and being intrigued by its interestingly winged leaflets.

shining sumac

You can easily tell this type of sumac by the winged margins between the leaves.

But then, out of the blue one day while researching different types of permaculture plants, I stumbled across an image that finally made it clear that this sumac was winged sumac. It’s a great plant, with many uses and a strikingly beautiful presence on the homestead, especially in fall. It’s leaves are the darkest, most robust red I’ve ever seen.

But it’s not just a pretty plant! It also, like all of the safe sumacs, has a very high amount of vitamin c in it’s berries. You can soak them in water to pull out the vitamin c, and then freeze the tangy juice and use it like you would lemon juice. It’s also common for people, especially in the south, to make “sumac-ade” or pink lemonade out of the berries as well. I’ve heard of fisherman using a sprig of sumac berries in place of lemon when baking fish as well. In some countries, the berries are dried and ground up to make a spice that adds a red coloring to many dishes, and the pithy stems were often used in pipemaking.

winged dwarf flameleaf sumac

We love the beautiful fall color of Rhus copallina!

Shining sumac can grow in a wide range of climates, from zones 4-10, and can tolerate full sun or partial shade. It really is a pioneer species that thrives on the forest edge, where it leads the advancement of meadow to woods. It spreads by suckers, can quickly fill up an area that has been cleared, and it is often planted as both a wildlife cover species and as a shrub to stabilize soil and prevent erosion. All sorts of birds enjoy the berries, and they help to spread the seeds as well. One more interesting thing about  flameleaf sumac is that it often colonizes after fire events, which makes me wonder if the small stand we have used to be somewhere a burn or brush pile was kept by the previous owners.

In any event, I’m glad to have identified this plant, and even gladder to know that it’s so useful. I have been encouraging it wherever I see it growing, and hope to transplant a few into our backyard food forest this upcoming year and make a bunch of sumac-pink lemonade!


Black Walnut Trees in the Home Landscape and Garden

The other day, I was asked a great question in the comments section on my post about what wood to use in hugelkulture about planting black walnut trees. Specifically, about the ability of black walnut trees to “poison” other nearby plants with “chemical warfare.” I figured I would write up a post about some things to consider before planting these magnificent trees at your home or homestead.

First off, why do we even need to be concerned that a black walnut tree might kill our plants? Well, black walnut, along with hickory and pecan trees, produce a chemical called juglone. This chemical is toxic to many, but not all, species of plants and even some animals if consumed in large quantities. This gives black walnut trees an advantage in the wild, helping it to compete among other trees, vines and shrubs for sunlight, nutrients, and water. But not all plants are sensitive to juglone. In fact, many plants that co-evolved in the same areas with black walnut are not affected by the alleopathic effects of the juglone.

walnut trees in the garden


Furthermore, there are many factors that can influence a plant’s ability to live near a walnut tree and not succumb to the juglone poisoning. A few of the factors are related to soil and site conditions (pH, moisture, soil life), while others have to do with proximity to the tree. Because juglone does not travel very far in the soil, only plants immediately around black walnut trees are susceptible to poisoning. Also, by planting buffer trees, or trees that are not affected by juglone such as black locust, mullberry, elderberry, and black cherry, you can essentially contain the juglone to the area immediately under the tree.This area is particularly high in juglone because of the accumulation of leaves, nuts, nut hulls and roots.In this area, it’s best to only plant plants that are tolerant of juglone (check out a great resource here).

Plants that are not juglone tolerant include:

  • apple
  • azalea
  • birch, white
  • blackberry
  • blueberry
  • chrysanthemum
  • crocus, autumn
  • forget-me-not
  • grape, domestic
  • lily-of-the-valley
  • linden
  • mountain laurel
  • peony
  • pine
  • potato
  • rhododendron
  • thyme
  • tomato

Keep these far away from your black walnut tree, and make sure that when it drops its leaves in the fall, that they don’t settle down and decompose around these plants.

Personally, I think that there are a lot of options when it comes to using  black walnut in the landscape, particularly  in a food forest setting. With a little research, and some planning, anyone can take advantage of its majestic shape, delicious nuts, and extremely valuable timber. The nuts are easily planted in the fall, 3-4 deep and covered with a layer of either straw or leaf mulch. After freezing and thawing all winter, they should germinate in the spring. Just make sure to mark them off so you don’t mow them down next year!

Plant Propagation: Principles, Practices, and Planning

As summer starts to think about turning to fall, the season for propagating woody perennials, trees, bushes, and shrubs gets closer. This spring we planted a bunch of fruit trees and berry bushes as part of our backyard food forest. Some of these plants, especially the ones we planted later in the year, did not appreciate the dry summer we had and will need to be replaced. This can add up when you are buying plants form a nursery, and while the value of a fruit tree investment is immense, it’s nice to be able to keep costs down by propagating new plants from trees and bushes you already own.

Propagation Book

So, I pulled out an old book that we bought at an estate sale a while back called Plant Propagation: Principles and Practices. It’s a textbook for the nursery industry but also has many uses for the home orchard or permaculturalist. My copy is the 3rd edition from 1975 and I think it was 50 cents. Compared to the $132 for a new edition, I think we did pretty good, and if you are interested in this publication I would suggest buying a used copy of an older edition.

Grafting Book

try and find an older edition to save a few bucks

The book covers everything from building greenhouses and cold frames, to starting root-stocks for fruit trees from seed and grafting scion wood onto them to clone specific cultivars. It’s very easy to search the book for specific information on how best to propagate certain plants. I was able to quickly find out that layering is the best method for blackberries, softwood cuttings for blueberries, root cuttings for elderberries, and hard wood cuttings for currants. There are entire sections on how to each technique, with pictures, charts and more detail than you would ever really need to know. Each chapter has a list of less than useful scientific resources and references as well.

budding book proapgation

Easy to understand text and diagrams for every propagation technique

I definitely recommend Plant Propagation: Principles and Practices to anyone interested in propagating any sort of plant material, from fruit trees to house plants. I’d also suggest searching amazon for a used older edition to save some money on it. While it is written for a college level course, it reads easy, and is full of useful information for home gardeners and laymen. For anyone who finds themselves wanting to propagate multiple types of plants, having this book as a reference can save a lot of grief and effort.

apple picking, filling up our bags!

last week jason and i picked all of the apples on our one, mature apple tree. this one we did not plant and it was here when we bought the house and land. it is the very first tree member of our food forest. last year this apple tree did not make apples larger than the size of small crab apples, but this year, after being pruned, it made a great first harvest for us!

our (golden delicious?) apple tree

our (golden delicious?) apple tree

we’re not sure what variety of apple it is, but the apples are very similar in taste and appearance to the golden delicious apples that my parents grow. this year the apples grew to be much larger and they taste wonderful! a little sour and a little sweet–my favorite!

jason climbing the ladder to get to the apples at the top.

jason climbing the ladder to get to the apples at the top.

first we picked the lower apples on the tree, placing them into our picking bags and baskets and afterwards we brought out the ladder to get to the apples at the top of the tree. we were surprised by how many apples were actually hidden on the branches of the tree… we got so many more than we expected!

jason's picking basket.

jason’s picking basket.

my picking basket. a backpack hung over my front makes it easy to place the apples i pick inside. plus, it's practice for being pregnant in the next few years.. ha, ha!

my picking basket. a backpack hung over my front makes it easy to place the apples i pick inside. plus, it’s practice for being pregnant in the next few years.. ha, ha!

after we picked all of the apples, we sat in the cool basement and sorted them, separating the apples with blemishes from those without them. the apples that are the worst shape are in the kitchen now, awaiting their turn to be consumed. other apples with blemishes are in the fridge downstairs, to be eaten before the other refrigerated, blemish-free apples.

after we sorted the apples we weighed them and we got 32 pounds! how exciting!

next on our plate (besides the fresh apples)… german pancakes with apples and apple pie! stay tuned for some of these recipes…

.:.

Planting Trees: A Quick How To

As we wrap up the initial planting of our backyard food forest, I thought it made sense to put together a post on how exactly we plant our fruit trees. We already uploaded a video about protecting fruit with tomato cages, so check that out if you haven’t already, but today I’m going to give a quick how to on planting bare-root fruit trees.

apple tree location

This spot in the front yard is just out from the dripline of a big oak tree and should get plenty of sun.

First off, decide where the best place to plant your fruit tree is. Some things to consider are the directions of your primary winds, how much sun the tree will get, what sort of shade the surrounding trees or structures may provide, and also how much shade your tiny fruit tree will provide when it is mature. It’s also nice to be near a source of water for both irrigation and planting if you can.

Next, I like to scratch off the top layer of sod or leaf litter, depending on where I’m planting, with either a mattock or shovel. This makes it easier to break ground, and also disrupts weed and grass growth in the area right around the young tree. Now it’s time to start digging. I like to dig a hole that is bowl shaped, with gently sloping sides, and a little deeper than the root ball on the dormant tree. For most of the trees we planted this year, this turned out to be a hole that was two and a half to three feet wide, and 18 to 24 inches deep.

fruit tree hole

Make sure your hole is big enough and you don’t cram the roots in!

After the hole is dug, I like to rough up the sides and bottom a little to make sure the tree roots can grow out into the native soil. I now backfill the hole a bit, and place the root ball of the tree on a small pile of dirt and see if the depth is right.

I try to plant the tree at the same level is was planted at in the nursery, a couple inches below the graft union. This is important because if you accidentally plant the graft union below ground, the tree will grow as a full size tree and you will lose any semi-dwarfing or dwarfing effects. Now this isn’t necessarily a bad thing, but if you spend money on a dwarf apple tree that only gets 6 ft. tall, you probably won’t be happy when it ends up being 60 ft. tall.

planting apple tree

Start packing in the dirt around the roots, making sure to bust up any big clumps.

Once I have the right depth, I pack dirt around the roots of the tree, being careful to try and break up any large clumps of our beautiful, red Carolina Clay. At this point, I may add a handful of our native forest soil, in order to inoculate the young tree’s roots with mature soil bacteria and beneficial fungal mycelium to help with the uptake and cycle of nutrients.

heirloom apple tree planting

Fill in the rest of the hole and water deeply to remove any air pockets.

After that, I fill the hole in completely, and perform any grading or minor earth shaping to channel runoff and rain water. Ideally, now is when you would plant a few support species next to the tree, to help it grow. It’s also the best time to add a thick layer of mulch around the base of the tree, and then give it a good long drink to water it in.

And that’s pretty much it. All in all, after you get a few under your belt, it takes about 15-25 minutes per tree, depending on the size of the roots. Not too bad when you consider the value of a mature fruit tree, and how much food security it provides.

food forest details: keeping our plants safe and thriving

if you have looked at jason’s post from yesterday, detailing the why and where of our food forest, you know about our plans for planting over 100 fruit trees and bushes on our land.

the below video shows a few of our plant species and explains where we chose to plant them, as well as includes a demonstration about how to add a layer of protection around your own precious trees!

.:.

.:.

Older posts

© 2024 KW Homestead

Theme by Anders NorenUp ↑