KW Homestead

Pasture Raised Poultry & Edible Landscaping Plants Since 2013

Tag: processing and preserving (page 1 of 3)

How To: Rendering Your Own Duck Fat

First of all, let me start by saying that cooking with duck fat is about the best choice you can make for your health and your taste buds. Duck fat is versatile and flavorful, it stores for long periods of time in your fridge, and a super long time in your freezer! Fantastically, it can be reused over and over (unlike butter or olive oil) and it has a high smoke point. What’s not to love?!

Duck fat has a rich, creaminess to it that rivals pork fat in “yum factor” and lends a subtle umami to any dish!

We recently rendered our own duck fat from our very own pasture-raised, non-GMO Pekin ducks. The process is simple (really) and since we also sell our unrendered duck fat, you too can make cooking with duck fat a reality!

All you need for rendering duck fat:

  • large pot
  • a few cups of water
  • long-handled, metal, slotted spoon
  • duck skin/fat pieces
  • time (a few hours)

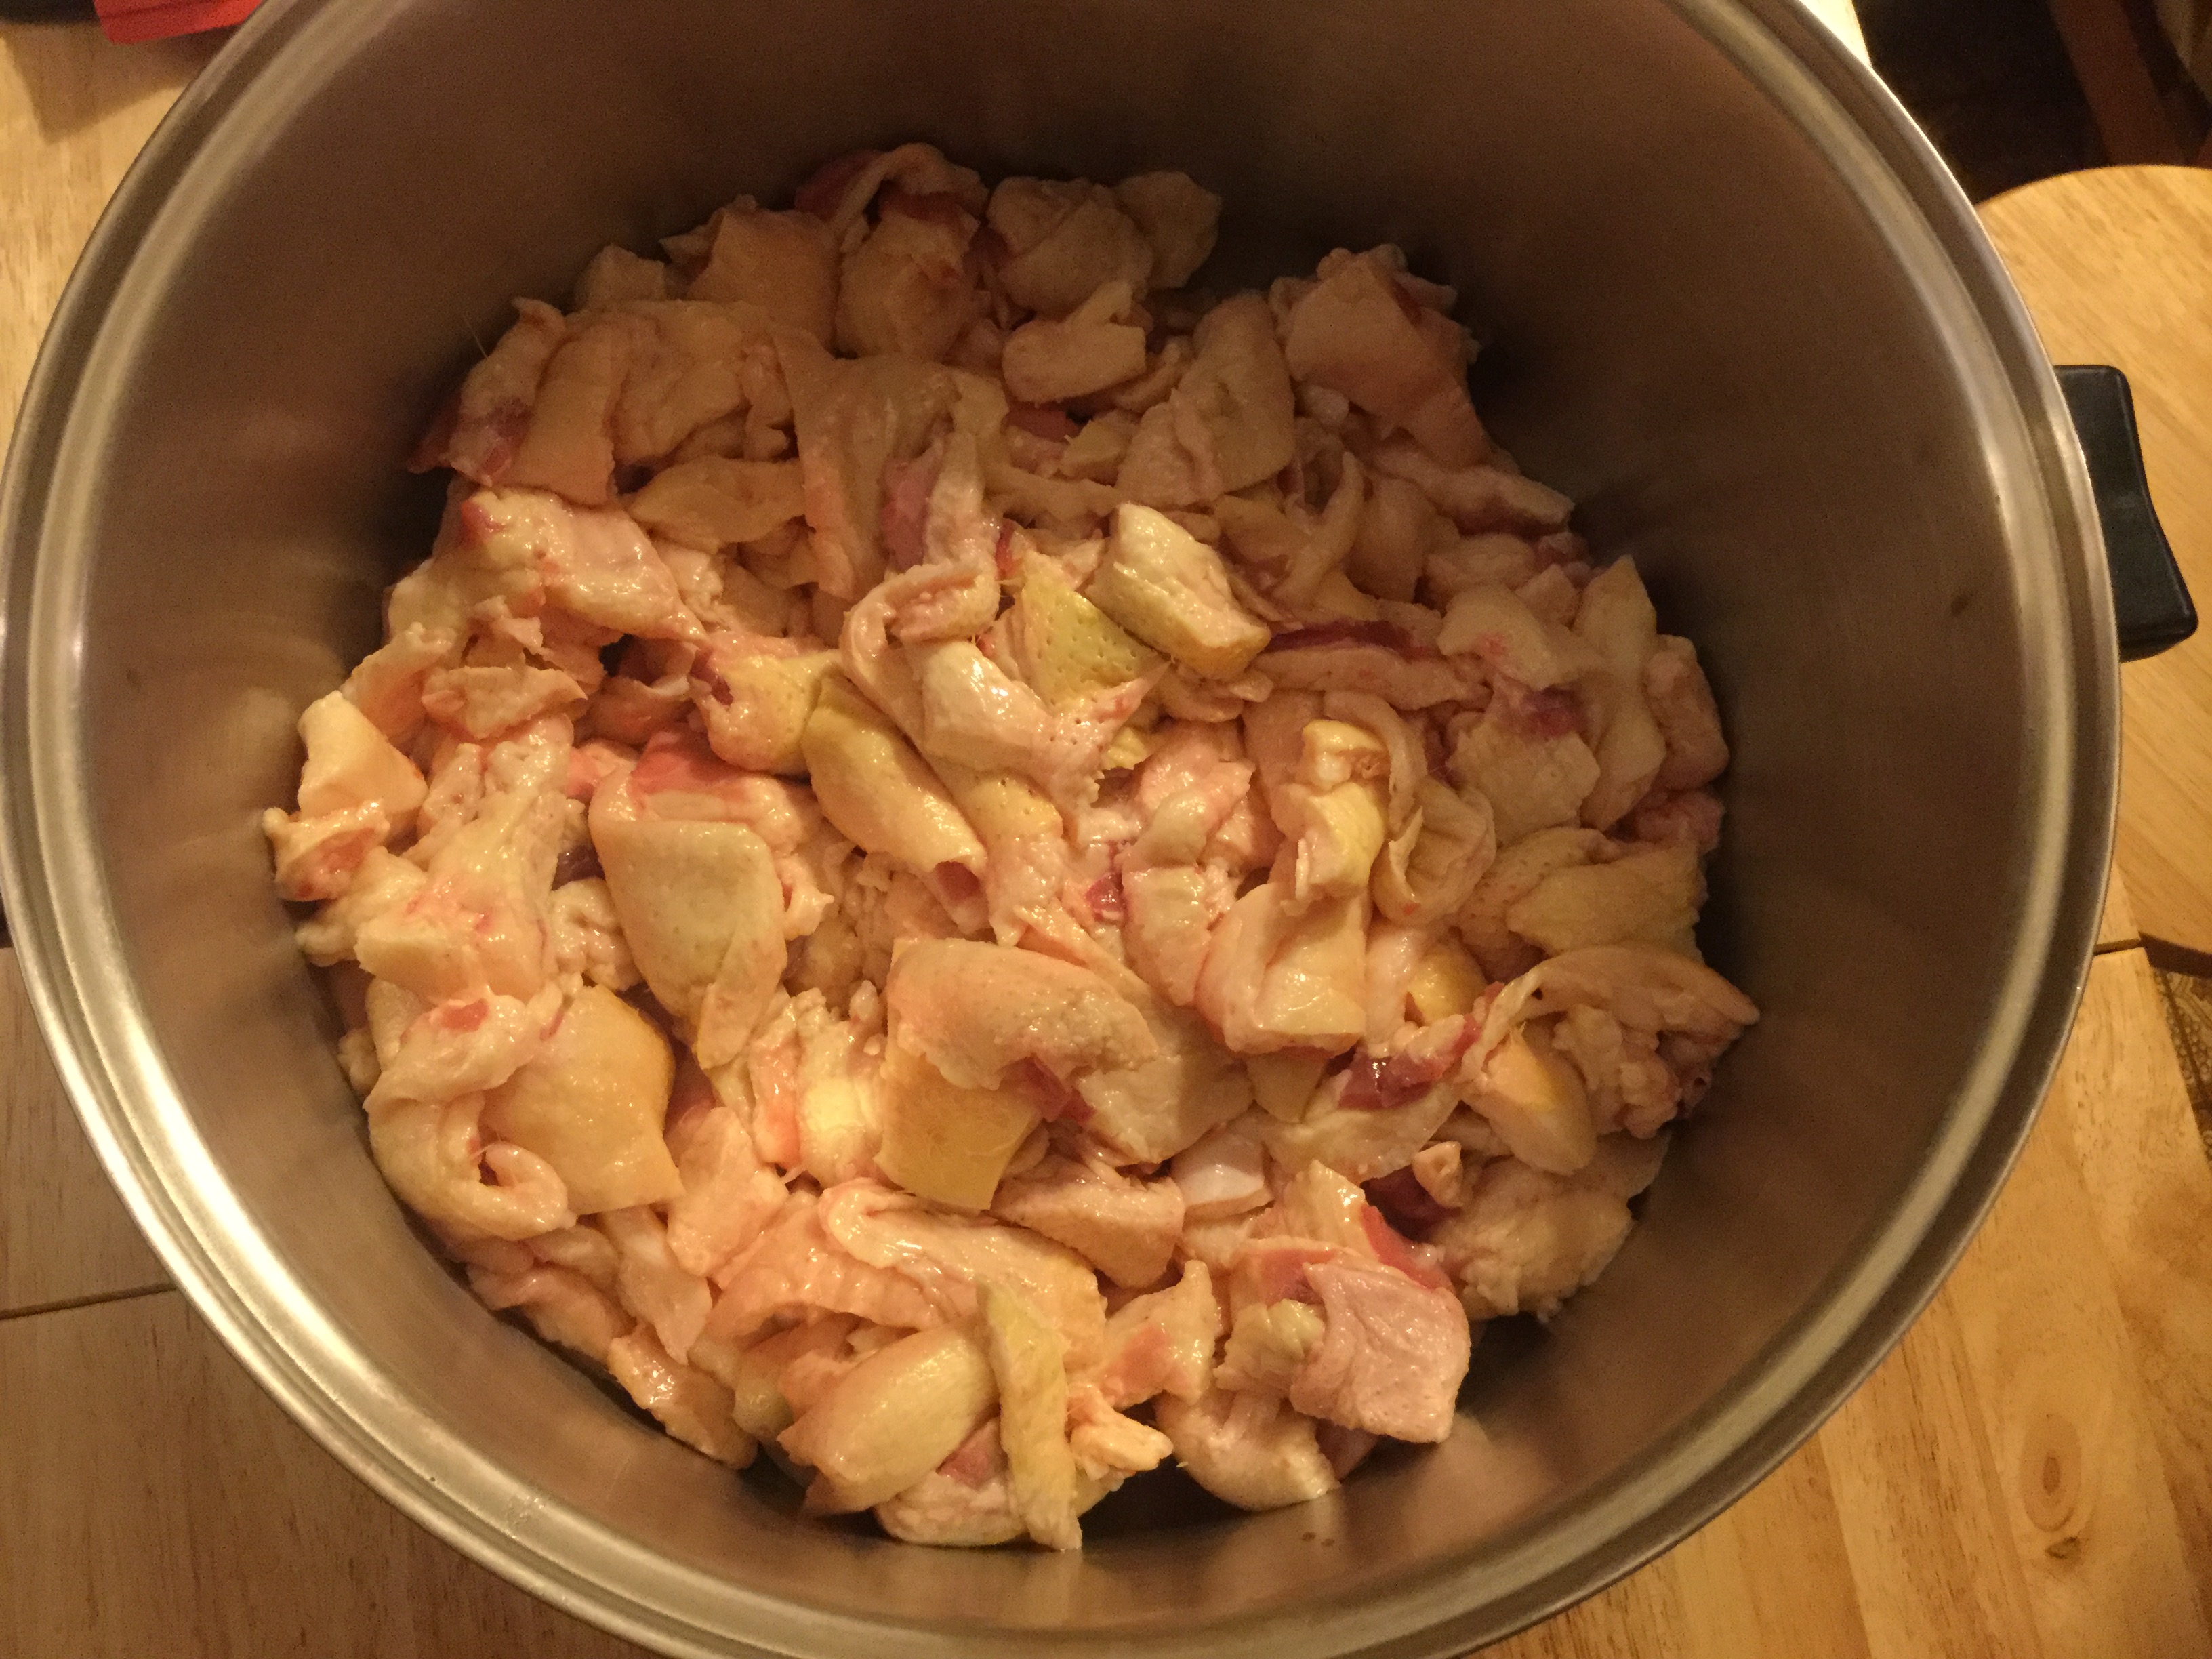
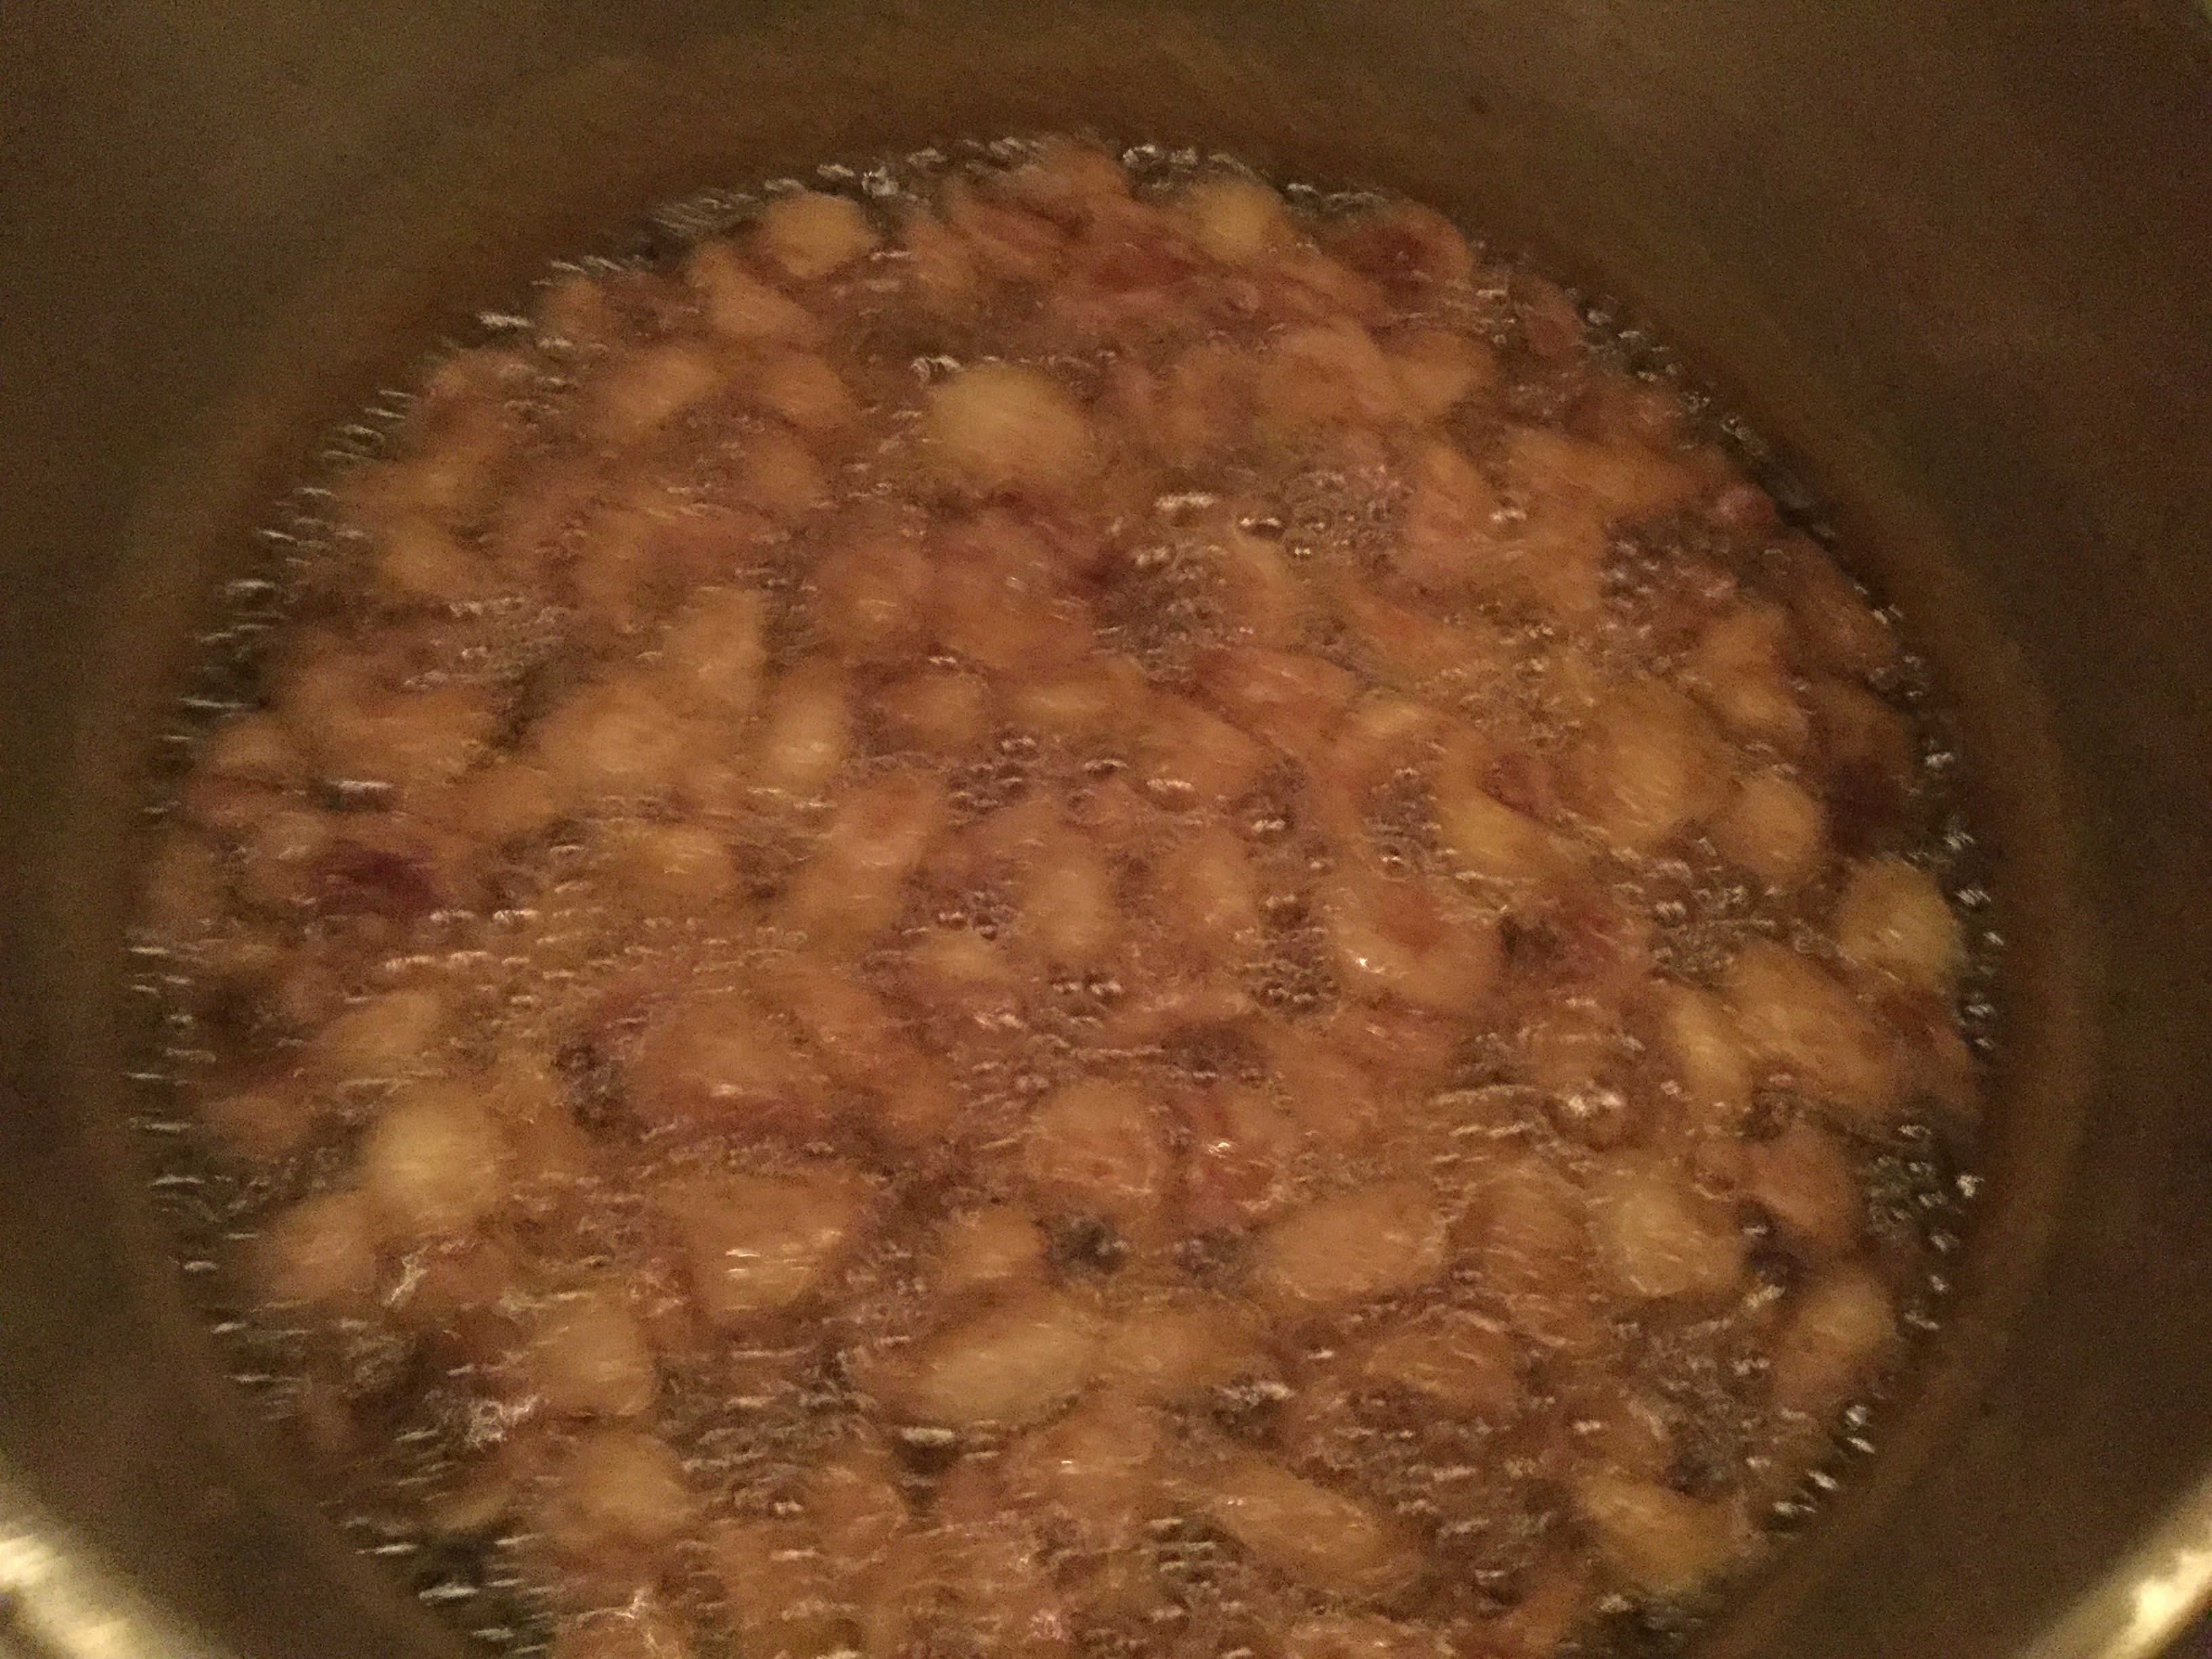
We began with 6 pounds of leftover, trimmed skin pieces from our butchering/portioning process. We placed all of this in a large pot and added some water (a cup or two) to the pot to ensure that the fat and skin wouldn’t burn. Then we turned the pot on low.

image

Once you get to this stage, you’re done with the hard part!

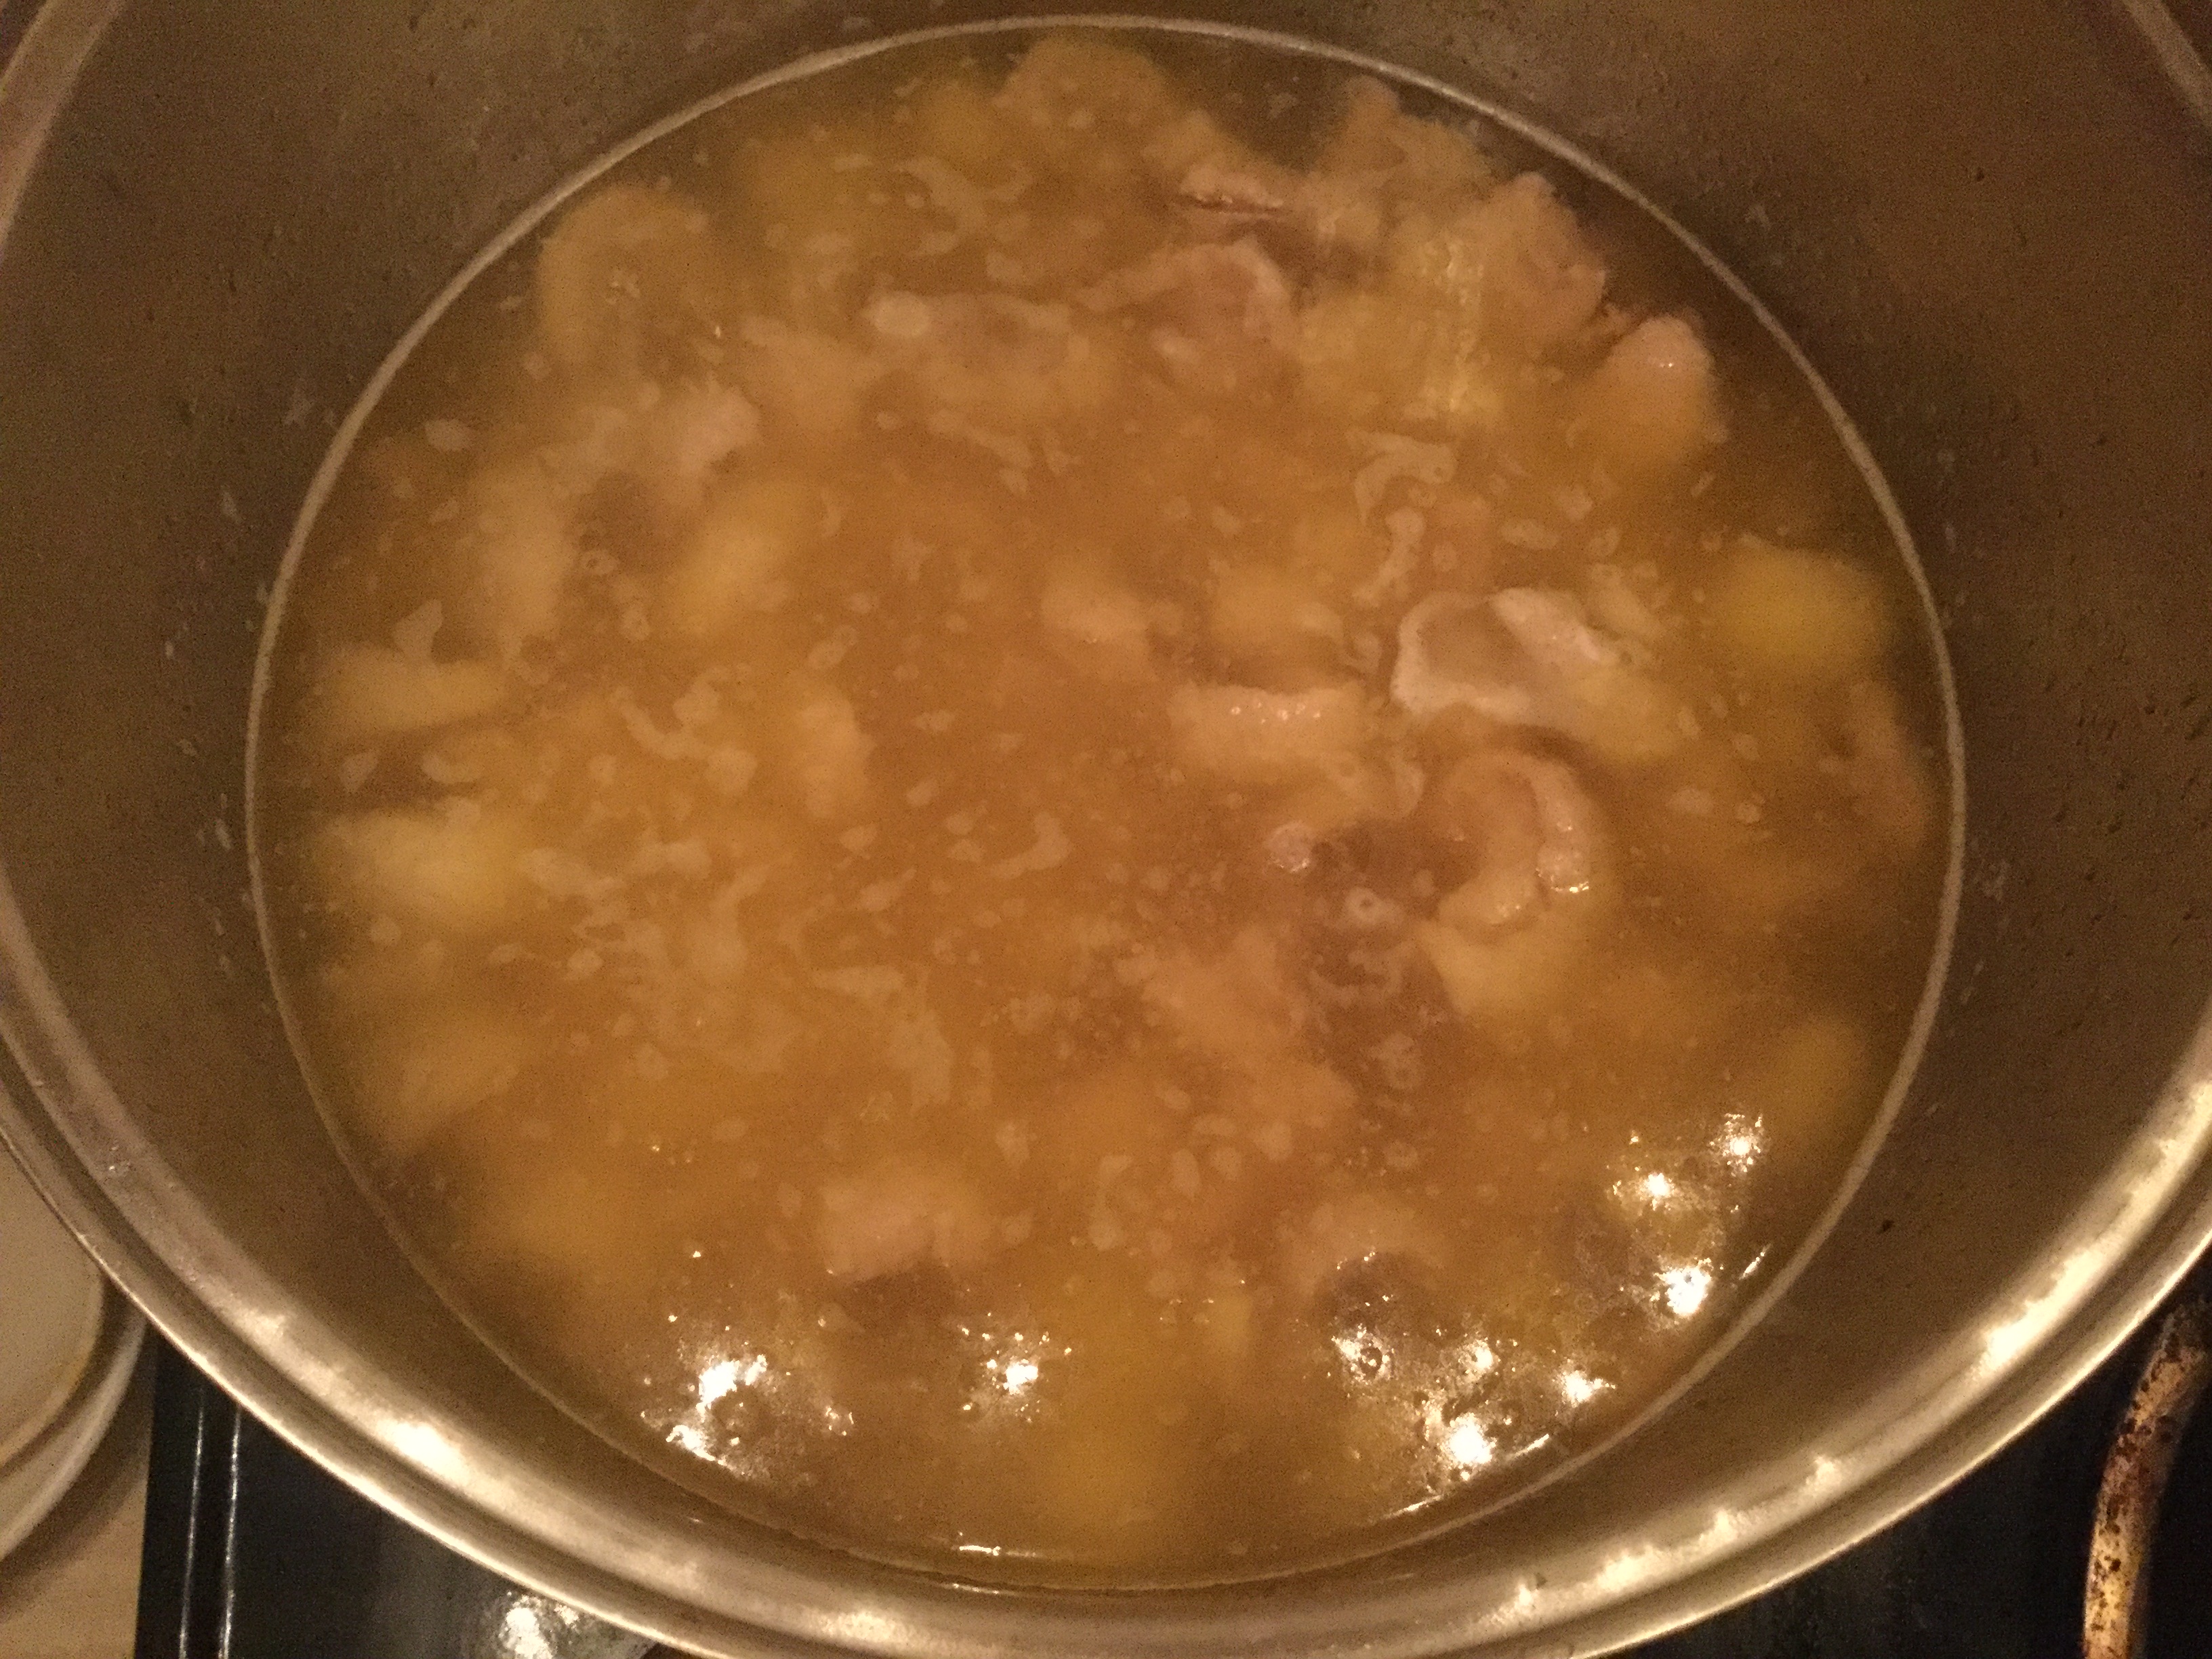
All you need to do now is keep an eye on your fat. Over time, you’ll see the fat start to cook out of the skin and the water will begin to evaporate (leaving just the delicious fat).

image

image

image

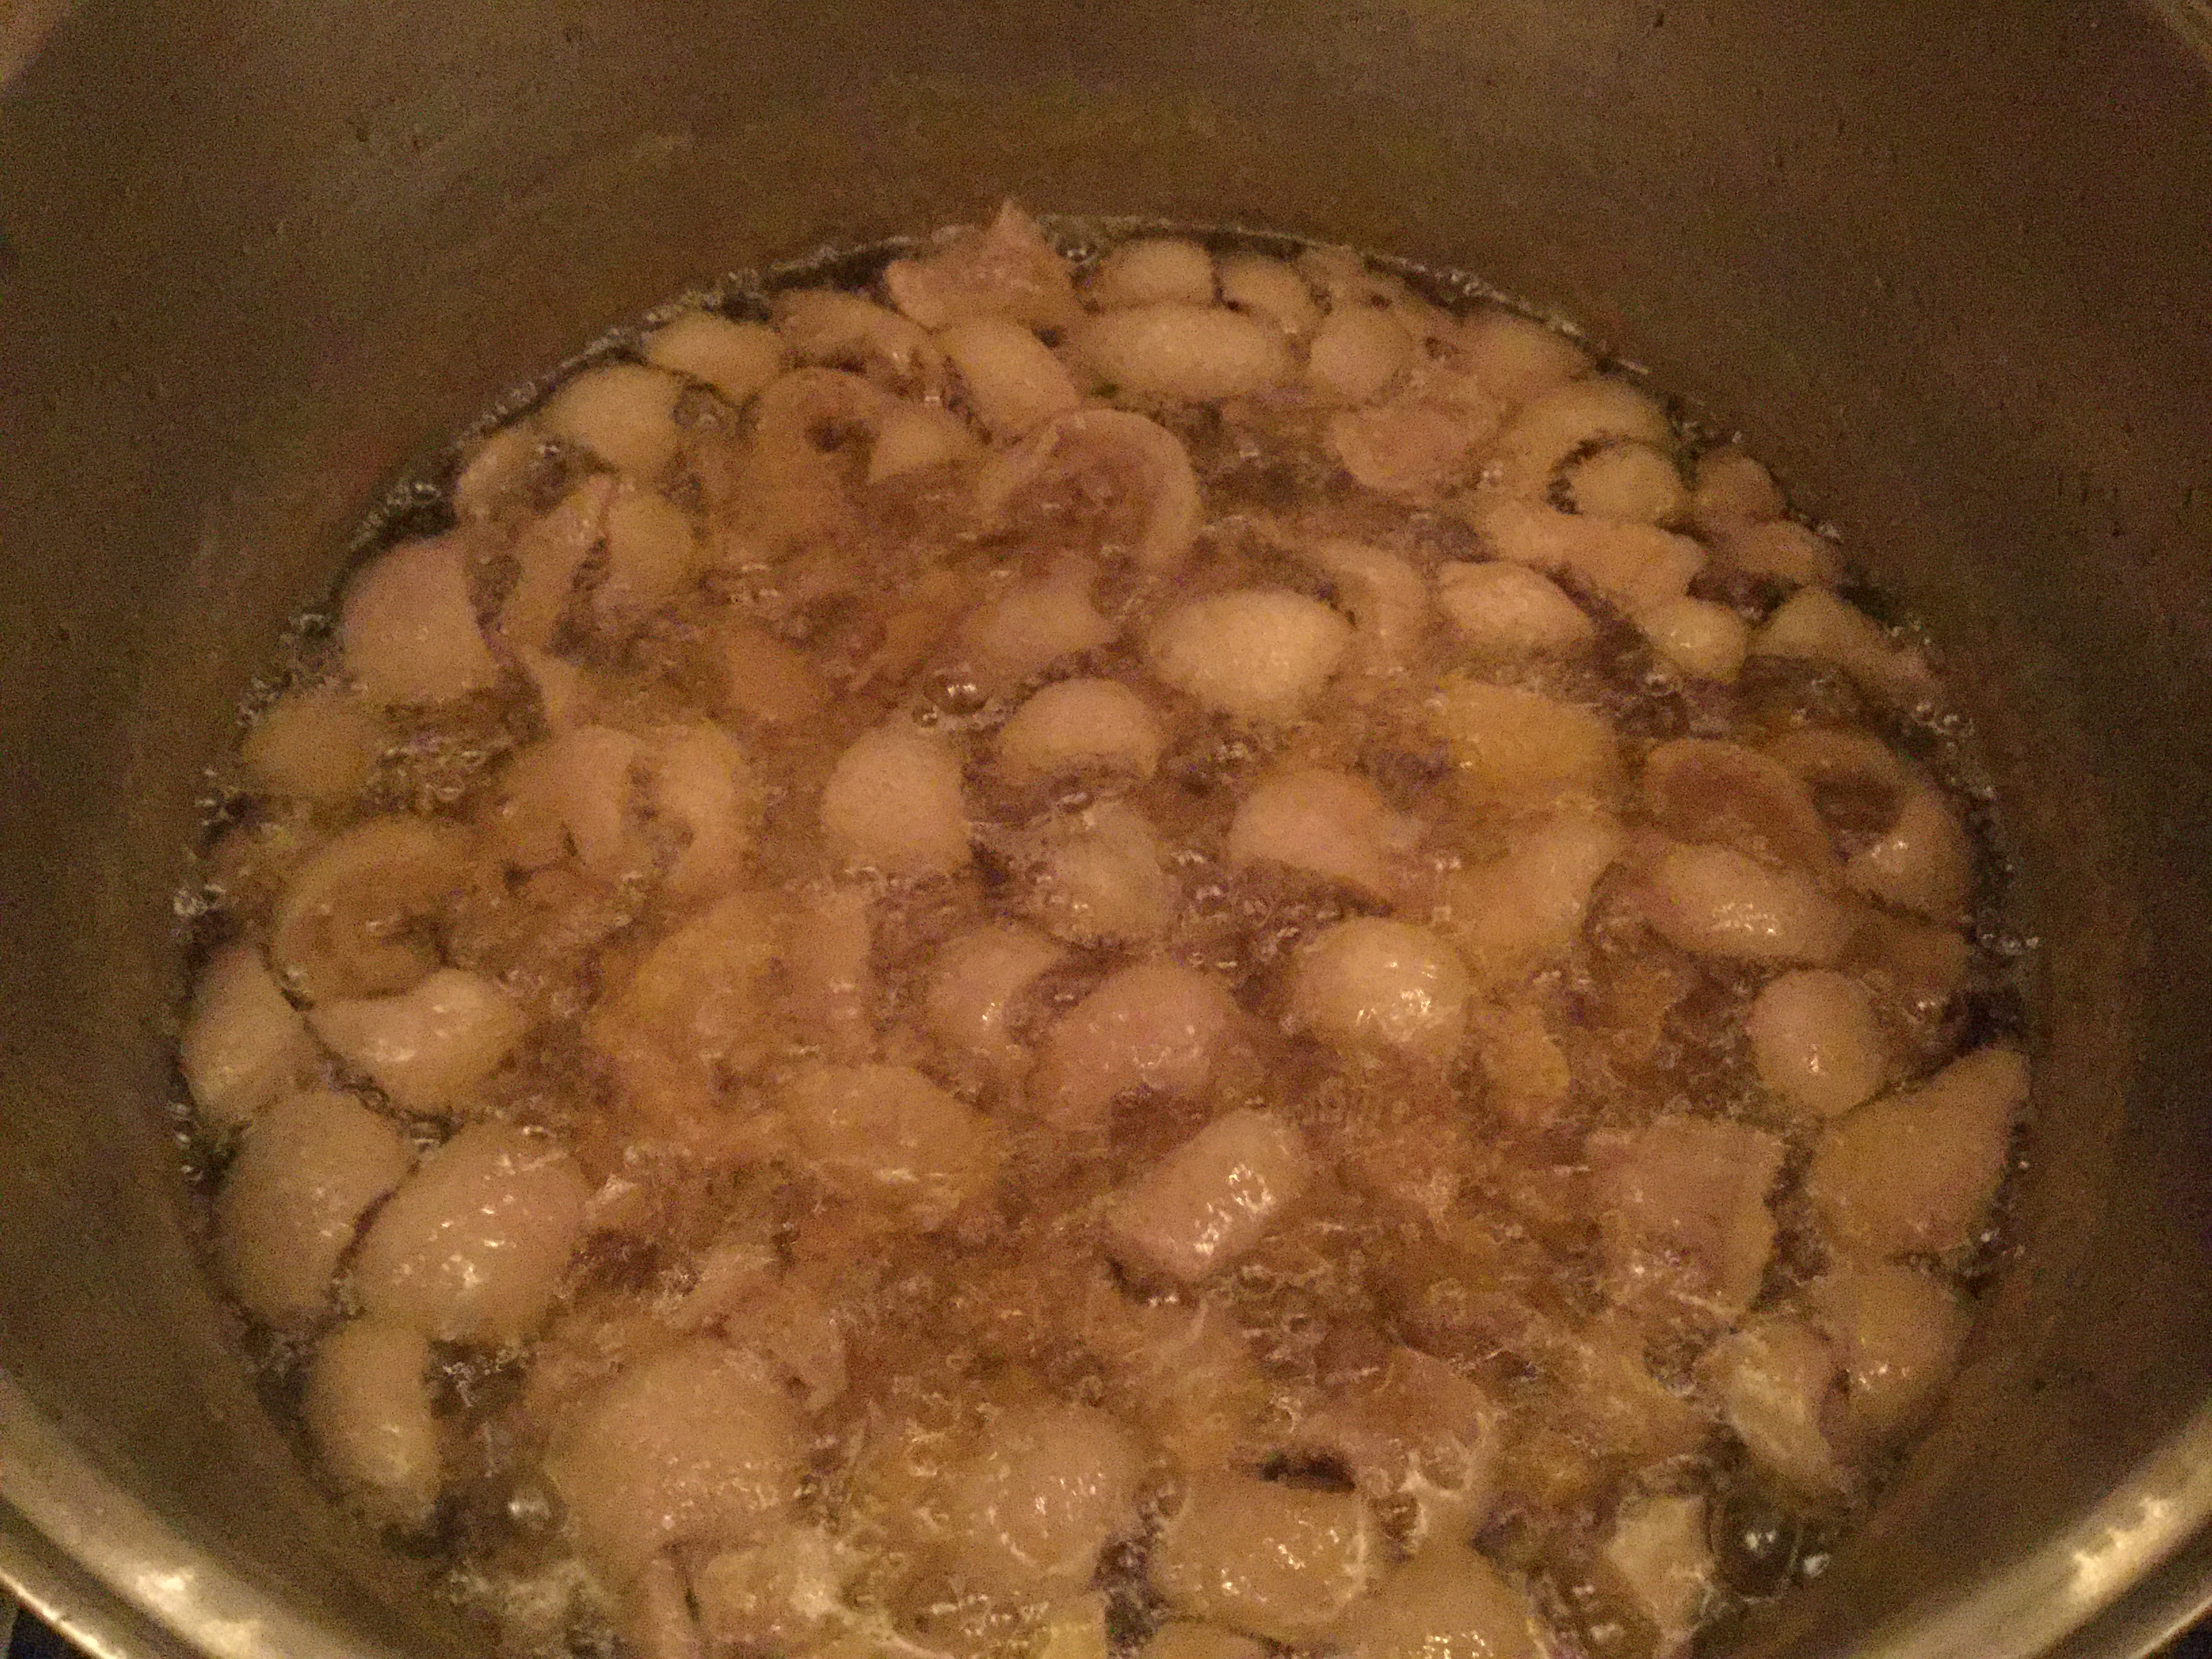
In the last stage, the skin with shrink and brown up. This is a sign that your fat is almost ready. Be sure to keep an eye on your fat, especially at this stage, since your little skin-bits are closer to burning, as well.

image

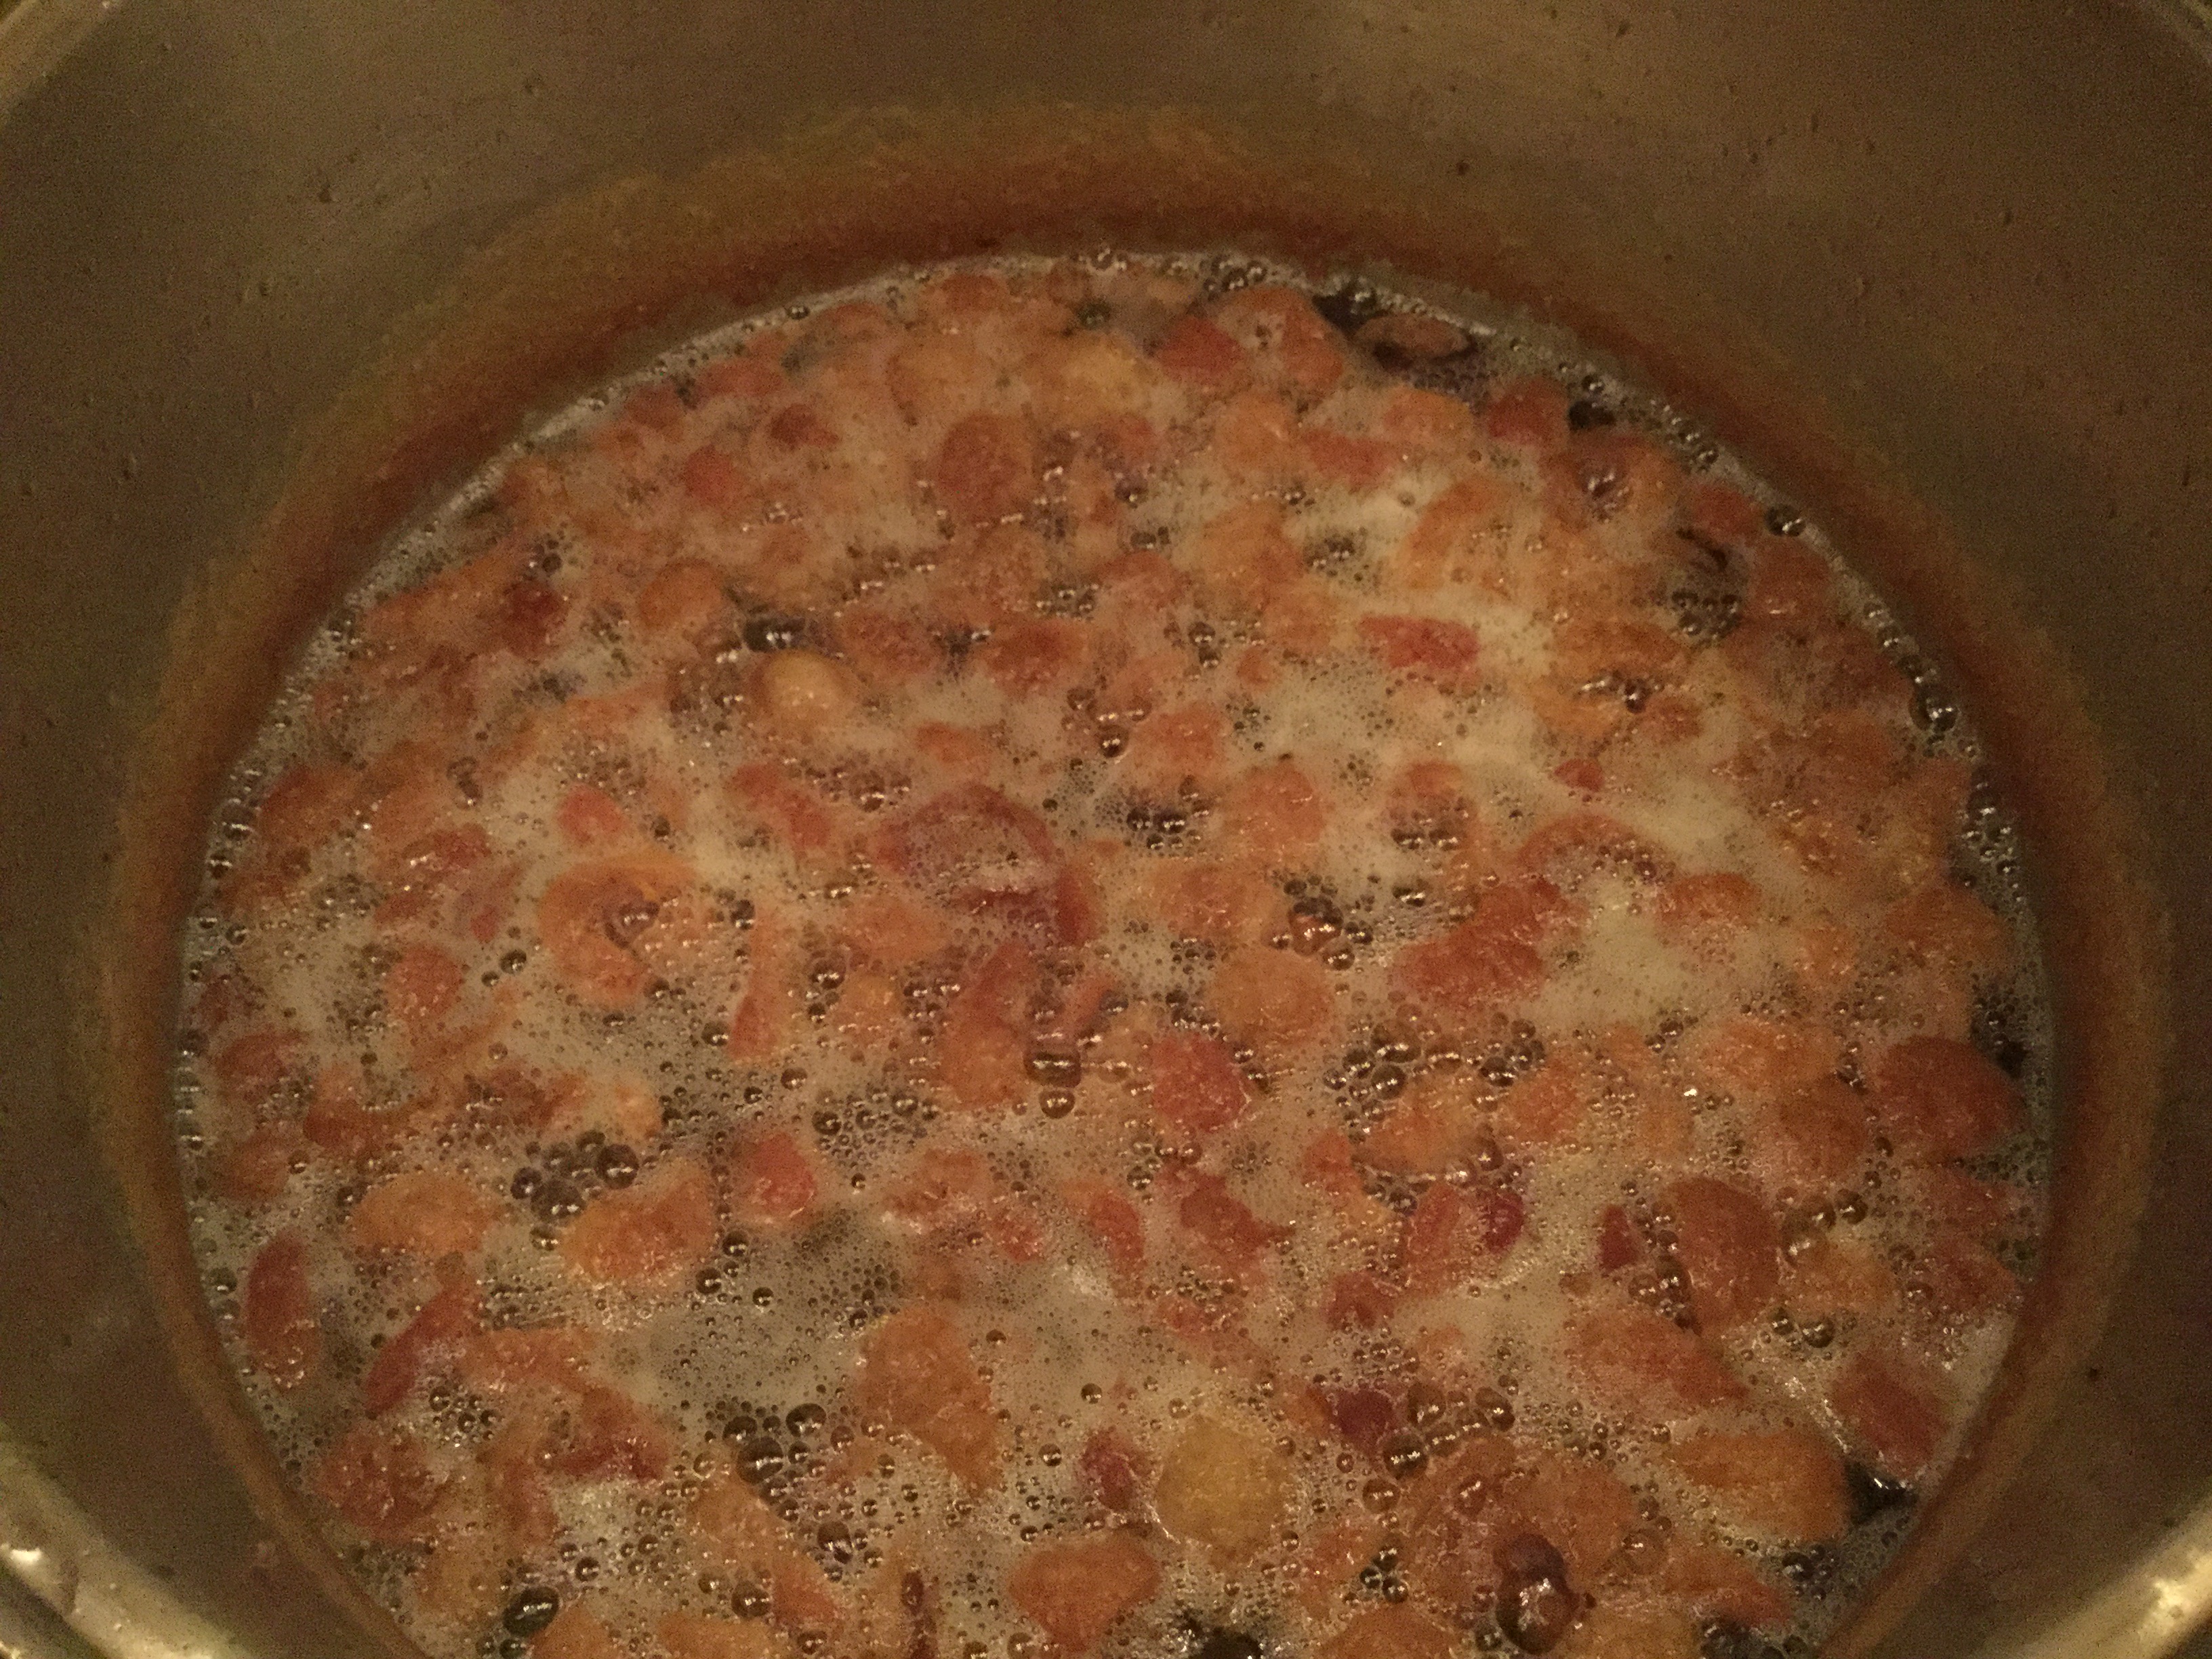
Once your skin bits are fully browned, your fat is ready! Remove your pot from the heat and let it cool for A LONG TIME. Keep in mind that fat is way hotter than water. Even though your fat will never reach its boiling point (this is intentional… Don’t let it smoke or boil!) it is going to be roughly TWICE AS HOT as boiling water. So be very safe when handling.

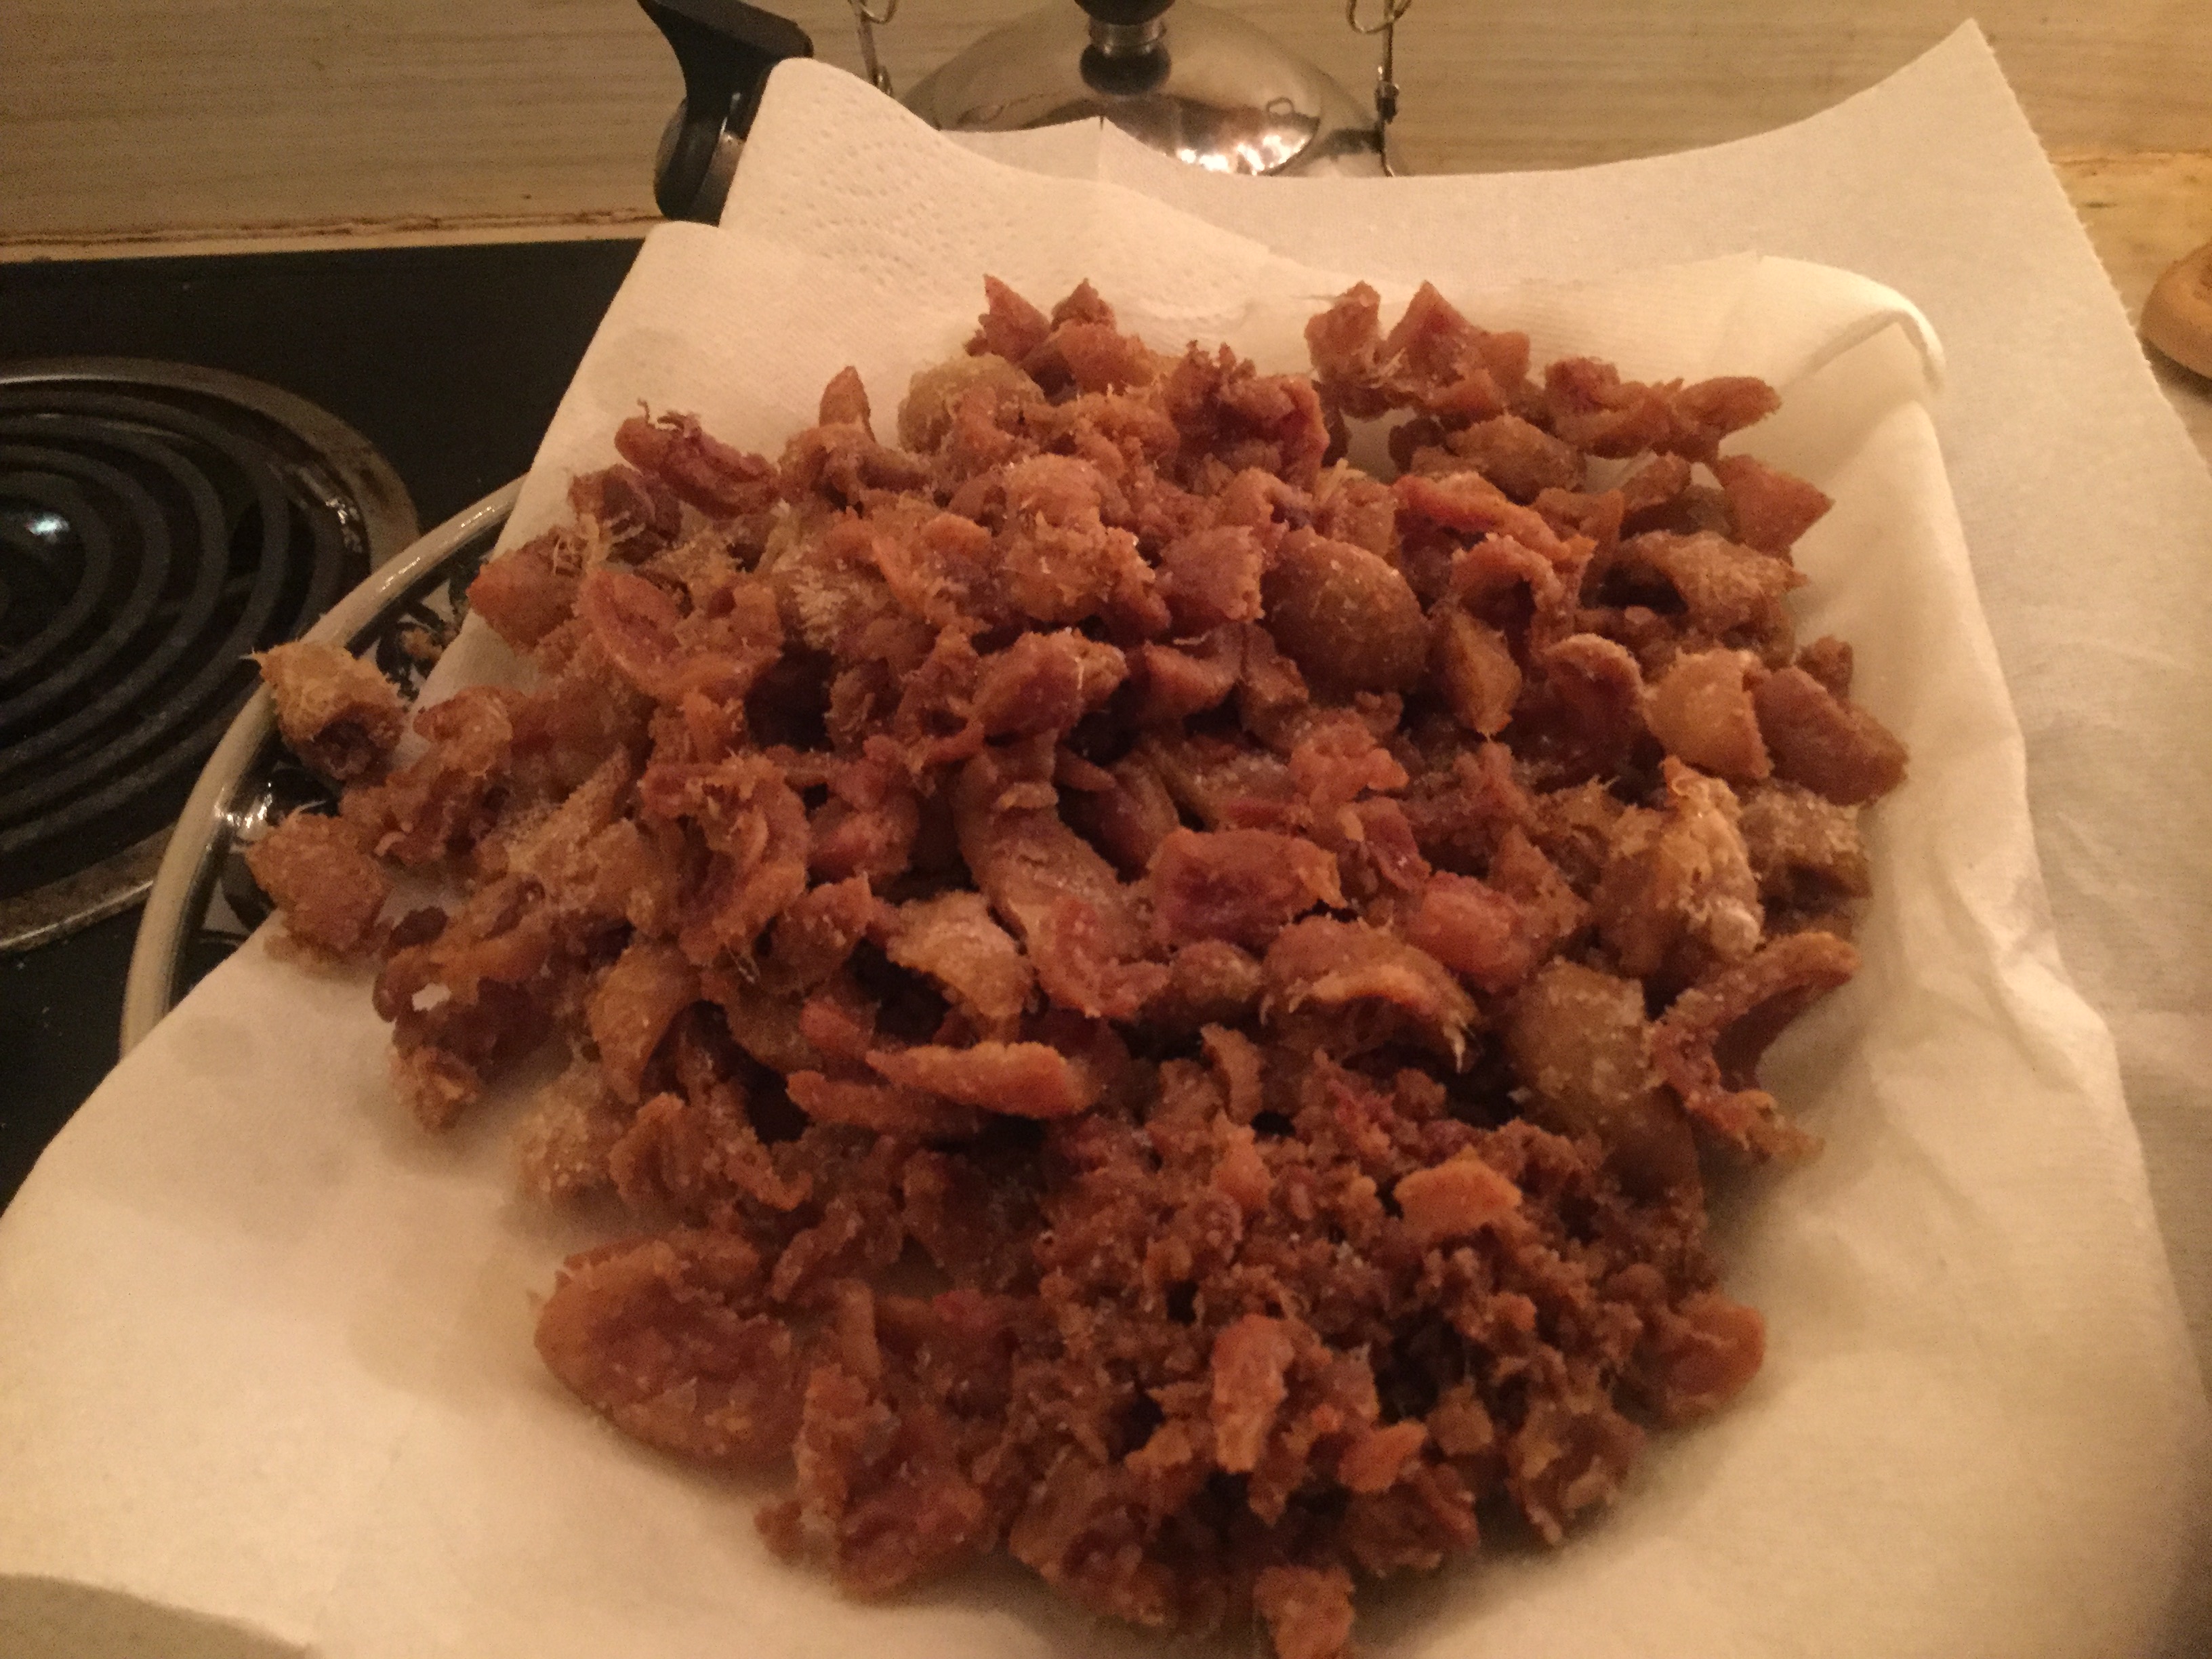
You can use a long-handled, slotted, metal spoon to scoop out your skin-bits, or cracklings. Let them drain over the pot before moving them to a place to dry and cool. Congratulations! As a by product of rendering your fat, you’ve creating the most delicious snack known to mankind: duck skin cracklings. Salt and consume with great decadence!

image

In the meantime, continue to let your pot of fat cool. We let our fat cool off for many hours before pouring it into containers for storage. Always be safe!

image

image

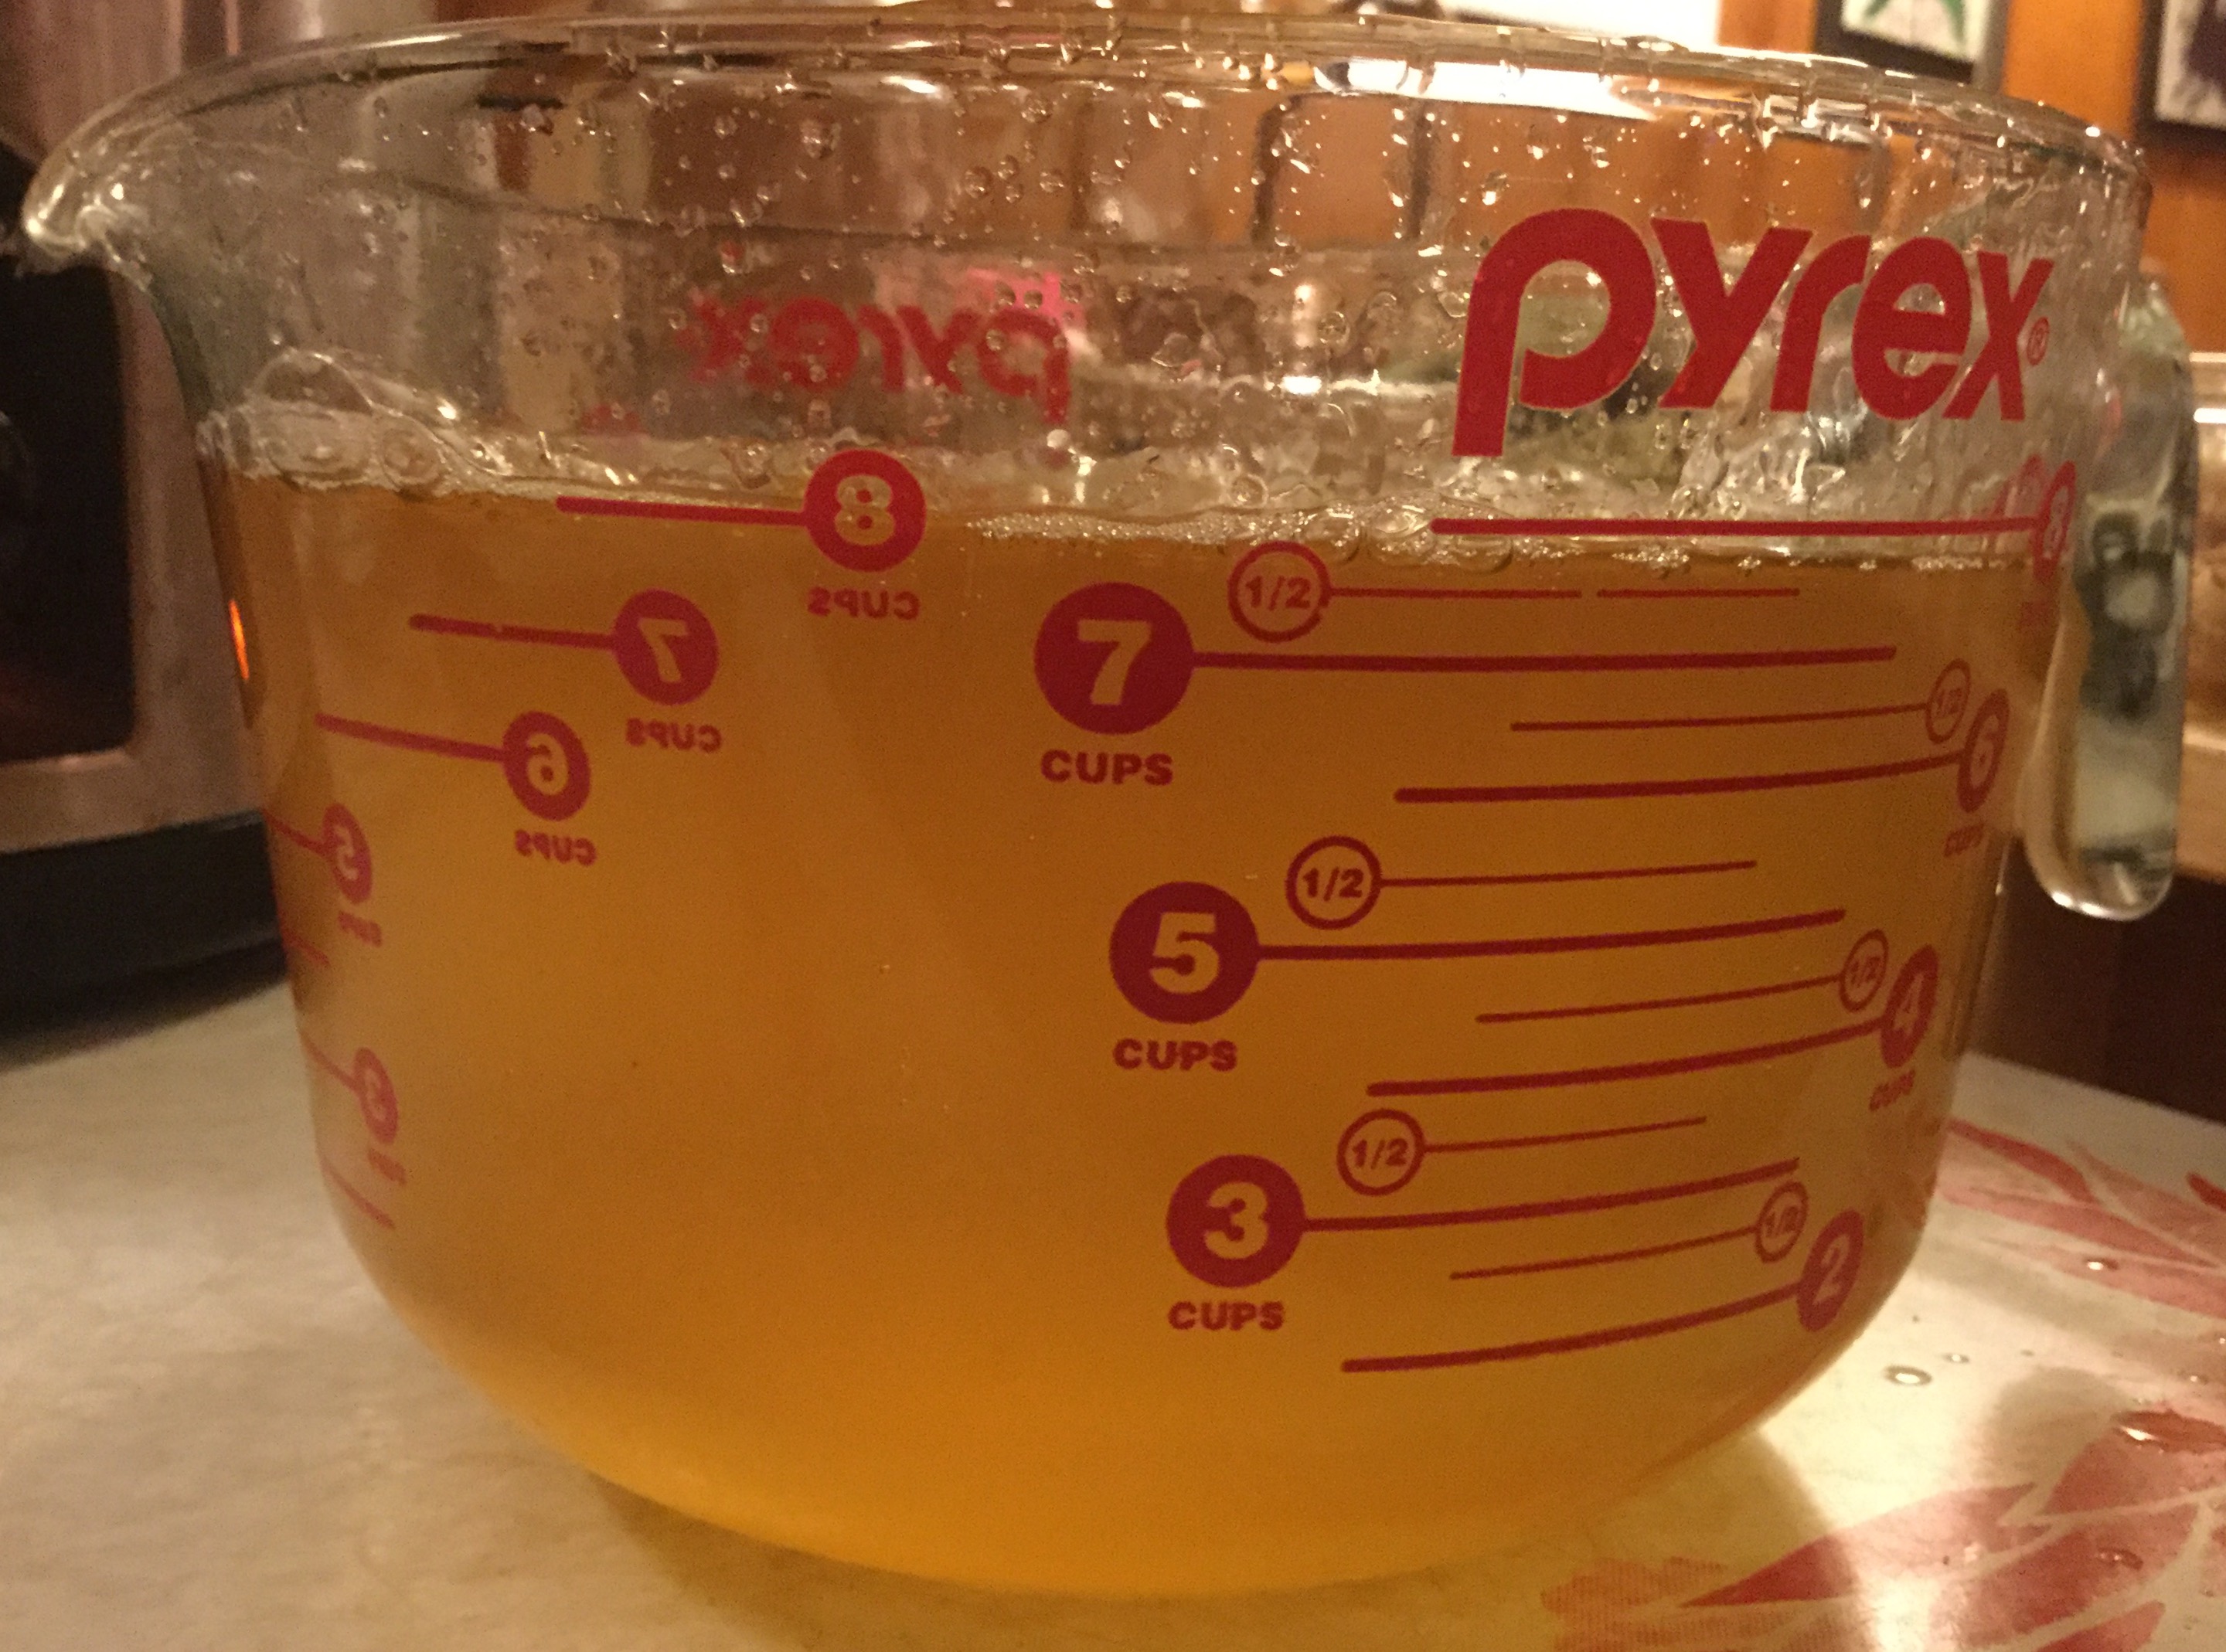
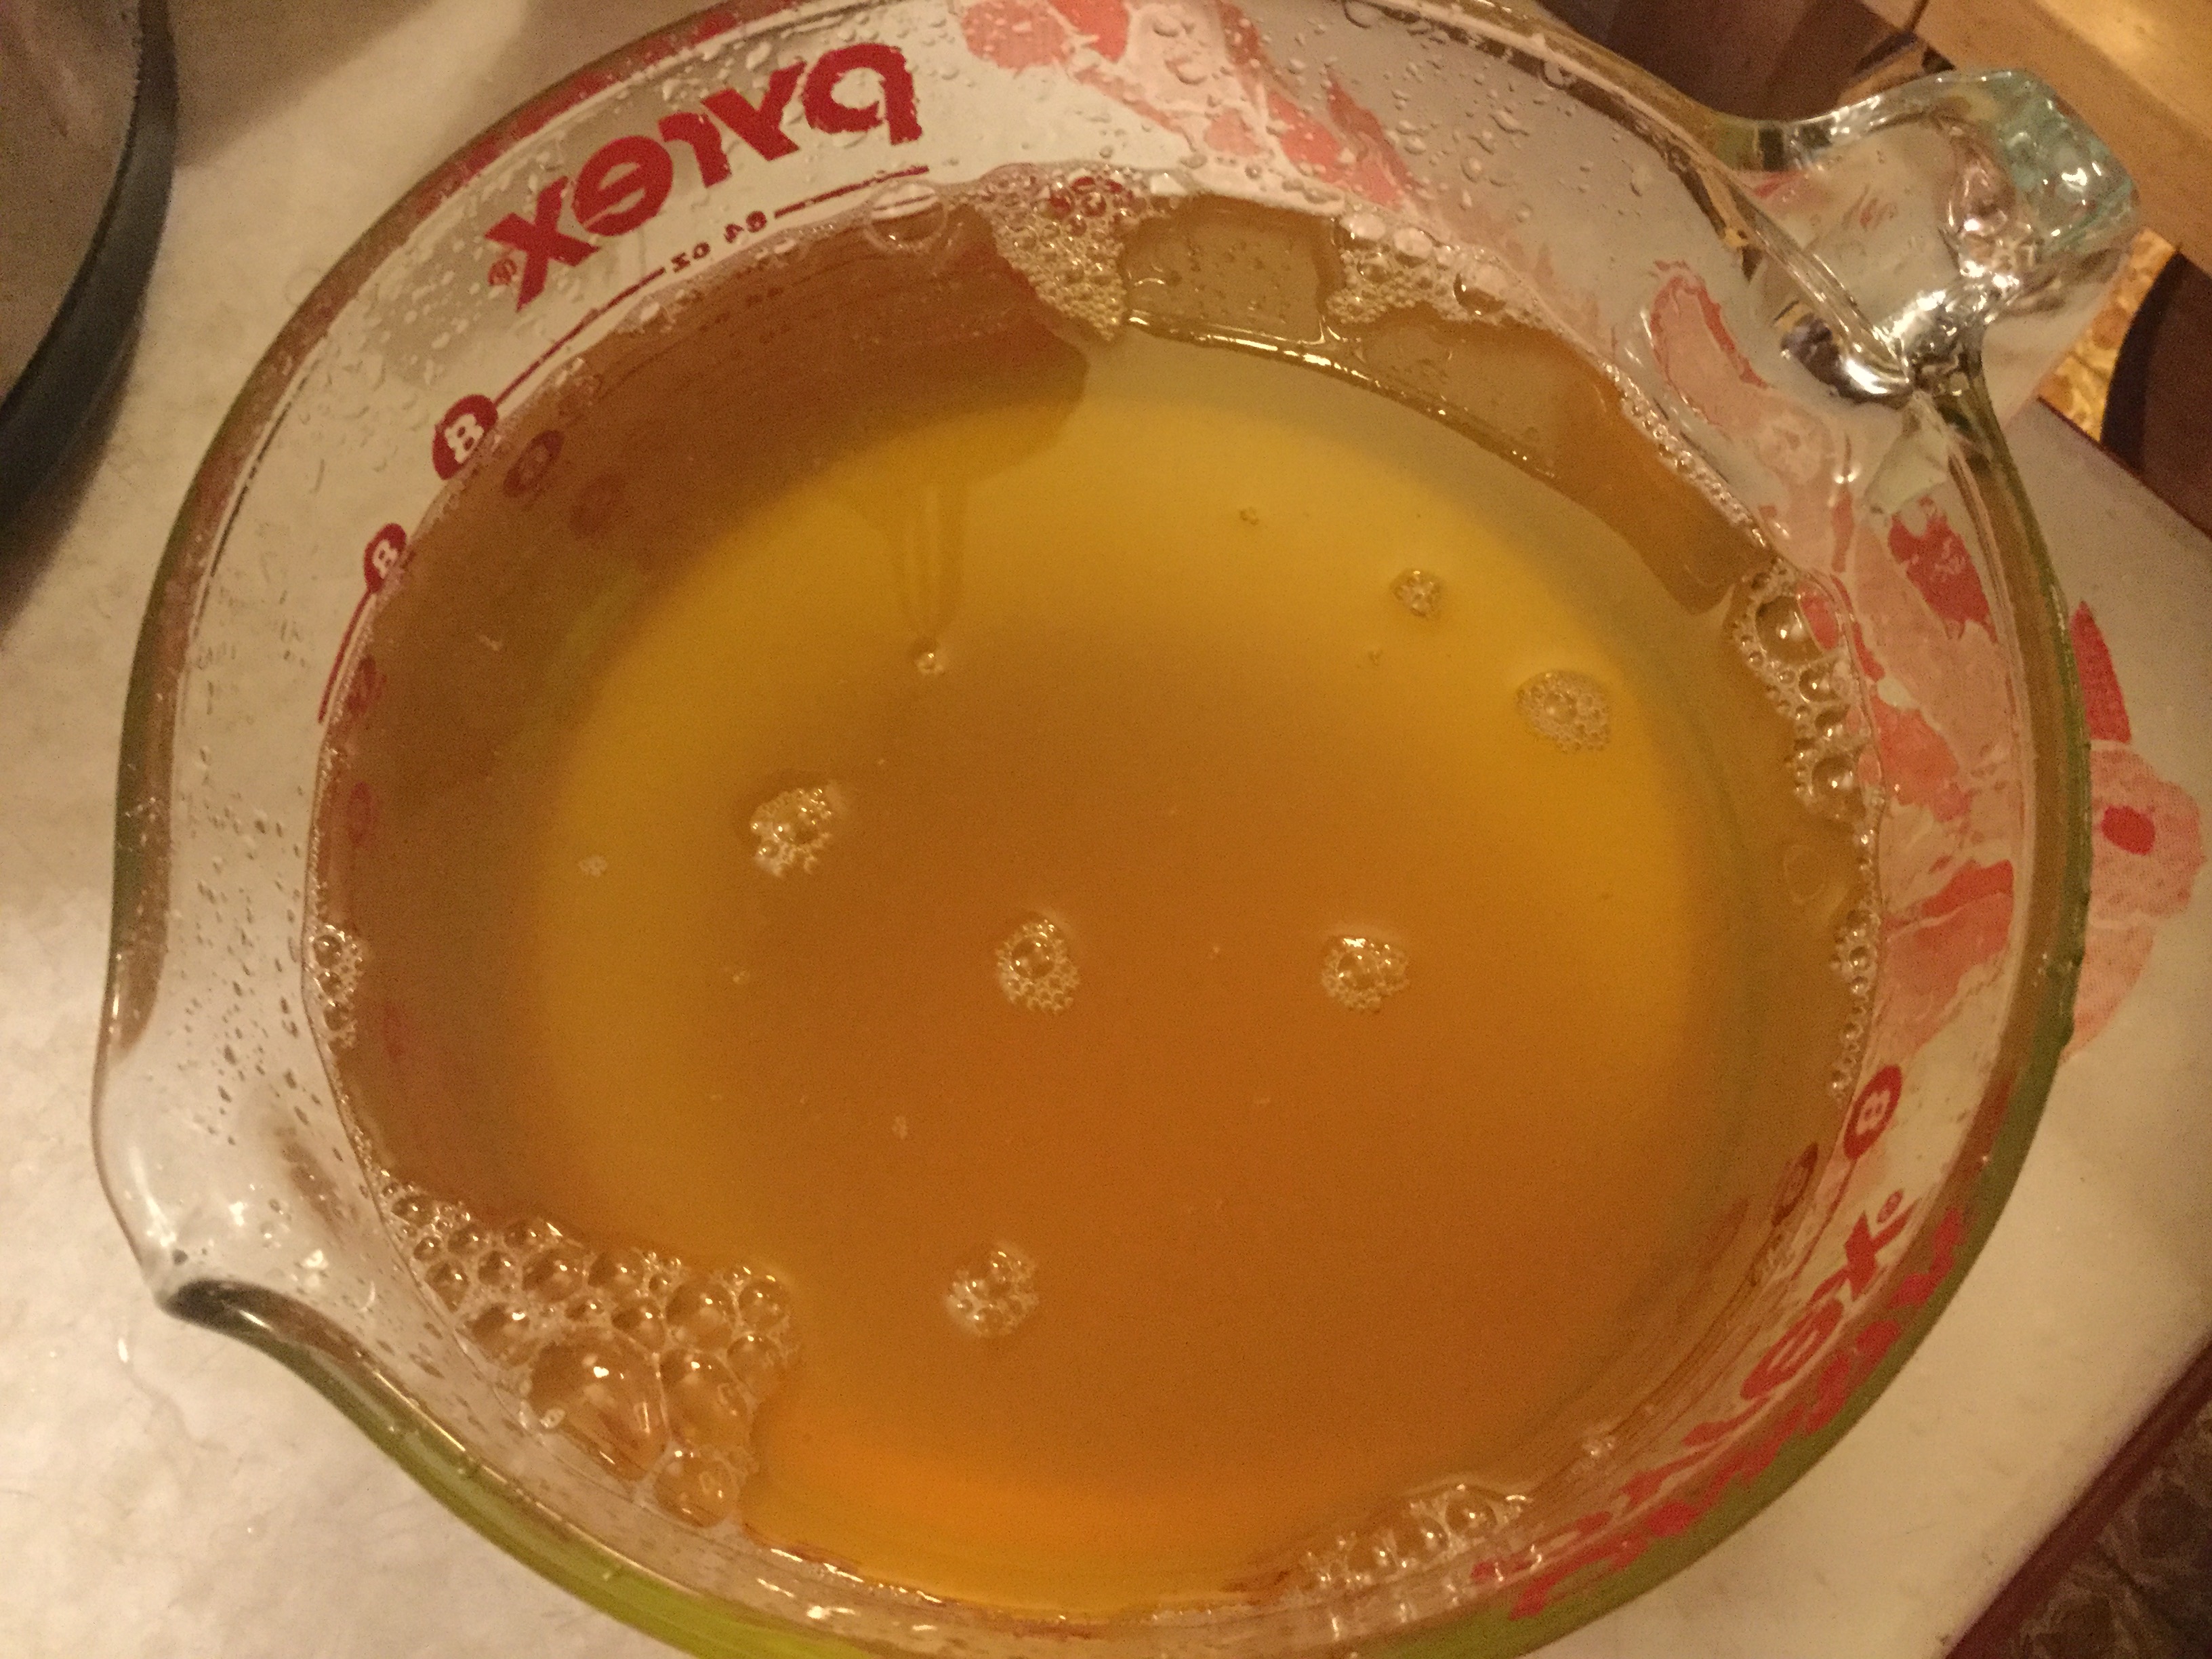
6 pounds of skin/fat pieces makes approximately 8 cups of rendered fat. We store ours in a huge container in the fridge and scoop out of it every time we fry eggs, sauté veggies, etc.

And sometimes, when no one else is looking, we sneak a small spoonful of just plain fat. We think of it as “duck fat ice cream.”

.:.

Dehydrating Mushrooms and Apples

We just dehydrated our first batch of mushrooms and apples.

The shiitake mushroom logs won’t fruit in the colder weather, so now is the time to save them for winter soups and stir frys.

The apples were beginning to spoil rather quickly, so we thought that dehydrating them for fruit-leather-like snacks would be fun.

apples

Some of the apple are going bad…

The apples and the mushrooms were sliced about 1/4 inch thick or smaller and laid out on the dehydrator trays. The apples were soaked in a Vitamin C water solution to lock in the nutrients that are often lost during dehydrating and to keep them from turning brown too quickly. They were dehydrated for about 14 hours at 135 degrees.

apples

Soaking apple slices.

The combined smell of the dehydrating apples and mushrooms was a bit funky, but the finished product looks great. I can’t wait to try the mushrooms this winter!

mushrooms

Ready to go in the dehydrator!

.:.

Pickles, Pickles, Everywhere!

With the cucumbers doing so well this year, we’ve had to make a lot of pickles to preserve them! The paste tomatoes have also started coming in, as have the tomatillos. This means that fermented salsa is the way to go for us!

So far we’ve pickled a couple gallons of cucumbers and a few quarts of salsa.

pickling

White Wonder cucumber pickles on the left and tomato salsa on the right.

Our salsa has manifested into two distinct kinds:

  • Tomatillo salsa
  • Tomato salsa

Each of these salsas has a variety of garlic, basil, and jalapeño, and each of them has a touch of the other’s main ingredient (either tomatillo or tomato, depending).

One we’ve pureed the ingredients, we add 1 tablespoon of salt and 4 tablespoons of whey. This recipe is a variation on Sally Fallon’s recipe from her fantastic book, Nourishing Traditions.

This recipe has worked really well for us! We let them sit out in a room temperature space for a few days, “burping” them a few times a day. Daily taste tests reveal when they are ready, and afterwards they get refrigerated until we decide to eat them!

This is the original recipe that we use for pickles (this makes 1 quart):

  • Dill
  • Minced garlic
  • 1 cup of purified water
  • 4 tablespoons of whey
  • 1 tablespoon of salt

Happy pickling!

.:.


2015 Apple Harvest

Harvest season is upon us! In addition to the wild blackberries we put up, we harvested apples the other day from our somewhat deformed backyard Apple tree. This tree was planted by the previous owners of our homestead and forgotten to the point that it was almost completely engulfed by a massive honeysuckle vine.

Our first year here, it produced only a few small and tart apples that were eventually all eaten by deer, but after removing the honeysuckle and some heavy pruning, we were rewarded with a 32 pound harvest last summer.

This winter, I pruned it even more, and actually grafted some Roxbury russet scion onto a few potential leaders. Serious pruning of any fruit tree should be carried out over several seasons, so as not to shock the tree too badly.

apple harvest yield culls

our 2015 apple harvest, sorted and ready for processing

This year, we harvested a little over 40 pounds of apples. Now that’s not the 4-7 bushels that I talk about in my post on the value of a fruit tree investment, but it is a lot of apples for, other than a little pruning in winter, and 20 minutes of picking in Summer, essentially no input. No fertilizer, insecticide, fungicide, herbicide, or irrigation.

Now of these 40 pounds of apples, I’d say that only 15% are “grocery store” apples. That is nice and plump, with no blemishes, bruises, funny shapes or insect bites. We’ll eat these fresh and savor every bite.

the grocery store apples: blemish free and plump.

The rest of the apples will be processed and preserved. We are plan on drying/dehydrating them.  Of these apples, the non grocery store apples, most of them contain either a few minor defects, or 1 large defect. They also tend to be a bit smaller, and more oddly shaped. This doesn’t effect the flavor though and they should dehydrate fine. 70% of our apples fall into this category.

processing apples with minor defects, nothing major to see here

The next batch of apples have more serious defects, often a major soft spot that will effect its shelf life, or many medium sized defects. These apples are often small, and we are going to have to cut around the bad parts when we dehydrate them. They are still usable, but the yield of fruit on them is low. I’d say about 10% of the apples fit this category.

these guys are still usable, but the yield is low and they don’t store well

The last category are the culls. They’re pig food. These apples are either too small to mess with, or almost completely covered in defects and soft spots. Drops and rotten apples fall into this category and they will be fed to the pigs who will enjoy them thoroughly. The remaining 5% fall into this category.

culls. not worth messing with, a.k.a. pig food.

All in all not too bad, and we will definitely update you when we start dehydrating apples!

A Blackberry Adventure!

It seems now, as I write this, that blackberry season is over on the homestead. We were hoping to harvest 50 quarts but we fell short this year, landing somewhere around 15. Not nearly as much as we wanted, but it definitely is a great start since last year we harvested 0 quarts!

The picking process is simple, really. You just have to be a little thicker skinned than usual and get used to getting scratched and hurt (not such a new concept around here, really!).

We both got suited up with long pants, a long-sleeved shirt, a hat (the brim really helps by keeping briers from smacking you in the face), and a glove.

jason

Jason after a round of picking.

We tied the baskets to our front, as though we were carrying basket-baby-bellies which allowed us to keep both hands free. We could fit about 4 or 5 pounds in the basket before it got too full and heavy, which meant that we could pick for at least an hour without having to go back to the house to drop off our fruits.

Emma

Emma wearing a basket.

Jason had a different tactic than I did. I chose to wear a glove on my left hand so that I could grab briers and pull them closer to me to pick the berries with my right hand. I would pick up to 10 berries, letting them collect in the palm of my hand before dropping them off in the basket. Jason chose to pick with both hands, without gloves.

We decided to have a competition to see who could pick the most, with points lost every time you yelled out in pain from a brier sticking you (which was often). We imagine that the game is one we can use to get our kids to pick blackberries with us (and one that we imagine will make them tough!).

Once we were done for the day we weighed our fruit (I won!) and we rinsed them outside with the hose.

blackberries

Then we brought them in to dry. We spread them out on a towel and turned on a fan.

blackberries

And once we decided they were dry enough, we filled up quart Ziplocs with them and labeled them.

bags of blackberries

Now we have at least 15 blackberry pies for the fall and winter. Yay!

.:.


What’s Fermenting at Kuska Wiñasun Homestead?

Beer!

But not your typical ale. This experimental concoction is relatively straightforward, save for one tiny detail. There are no hops in it.

hickory leaves beer

Amber ale with hickory leaves

Gasp! That’s beer blasphemy! Off with his head!

Hold on, lets talk this through. Now while I enjoy hops, IPAs, pale ales, and Double Dry Hopped Double IPAs  as much as the next craft beer enthusiast, they are not the only game in town. Hops are a relatively new innovation on the brewing scene, really coming into prominence in the last  500 years or so. Before that, brewers, brewsters, and alewives used different combinations of herbs and spices to bitter and balance their beer.

These “Gruits”, or herbal beers, relied on plants such as yarrow, bog myrtle, mugwort, wormwood, rue, rosemary, and heather to balance out the sweetness of fermented malt beverages. The history of gruit is a fascinating one that involves propaganda, the Protestant Reformation, and secret and sacred recipes that were passed down for generations.

While these herbs have a long history of being used in brewing, I chose a different avenue for my beer. Hickory leaves.

hickory leaves bittering homebrew

Fresh hickory leaves ready for the brewpot

I got the idea from Scratch Brewing, a small experimental brewery in IL that frequently uses foraged and locally farmed ingredients in their brew-house. They brewed up a few batches that used hickory leaves in place of hops for bittering. Seeing as how we have plenty of hickory trees here, and no hop vines yet, I thought it would be cool to experiment with them in a small batch of homebrew.

hickory leaf beer

Hops are just 1 of many plants that can be used in brewing

I ended up adding 5 oz. of whole, freshly picked hickory leaves to my 5 gallon batch. Green hickory leaves have a not unpleasant taste to them. They are slightly astringent, but clean tasting and “green.” We’ll see how this one turns out.

One note of importance: Hops are an excellent preservative in beer, so this beer won’t be able to be aged for any length time and will have to be drunk relatively quickly. I guess I can live with that.

Spring Cleaning the Basement: Reclaiming the Space!

We recently just DEEP-cleaned the basement. And when I say deep-cleaned, I mean it!

Since the chicks lived down there for far too long and we finally just kicked them out, there was a lot of cleaning to do! They had kicked up so much pine-shaving-and-poop dust that we had to vacuum, spray down, or wipe down EVERY SINGLE THING in the basement, no joke. The Christmas ornaments that were hanging on the tree had to be dusted (it is another story entirely as to why we still had the tree up…), the ceiling had to be swept with brooms to clear it of “floof,” and every single plant was wiped down. Shall I go on…? Ahhh!

This took forever but we feel so great now that it is all sooooo clean down there. We even did some rearranging to get ourselves ready for planting, processing crops, and working in the kitchen down there.

The main hang out spce is now tree-free and ready for the ping pong table whenever we're ready to challenge each other to a duel!

The main hang out space is now tree-free and ready for the ping pong table whenever we’re ready to challenge each other to a duel!

We processed and placed the dried crops that were taking up so much of our work space, and we now have a work table free for crafts and other homestead necessities.

basement

What an open space we have!

I am most excited about the kitchen, which has been super-scrubbed and the counters have been cleared off and made ready for dealing with any meats or food processing we plan to do. The dehydrator now has a permanent home and there is way more table space!

kitchen

Downstairs kitchen!

And now for the big reveal… The bathroom. It was once a hotbed of chicken grossness, and now it is utterly clean and empty! Don’t be shocked by how much it looks like a torture chamber… It can’t help it… It was made that way! Clearly, it is unfinished and might remain so in order to use it for butchery or other activities like rinsing vegetables in bulk (it has a drain in the floor and we have a huge colander).

bathroom

So clean (by dank and dark basement bathroom standards)!

It feels so great to already be ahead of the game on spring cleaning!

.:.

christmas eve cooking!

biscotti

almond, vanilla, coconut, and walnut biscotti in the works!

today is a great day for cooking and enjoying family time!

you can find us in the kitchen making cranberry fruit leathers, biscotti, and banana bread or delivering our home-baked gifts to loved ones!


biscotti

biscotti stage 2


bread

pecan, vanilla, chocolate banana bread!


sauce

cranberry sauce, waiting to be spread out on our dehydrator’s drying racks.


sauce

cranberry sauce about to be transformed into fruit leathers!

have an early merry christmas!

.:.

Acorns/Oak Nuts: Food from the Woods

This year has been a good year for acorns in North Carolina, with almost every oak I’ve seen having a decent crop of nutritious nuts. The oaks on our property are no exception, and in particular the chestnut oaks have had a bumper crop of huge acorns this fall.  I gathered this pile of acorns from beneath a chestnut oak in about 5-10 minutes, and it ended up weighing about 5 pounds. Not too bad, and if you do some math, that would be 30-60 lbs. an hour.

chestnut oak acorns edible

5 pounds of chestnut oak acorns from our woods

Chestnut oaks make great acorns, some of the largest in our bioregion and also some of the least bitter. In general, the tastiest and sweetest acorns come from white oaks, while the most bitter tend to come from red oaks.

I’ll start processing these in the next few days and eventually get down to a nutritious and delicious product! Talk about nutrient dense food!

But before that can happen, the tannin will need to be leached out. This isn’t too complicated or difficult, but it does take some effort. I don’t know if we’ll be eating acorn bread on our tomato sandwiches next summer, but it should be a fun and edible experiment!


processing and freezing jalapeño, aji, and cayenne peppers

our peppers are still coming in strong and we just picked a lot of them to prepare for our first frost which usually comes in around this time. although our weather has been warmer than the norm for this time, we could have our first frost anytime in the next few weeks. last year our first frost was mid-october, so we’re getting ready for it!

many of our peppers were ready to be picked: red bell peppers, yellow bell peppers, jalapeño peppers, aji peppers, and cayenne peppers. the spicy peppers have certainly done better than our sweet bell peppers this year, which is fine with us. although we love eating sweet bell peppers in stir fries or in roasted dishes, our spicy peppers are easy to preserve and they are wonderful when added into soups in sauces throughout the winter. we still have a few “cubes” of jalapeño puree in the freezer, and it’s always nice to see that you have a surplus, even if it is just a surplus of 5 spicy ice cubes!

after we picked this batch of peppers, we rinsed them, and decided to process and preserve them separately. we have an awesome little food processor that fits about a cup of ingredients at a time, and it is great for processing little batches without much cleanup.

i began with the least spicy of peppers, realizing that if i began with the cayennes , all of my other batches would be equally spicy! so, jalapeños went in first, being chopped into quarters and tossed into the processor with some olive oil. once all of these peppers  were pureed, i packed them into ice cube trays and stuck them in the freezer.


red and green jal

red and green jalapenos

after the jalapeños came the aji peppers, which are a little spicier and interestingly “empty” inside. let me explain… where green and red jalapeños are both very firm and meaty, aji peppers feel very flimsy and when cut open have such an open chamber inside that they resemble a smaller, wrinkly sweet bell peppers. after the aji peppers were processed, they were also added to the ice cube trays (taking up considerably less space than the jalapeños). 

delicious aji peppers... introduced to us in peru!

delicious aji peppers… introduced to us in peru!

after the aji peppers came the cayennes, and although i did my best, my fingers did start to burn after scooping out these pureed peppers and packing them into the trays. nothing like cayenne pepper juice to make your hands hot!

spicy cayennes

spicy cayennes

we filled up a little less than 2 ice cube trays, and oh, what a sight! the lovely green jalapeños (with some red flakes from the fully ripened red jalapeños), the carrot-orange aji peppers, and the bright red cayenne peppers make for lovely, colorful ice cubes. for now, if you include the other spicy peppers we’ve preserved so far, we’ve got a healthy store of spice for soups and sauce this winter!

jalapenos and aji peppers about to be turned into spicy ice cubes!

jalapenos and aji peppers about to be turned into spicy ice cubes!

.:.

Older posts

© 2024 KW Homestead

Theme by Anders NorenUp ↑