KW Homestead

Pasture Raised Poultry & Edible Landscaping Plants Since 2013

Page 31 of 50

candling eggs and seeing baby chicks grow!

the incubating-chicken-eggs adventure continues… this time with some more hands-on activities!

last weekend we “candled” our eggs, a term which supposedly came from using the light of candles to see through the egg shell and observe the progress of the contents. this process usually shouldn’t be started before the eggs have been incubating for 7 or 8 days, since the growth of the baby chick inside is a lot more fragile during the first week (ish). also, waiting until at least a week into the process ensures that when you finally do candle the eggs, the embryo inside is much more visible.

the really cool thing about this simple and easy way to check on your eggs, is that it’s like a chicken ultrasound! you can actually see the life growing! candling also allows you to make sure that no bad eggs are still in the bunch that might explode later during incubation, affecting the environment of the viable eggs.

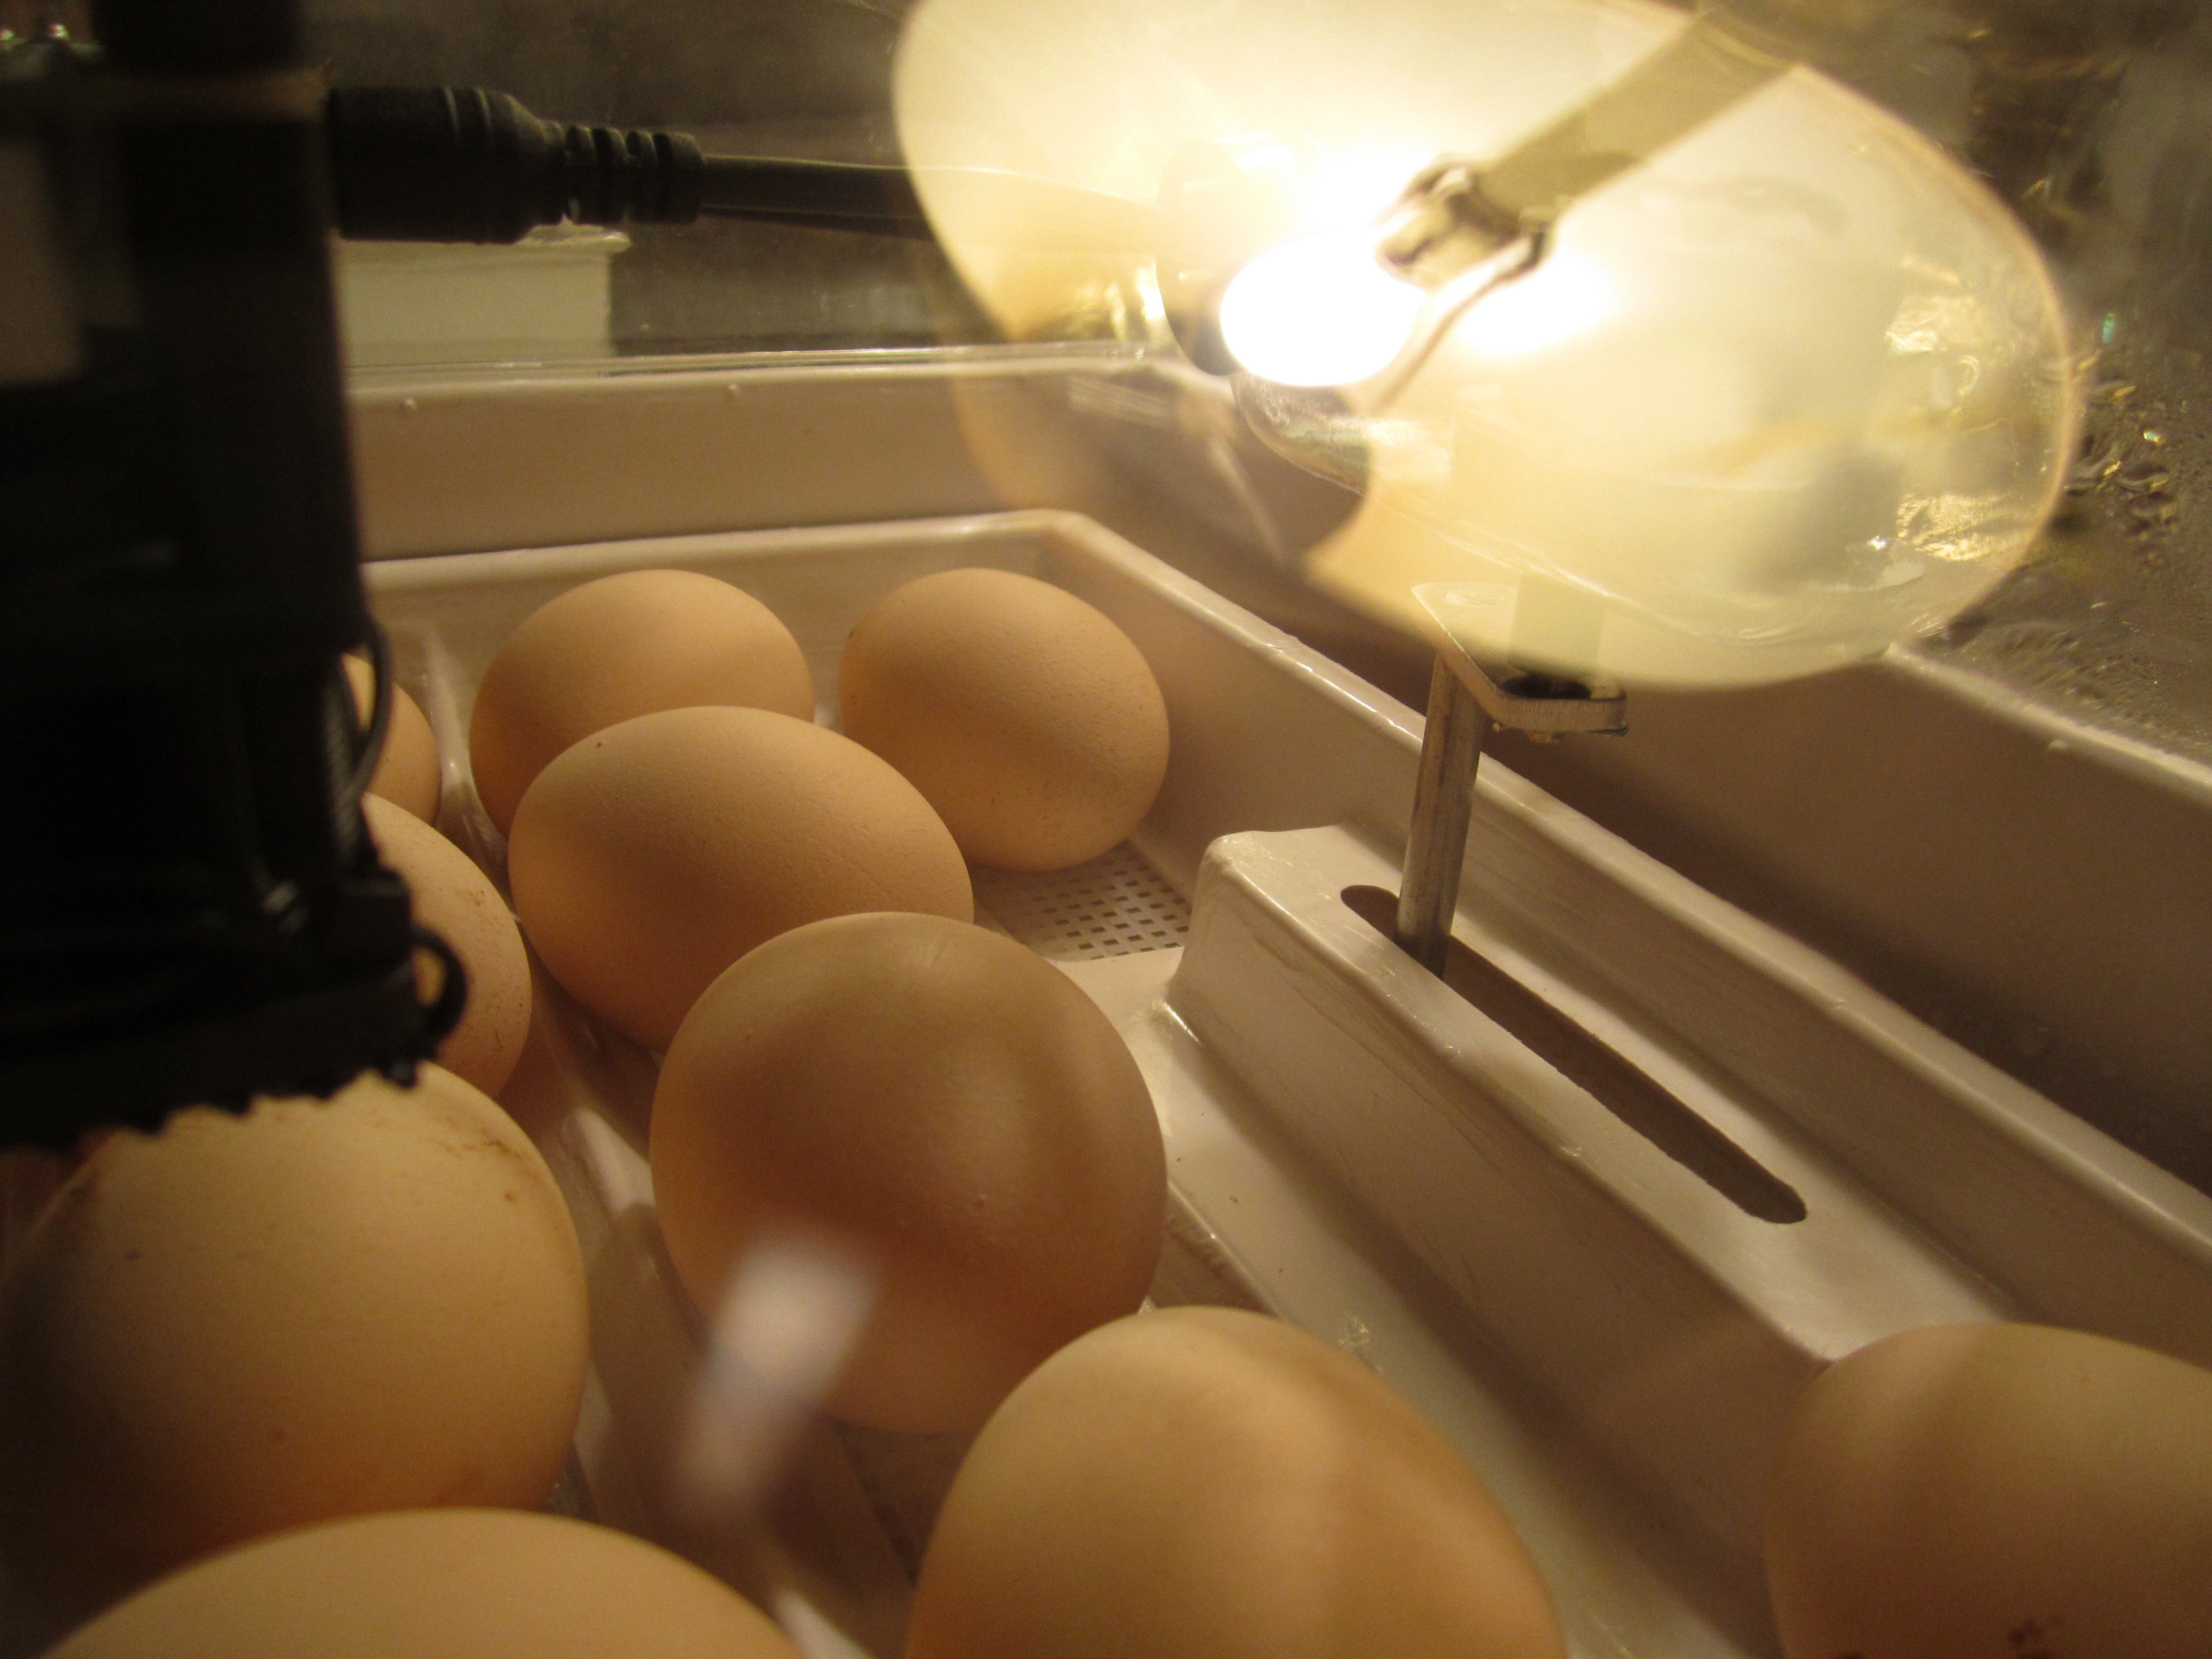
dark-shelled eggs are harder to see into, since the increased pigment in the shell obscures the light and keeps it from penetrating through as easily. jason and i actually has some trouble at first figuring out how to get the bright light to focus on the egg, until he had the idea to put our 1,000,000 candle power flashlight underneath a full toilet paper roll and sit the egg on top of the tube’s opening. this worked perfectly, and also meant that we didn’t have to hold the egg since it rested on the tube just fine on its own. i was able to shift the egg more easily this way, and locate the embryos. the pictures and video that we took really don’t do the experience justice…

egg

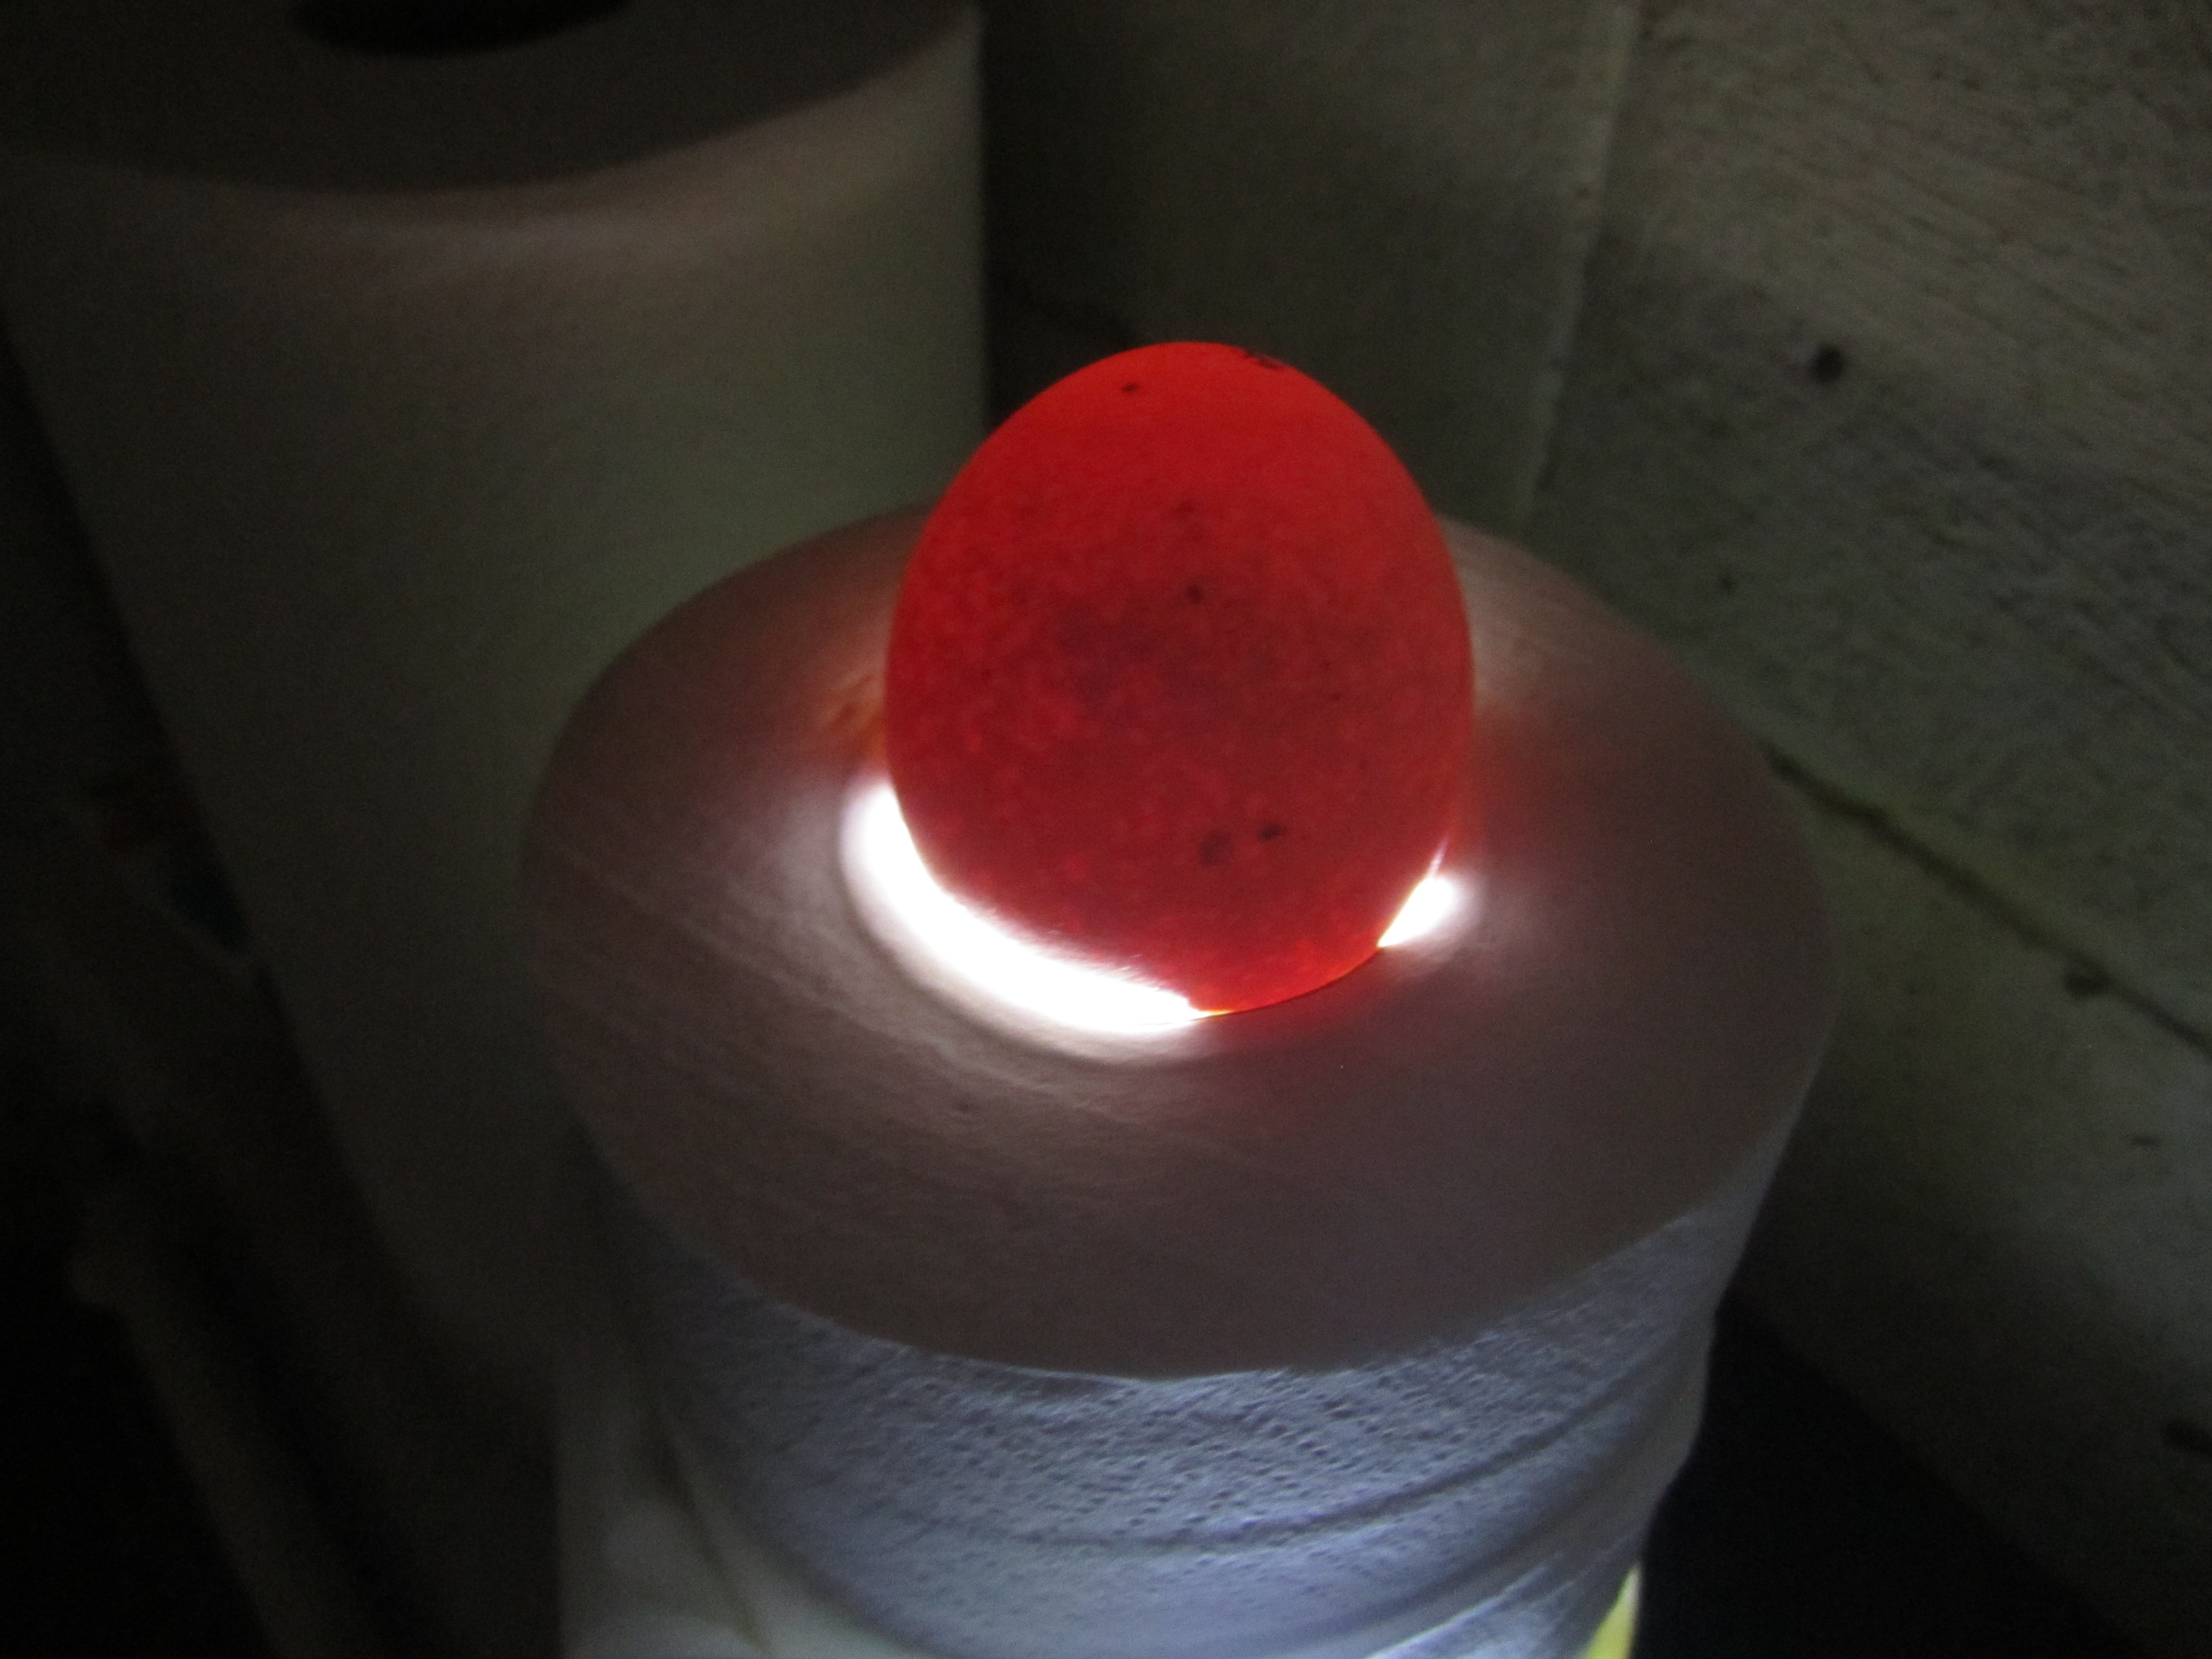
let’s see… how do i explain this? the darkest blob that is a little higher than halfway up the egg and a little to the left of center are the eyes of the chick!

the video below shows the dark shape (which is easier to see in the video) moving around in its shell. dancing, really! all the information that i read said that you might see the embryos move inside their shell during candling if you got lucky, and i got lucky over a dozen times! after i finished squealing with delight, i filmed the video!

the coolest thing i learned?

that at least 21 out of our 27 incubating eggs are fertilized and growing magnificently! this is a really high ratio and makes me proud of rex! also, it makes me less inclined to eat him next time he tries to attack me!

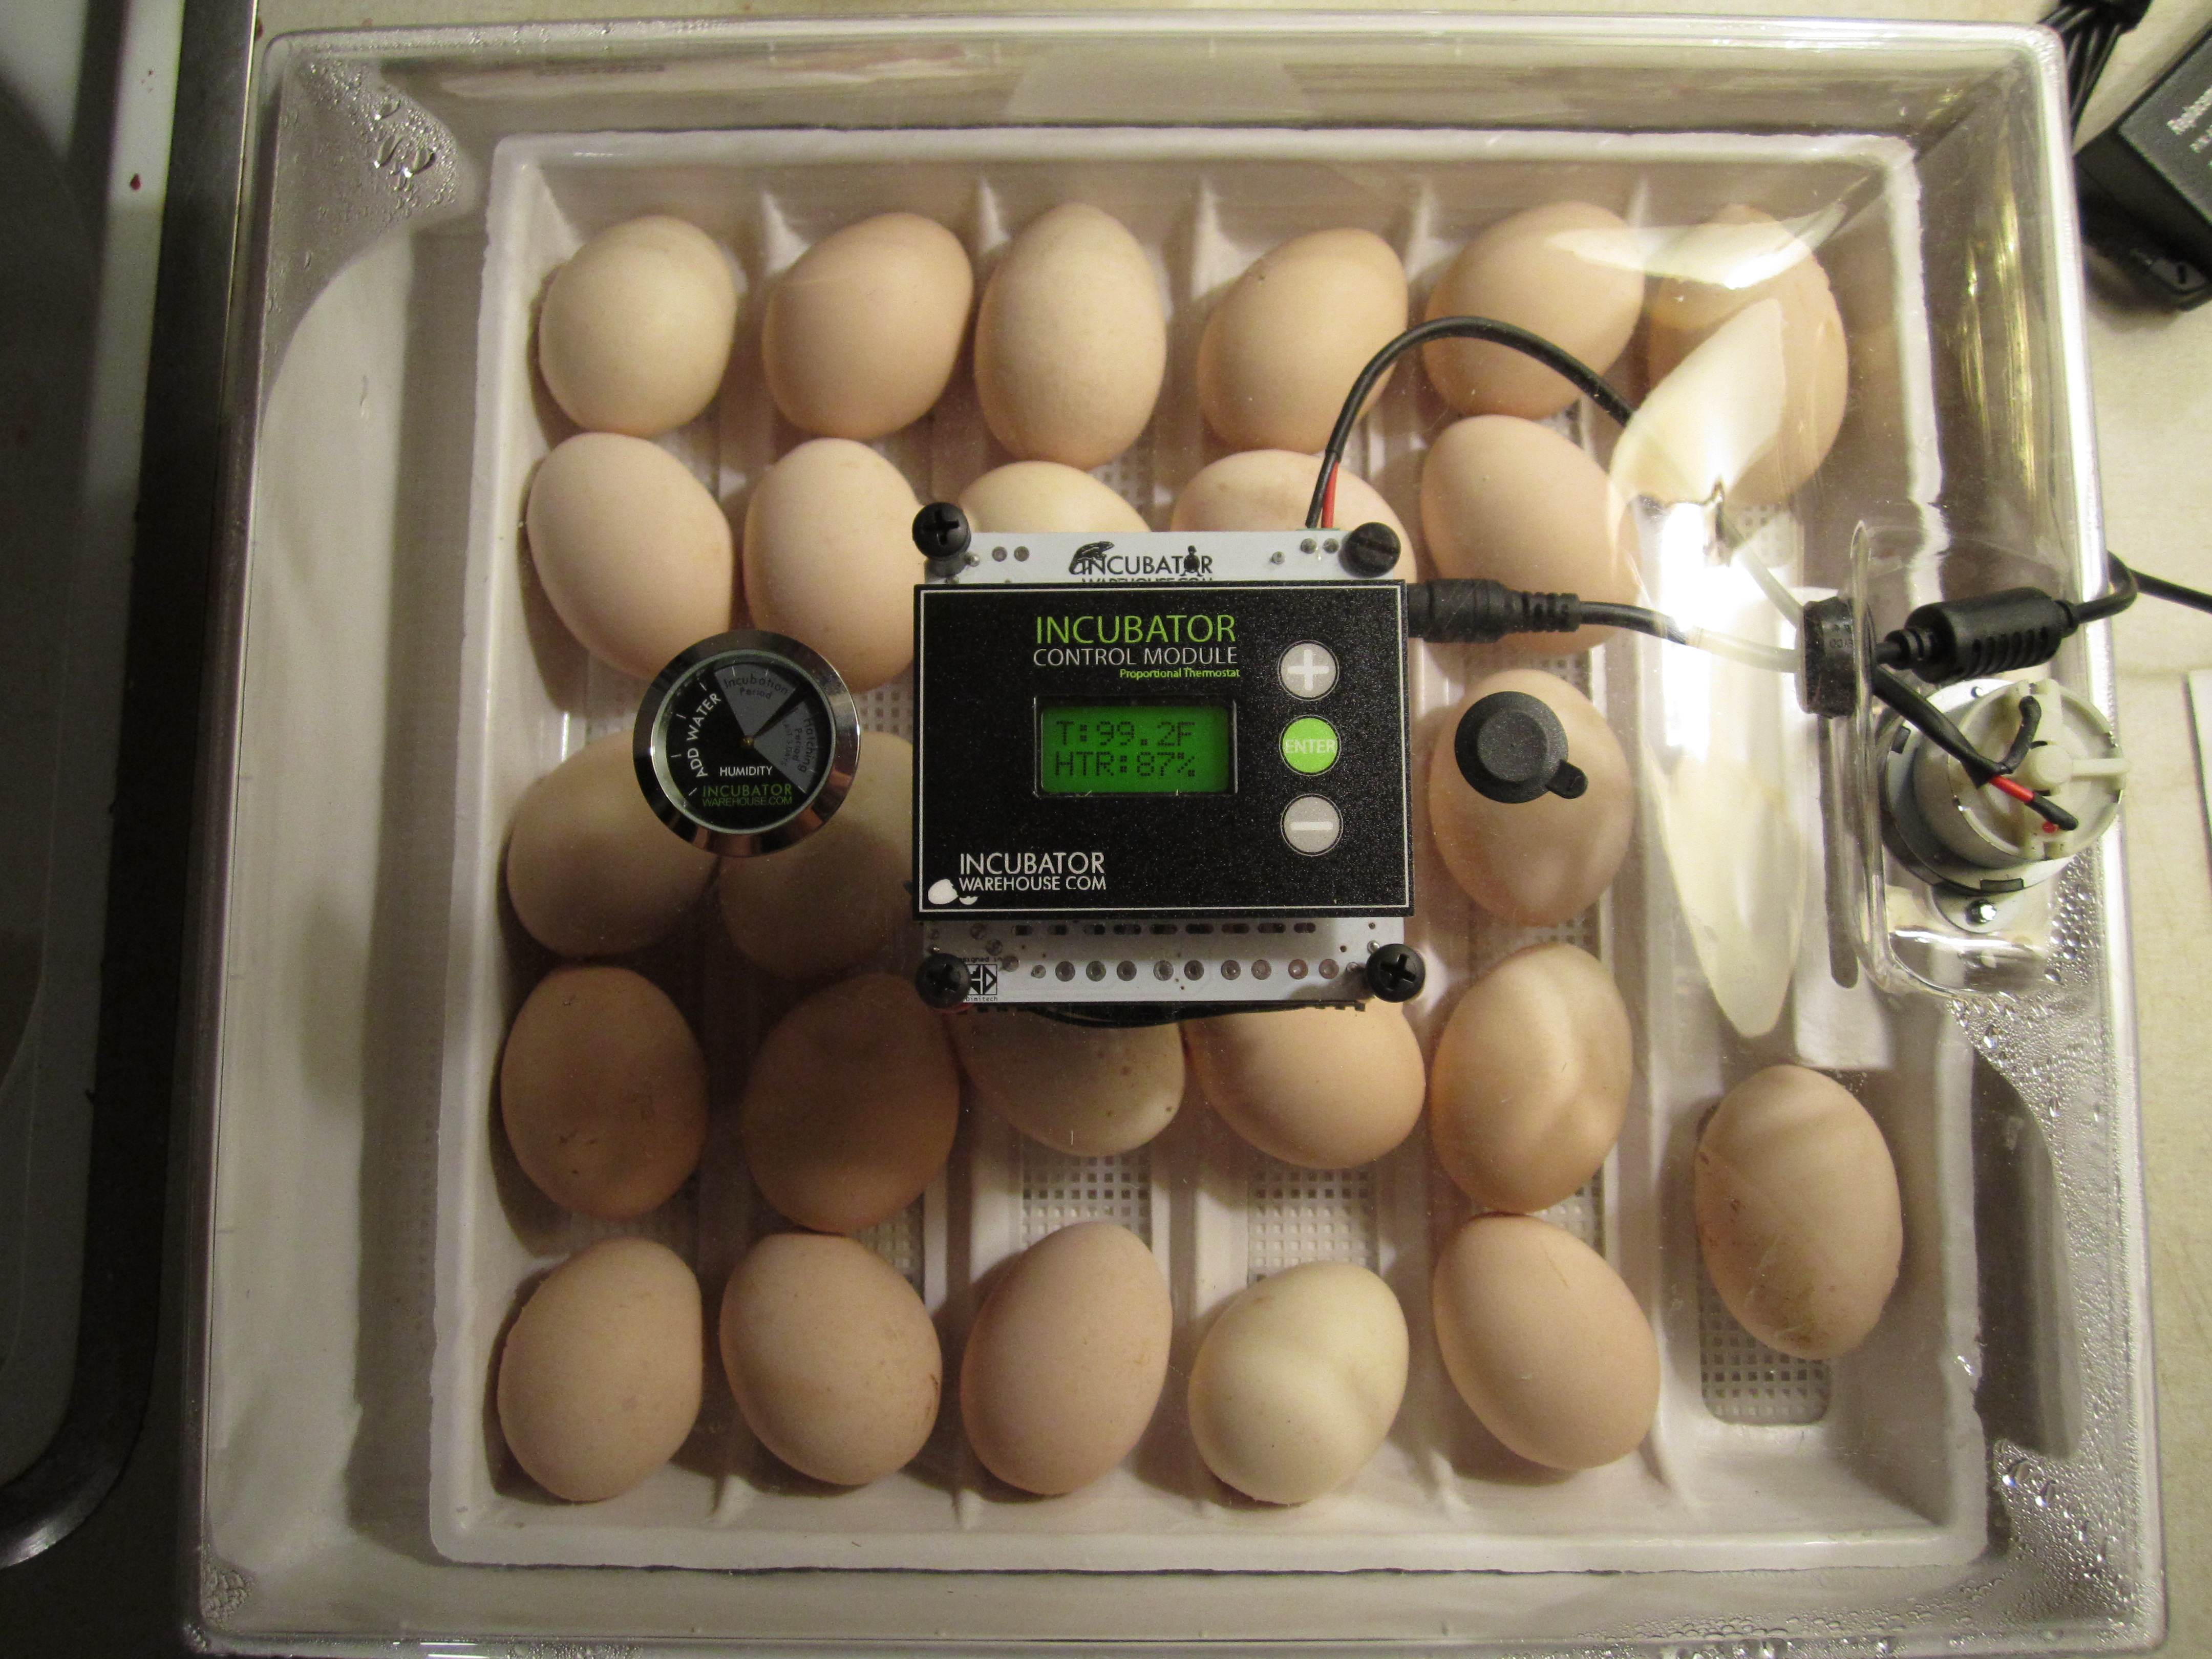
after candling all of the eggs, i put a check mark on the eggs that i was sure were fertilized and growing. later tonight, after i’m done writing this, i plan to candle the other eggs and see if they are fertilized, as well as check on a few of the ones i’ve already checked off! talk about an awesome way to spend the evening!

eggs

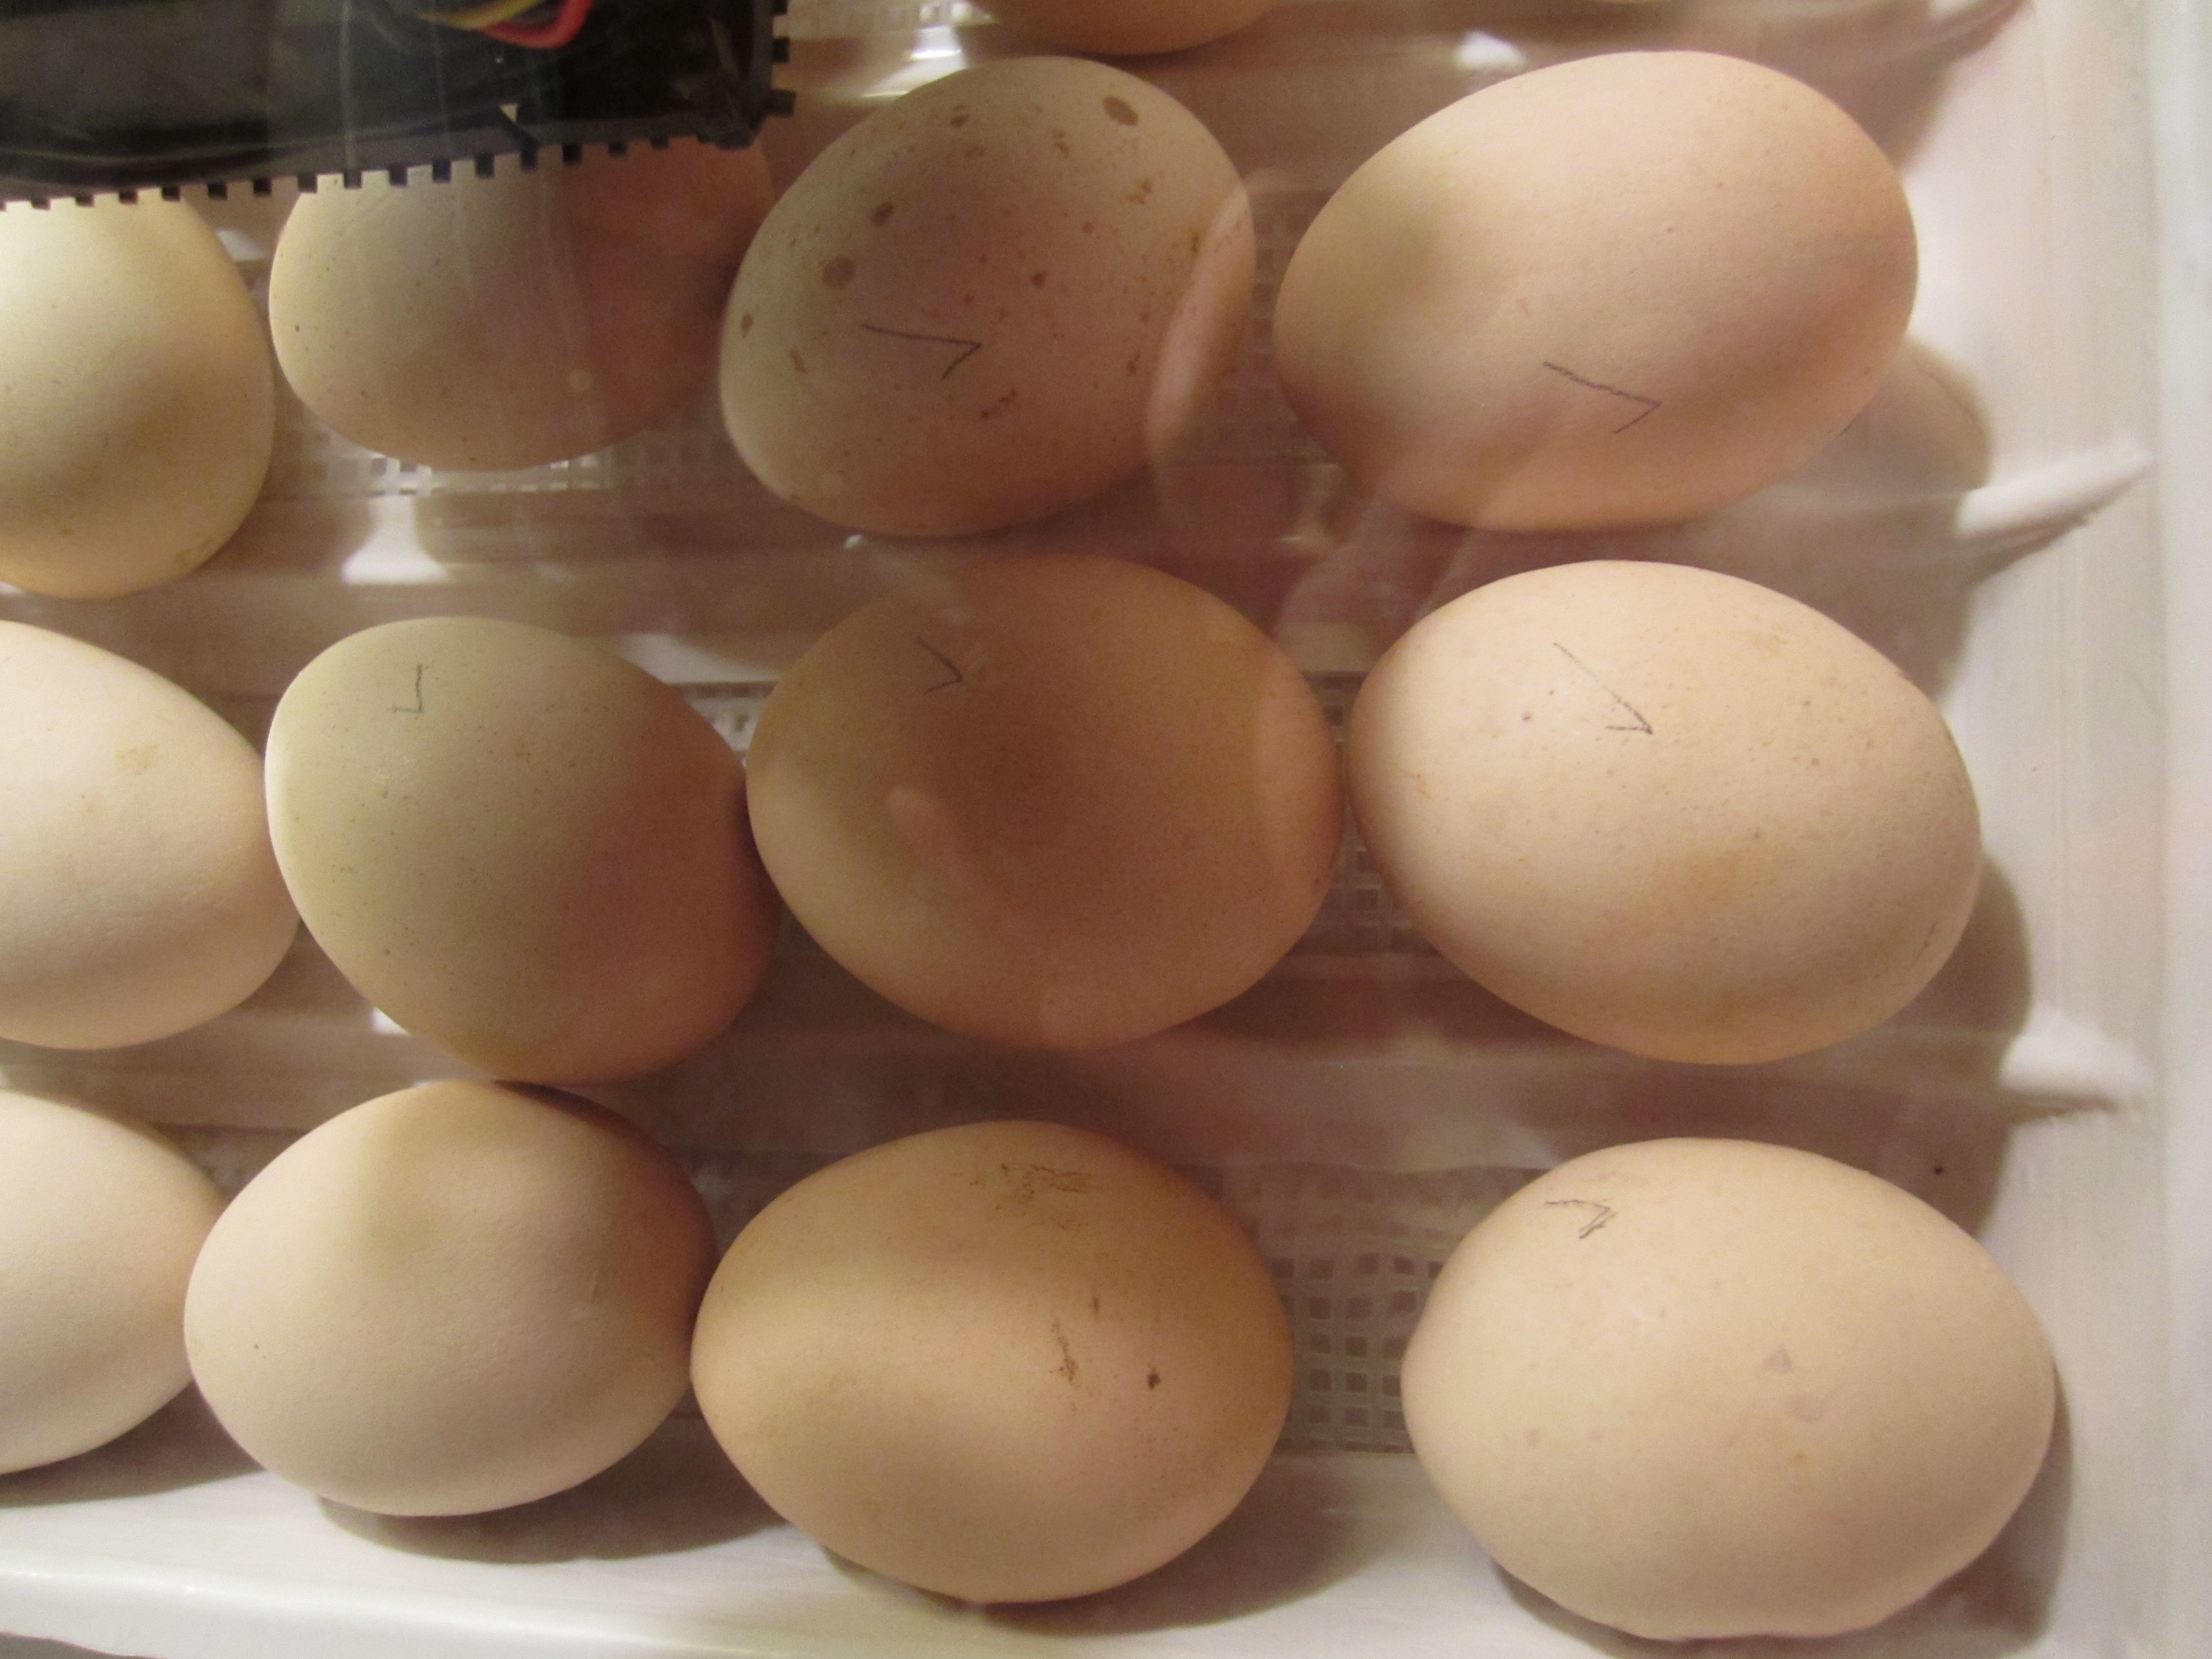
our incubating eggs, most of them with check marks!

.:.

Some Cold Weather Posts… Brrrrrr…..

In anticipation/celebration of the unusually cold weather that is rolling in tonight, 19 degree cold weather, I thought I’d take a look back at some of our cold weather posts from the past. For new readers who maybe weren’t around last winter, check out some of these posts on cold weather and winter homestead chores.

Hopefully these posts don’t make you feel too cold! Stay warm tonight!!

With Christmas right around the corner, why not get your Christmas tree delivered right to your home instead of messing with all the hassle and mess of picking one up and transporting it back home! If you are in the triad area, check out our Greensboro Christmas Tree Delivery service!

Acorns/Oak Nuts: Food from the Woods

This year has been a good year for acorns in North Carolina, with almost every oak I’ve seen having a decent crop of nutritious nuts. The oaks on our property are no exception, and in particular the chestnut oaks have had a bumper crop of huge acorns this fall.  I gathered this pile of acorns from beneath a chestnut oak in about 5-10 minutes, and it ended up weighing about 5 pounds. Not too bad, and if you do some math, that would be 30-60 lbs. an hour.

chestnut oak acorns edible

5 pounds of chestnut oak acorns from our woods

Chestnut oaks make great acorns, some of the largest in our bioregion and also some of the least bitter. In general, the tastiest and sweetest acorns come from white oaks, while the most bitter tend to come from red oaks.

I’ll start processing these in the next few days and eventually get down to a nutritious and delicious product! Talk about nutrient dense food!

But before that can happen, the tannin will need to be leached out. This isn’t too complicated or difficult, but it does take some effort. I don’t know if we’ll be eating acorn bread on our tomato sandwiches next summer, but it should be a fun and edible experiment!


adding a donkey to the family: why?

so the donkey quest has begun… through research, at least! we just got our great, new donkey book in the mail, donkeys: small-scale donkey keeping by anita gallion.

donkey

this donkey isn’t jack-jack, but he sure looks like him!

i’ve wanted a donkey ever since i volunteered at a horse rehabilitation center, about 5 years ago. the one donkey that they had there was a perfectly healthy, hilarious gelding (castrated male donkey) named jack-jack. he would stand by the fence and bray until i would come over to him and pet him or feed him, and the first few times i interacted with him he made me nervous simply because he was so pushy and snugly. he was a downright attention addict. i wasn’t sure why he was at the farm, but the owner told be that he had been brought to a horse sale, very skinny and obviously malnourished. the first owners couldn’t afford to take care of him anymore, and although the owner of the farm already had many other sick, crippled, or old animals, she decided she had to take him too (she was just that kind of animal-loving person).

after he lived at the rehabilitation farm for a while, he gained his weight back and became a thoroughly healthy, spunky fool. he quickly became the personality of the group, and even became good friends with the giant and very blind percheron draft horse named ophelia. jack-jack often led the other blind or old horses around the field and would sometimes even intervene when the socially bizarre horses were doing something crazy… usually repetitive walking or chewing behavior because of past trauma or of being locked up in a little stall all the time by their first owners.

the horse i volunteered with, marigold, an old thoroughbred racehorse, would walk in circles when she first arrived at the rehab farm since where she came from, she was used to always having just a little bit of space. jack-jack would step in when he caught her doing this, and try to get her to socialize and move around to other places.

horse

marigold, my old, blind friend!

i was also impressed by how smart and observant jack-jack was… he would try to untie ropes when he saw them tied up and he was capable of untying his lead rope from a tree or branch! sometimes he would even attempt to unlock the gate lock with his lips… though he was never successful!

he was also so loud! after spending time at the farm i learned that donkeys are fantastic at protecting their herd (including any horses or other animals they’ve adopted) through 2 basic tactics: being so damn loud that predators just want to run for it, and by being almost totally fearless with their sharp-hoofed attacks! i’ve always heard that donkeys are less skiddish than horses and are more willing to charge and kick butt.

so far, in my theory, donkeys are to horses as geese are to chickens: both donkeys and geese can almost totally survive on the grasses or scrubs that grow around them and don’t need as much nutritional supplementation as chickens or horses do, they are great animals for protecting themselves and for seeming threatening to intruders (animal or human), and they are so comical and goofy (well, at least to me)!

jason agrees that a donkey will be a great addition to our homestead, and we’re already thinking of all the new opportunities that can come from having a donkey… having a trusted creature that a kid can ride, that can pull a plow, and can haul logs or other heavy loads. we’re also excited to have a new friend that can let us know when someone comes to visit and can protect our other pets and farm animals from harm. not to mention their valuable manure and just how cute they are.

we can’t wait to get a jenny who can be the mother to other lovely donkeys who will be our friends and our children’s friends for decades to come!

.:.

Managing Woodlands, Woodlots, and Forests for Fun and Profit

The millions of acres of American Woodlands have, for the last 2 centuries, been mined not managed. They have been stripped, clearcut, set on fire, and replanted with short rotation mono-crops to the point that many of our mature woodlands and forests bear little resemblance to healthy and natural woodland communities.This has been done in the name of short term profits, and while the logging companies and sawmills made-out great, more often than not landowners received a stumpage price way too low, and were left with a degraded and less valuable piece of forest in the aftermath.

clear cut timber permacultre

clear-cutting forests is rarely the best form of timber management

It doesn’t have to be this way though. Forests can be sustainably managed and designed to produce income for generations. With proper thinning, forest planning, tree selection, and management techniques, forest owners can ensure that their woodlot is not just a commodity to be firesold to save the farm, but a profitable ecosystem that increases in value over time, and can be passed on to future generations.

To do this e will have to go into these abused forests and asses the damage that countless “highgrading” cuts (a logging practice where all trees above a certain diameter are harvested, leaving the worst adapted and least valuable species standing) have left only stunted, poorly composed timber stands. Sometimes we may need to replant, or perform shelterewood and seed tree cuts to ensure proper forest regeneration, but often some thinning of poor quality trees, which can release trees of higher quality to achieve their full potential, combined with timber best practices like crop tree management, silvopasture, and coppice regeneration can bring degraded and abused forests back into sustainable productivity and profitability.


These thinnings wont always be of high enough value for commercial loggers, but this material does not need to be wasted. In fact,it can be extremely profitable. These crooked, small diameter and low value logs can be used for mushroom production on logs, firewood,craft wood, or even be sawed to length on portable bandsaw mills. Other uses can include fence posts,biochar prodcution, hugelkulture, and round timber construction.

logs

small diameter oak logs inoculated with shiitake mushrooms!

This is where the small woodlot managers have an advantage. It’s one thing to find uses for 2-10 acres of low value wood, but quite another when you are dealing with 1000’s of acres. Smaller forest owners, particularly those who live on the wooded acreage that they are managing, also have the advantage of constant contact and correction. They walk their property every week, sometimes every day and can notice things like diseased, dying and dead trees, and can quickly implement a strategy to deal with them. They can also easily diversify into many avenues of production. It’s very feasible for someone to combine a small shiitake mushroom operation on logs , a coppice grove for crafts, cut a few cords of firewood for home heating, put in a small food forest with edible tree and cane fruits, go hunting a few times a year for turkey, squirrel and deer, all while increasing the value of their timber, property and life.

timber management cruise nc

forest owners and managers should observe and interact with their woods in order to come up with goals, and management strategies

This is the key to timber management, the interaction between owner and forest. There cannot be a prescription for management until an owner knows what he/she want’s to achieve with their woodlot. After that, a timber inventory, and then a timber management plan can be created and implemented. From there, it transitions to the long and enjoyable phase of observations and interactions, all tailored to the goals laid out in the beginning. This can lead to many years of productivity, profitability, and sustainability, all from a woodlot that was worth only a fraction of it’s value, but with proper timber management, can be passed down for generations as it wealth accumulates.

incubating chicken eggs 101

the time has come for us to have some babies… 21 chicken babies, hopefully!

we finally broke out our new incubator, the incuview all-in-one egg incubator, that has the ability to keep eggs moist, turn them every few hours, and keep them warm and toasty just like a mother hens’s butt! another really cool thing about the incuview is that it is capable of incubating reptile eggs and many bird eggs, such as chicken, goose, duck, and turkey.

so, this past weekend we decided to incubate 21 chicken eggs (this is the number that will fit in the incubator) so that we can have some new chickens this coming year! we started incubating on sunday and we saved eggs from  last wednesday through saturday to be sure that we would have enough to incubate. these we stored at room temperature, pointy end down. we also made sure to shift them in their tray every day so that nothing inside the egg would begin to stick to the shell or form air bubbles. when sunday came around, we chose the best shaped, cleanest eggs from our collection and placed them end to end in the incubator.

egg incubator

our incubating eggs!

the default temperature fr the incubator is 99.5 degrees, which is ideal for chicken eggs, and the dial measuring humidity is easy to read and understand. i do recommend, however, putting less water in the bottom water tray than you think you need… i poured out a good bit of the water today, and the humidity is still very high inside the device. i’ll be checking the levels again tomorrow and pouring out even more water if the humidity doesn’t drop.

chicken eggs hatch after 21 days of incubation, and the last few days of incubation require a different humidity level in the environment so that as they hatch the chicks don’t get stuck to their shell. our incubator has a setting that allows for this increase in humidity and we can disengage the turning device so that the eggs are not turned during the last few, critical days.

egg incubator

the turning device is the metal rod that you see coming down from the lid of the incubator.

this weekend or sometime next week we will be able to hold the eggs up to a bright light to see which of the eggs are fertilized and which are developing properly. it’s like a chicken ultrasound!

the hardest part of the hatching will be  watching the chicks be born without interfering. it is great that you can see the whole event but since they recommend waiting every few hours to remove hatched and dried off chicks, i’m going to be jumping out of my skin while i wait to hold them!

we’ve decided that once they’re born we’re going to keep them in a pen inside of the basement shower so that they can grow without being molested by bolt and without taking up too much of our basement space. once spring rolls around, we’re going to replace some of our older hens with this new batch, and eat whichever older hens and newer roosters are left.

so, we’re starting off on a new adventure here at kuska wiñasun homestead, an adventure that will hopefully end in many little chicks!

.:.


Blackberry and Raspberry Propagation by Layering

We have plenty of wild blackberries growing on our homestead, so when we ordered cane fruit plants last year for our food forest, we focused on raspberries. We did get 1 type of blackberry though, a thorn-less variety named Chester, known for its sweet, early ripening berries. Because we only have 1 lone plant at the base of  a dwarf apple tree, we figured we should try our hand at layering, an easy method of cane-fruit propagation.

blackberry layering

a chester blackberry ready to be layered

Layering involves digging a small hole by the base of the berry bush and then bending one of the canes down into it. That’s pretty much it. Over the winter, the buried portion of the young cane will start to send out roots, and will develop into a new plant! By bending the cane, instead of snipping off a cutting, the new plant still has access to the old plants more established root network and all of it’s nutrients and water it can absorb from the soil.

layering blackberries

dig a small hole by the base of the plant, about 6 inches deep

blackberry propagation layering

then bury the new shoot, tamp down the soil, and wait until spring!

Come spring, simply cut the cane 6-8 inches from the base of the new plant, and feel free to either dig up and transplant your new black/raspberry or extend the older plant outwards like you would if you were creating an edible hedge, or fedge. This new plant will be exactly like your old plant, except that for the first year it’s leaves will be upside down!! Pretty cool, and a great way to produce more plants for free!

Don’t forget to join our email mailing list and stay updated on all things our ochre way!


Plantain (Plantago): Herbal First Aid in Action!

Here’s a short  video on how I treated an insect sting on my knuckle at work with some plantain today. Plantain is a great medicinal herb that is both very conspicuous and very safe. It’s a well known herb, sometimes considered a weed, that is often found in lawns, nature strips, and parks.

The compounds in the leaves are extremely useful at pulling out toxins and poisons, and old timers have used this wonder plant to treat all sorts of cuts, bites, and envenomations. My sting today was on my knuckle! Ouch! But the plantain (genus plantago) worked it’s magic and after just a few hours I couldn’t even tell which finger had gotten stung! Check out the video for more!

Be sure to join our email mailing list and stay updated on all things our ochre way!


frosted plants and crunchy leaves

a sure sign that fall is here and winter is coming… frost! we had our first frost of the year on november 1st, which was close in date to first frosts of other years. luckily, we were proactive; we watched the weather and were poised to harvest the crops before the frost came in. among the things that we harvested:

peppers

  • jalapeño peppers
  • aji peppers
  • sweet bell peppers
  • cayenne peppers

sweet potatoes (these we harvested after the frost because jason cut off all of the greenery and covered them up with sheets to protect the tubers for a little while longer)

  • red porto rican
  • yellow porto rican (see jason’s post to learn why their name is spelled this way!)
  • korean purple

chia

herbs

and a good thing  we did, too! check out how frosted (and killed and blackened) the peppers became…

frosted peppers

the aji pepper plants after the frost!


frosted peppers

the bell pepper plants after the frost!

some crops do well with a light frost, though. kale is one of them, and the frost even makes the leaves sweeter. our kale is still going strong and we ca’t wait to eat some!

baby kale

baby kale, oh baby!

jason also just put some garlic in the ground, which withstands even the coldest winters like a champ. our oca tubers are still in the ground, too, and they won’t get harvested until after winter is winding down.

i’ve also noticed the lovely trees and leaves on the ground (and since we don’t rake or leaf-blow them around, i get to enjoy their crunch for a while to come (even though they’ve piled up in the carport too!)!

maple tee losing leaves

topless tree… our front yard maple.


oak tree

our front yard oak

leaves in yard

my pile of leaves!!!

.:.

Rhus copallina: Shining, Dwarf, Winged or Flameleaf Sumac

Rhus copallina, or shining sumac, was one of the wild plants on our property that puzzled me for the longest time. I could recognize its distinctive sumac-y look that meant it belonged in the Rhus genus that contains the more common staghorn and smooth sumacs, but it didn’t match any of the pictures I could find of those two species. I was worried for a bit that it might be poison sumac (Toxicodendron vernix) but a quick Google search told me that the best way to tell poison sumac from okay sumac is the color of the berries. Red berries = don’t worry, and white berries = don’t touch/eat/make sumac tea. So, I went on not knowing exactly what the plant was, and being intrigued by its interestingly winged leaflets.

shining sumac

You can easily tell this type of sumac by the winged margins between the leaves.

But then, out of the blue one day while researching different types of permaculture plants, I stumbled across an image that finally made it clear that this sumac was winged sumac. It’s a great plant, with many uses and a strikingly beautiful presence on the homestead, especially in fall. It’s leaves are the darkest, most robust red I’ve ever seen.

But it’s not just a pretty plant! It also, like all of the safe sumacs, has a very high amount of vitamin c in it’s berries. You can soak them in water to pull out the vitamin c, and then freeze the tangy juice and use it like you would lemon juice. It’s also common for people, especially in the south, to make “sumac-ade” or pink lemonade out of the berries as well. I’ve heard of fisherman using a sprig of sumac berries in place of lemon when baking fish as well. In some countries, the berries are dried and ground up to make a spice that adds a red coloring to many dishes, and the pithy stems were often used in pipemaking.

winged dwarf flameleaf sumac

We love the beautiful fall color of Rhus copallina!

Shining sumac can grow in a wide range of climates, from zones 4-10, and can tolerate full sun or partial shade. It really is a pioneer species that thrives on the forest edge, where it leads the advancement of meadow to woods. It spreads by suckers, can quickly fill up an area that has been cleared, and it is often planted as both a wildlife cover species and as a shrub to stabilize soil and prevent erosion. All sorts of birds enjoy the berries, and they help to spread the seeds as well. One more interesting thing about  flameleaf sumac is that it often colonizes after fire events, which makes me wonder if the small stand we have used to be somewhere a burn or brush pile was kept by the previous owners.

In any event, I’m glad to have identified this plant, and even gladder to know that it’s so useful. I have been encouraging it wherever I see it growing, and hope to transplant a few into our backyard food forest this upcoming year and make a bunch of sumac-pink lemonade!


« Older posts Newer posts »

© 2025 KW Homestead

Theme by Anders NorenUp ↑